By default, 6sense uses its own matching logic to match 6sense accounts to your CRM accounts. Matching is very important when you purchase contacts from 6sense and export (“push”) them to your CRM, such as when you use a Purchase Contacts node in a Data Workflow or Audience Workflow.
6sense also provides custom logic settings where you can specify your own account matching rules. You can set up granular field-to-field comparisons with different types of match logic to prevent creating duplicate accounts.
Account creation match rules for Data Workflows
By default 6sense uses the company ID associated with the account in your integrated CRM to check whether it duplicates an existing account.
Alternatively, you can set your own custom account creation match rules, using one or more matched fields and one or more logical blocks. Optionally, you can use logical blocks to set up stricter rules as your high priority match rules, and less strict rules following those.
If you run an Account Creation Data Workflow and there is an account in your CRM that matches the configured rules, that account would not be created.
To set your own custom account creation match rules:
Go to Settings > App Settings > Workflows > Custom Match Rules > Account Creation.
Select Custom.
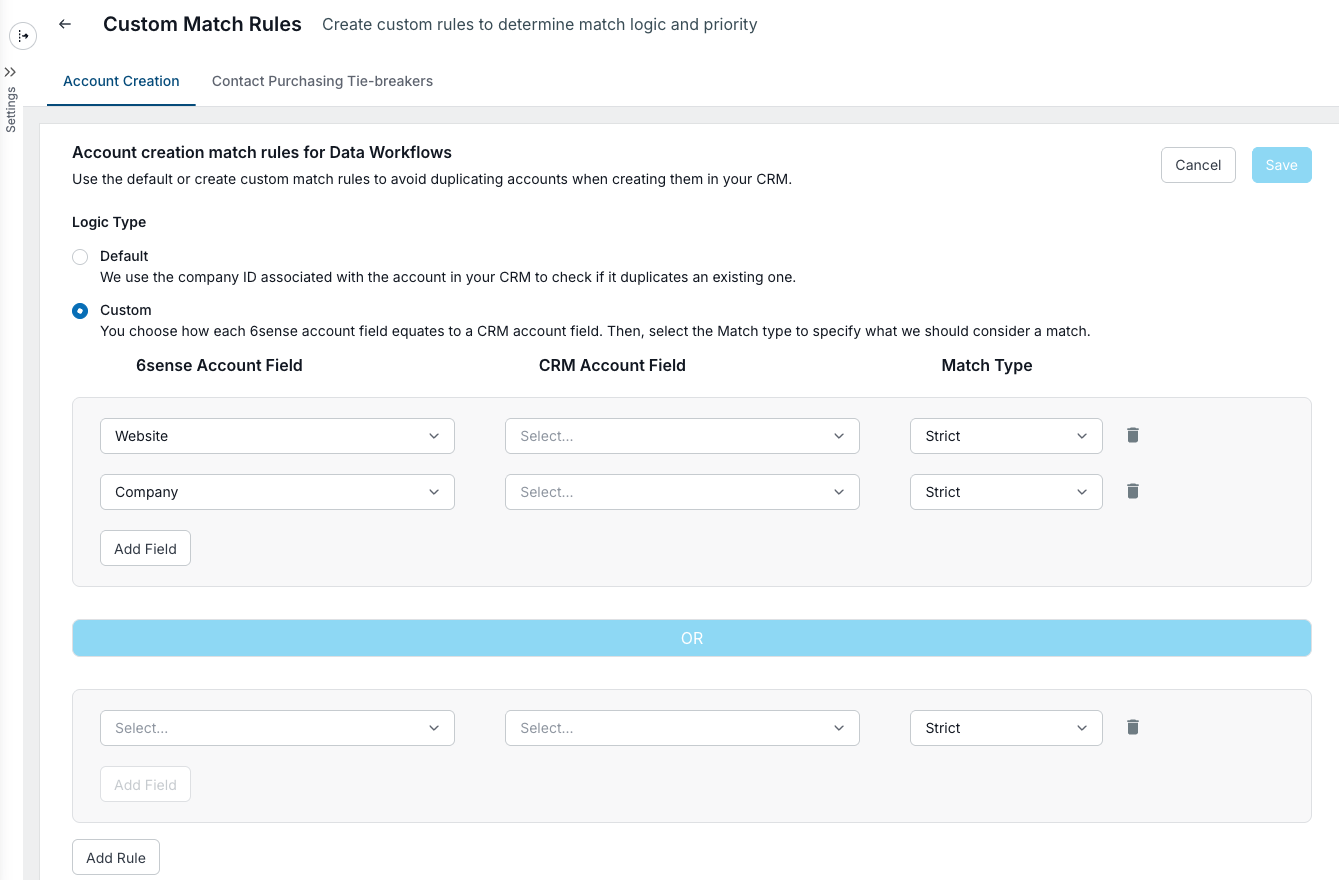
6sense suggests that you map the Website and Company fields, and you can change that if you prefer.
Select a 6sense account field from the pulldown menu.
Select its matching CRM account field.
Select the Match Type, either:
Strict
Normalized Company Name - if the field is a company name
Domain and Subdomain or Domain only - if the field type is a web domain
(Optional) Select Add Field to add another match rule.
The logic within a block is AND logic.
(Optional) Select Add Rule to add OR logic for another logical block, and enter the match rule.
Select Save.
Contact to account or company match rules
We recommend that you first configure your contact-to-account match rules before publishing a Contact Purchase Data Workflow.
Default contact to account match logic
6sense matches contacts to accounts and ensures that all new contacts are placed under the appropriate account record.
First, 6sense matches CRM accounts and creates a Company ID.
By default, 6sense attempts to match all CRM accounts to a Company ID using the name, domain, and country on the accounts in your CRM.
Next, 6sense matches purchased contacts to the Company ID.
All new contacts purchased from 6sense workflows are matched using the previously-created Company ID.
For example:
The purchased contact is John Smith, email johnsmith@acme.com. 6sense matches it to the 6sense Company ID of 1234.
All existing CRM accounts that have previously matched to Company ID 1234 are seen as a matching account to John Smith.
Use custom match tie-breaker rules to ensure the new contact is added to the correct account
During a contact purchasing workflow, multiple CRM accounts may match to the 6sense account. Contact purchasing tie-breaker rules allow you to set field-to-field and/or field-value matches in order to identify the correct CRM account for the new contact.
There is a max limit of 10 rules.
To set up custom tie-breaker match rules:
Go to Settings > App Settings > Workflows > Custom Match Rules > Contact Purchasing Tie-Breakers.

In the example above, it is possible that John Smith might have matched to multiple CRM accounts, as all accounts with a name, domain, and country of “Acme, acme.com, USA” would be considered a match.
Narrow down the match results by selecting either a field value or field-to-field match type parameter from the first pulldown menu:
Field Value Match: Identifies the type of accounts to match purchased contacts to. Select a specific field and value on the account record in your system.
Example: You have two Acme accounts in your system, one is a prospect, and the other is a partner. If you want purchased contacts to only be added to prospect accounts, you can specify the field here that denotes whether an account is a prospect or not.
Field-to-field Match: Specifies which purchased contacts should match to which account, by matching fields on the contact record to fields on the account record.
Example: You have two Acme accounts, one in NY and the other in CA. When Acme contacts are purchased, you can specify here that the contacts based in NY should be added to Acme, NY Account, while contacts based in CA should be added to Acme, CA.
Click Add Rule to add additional parameters. You can use a combination of the two parameters described above and arrange them in order.
Select a value for If no other conditions above match, use this criteria. These are date created or updated criteria.
Match rules reference
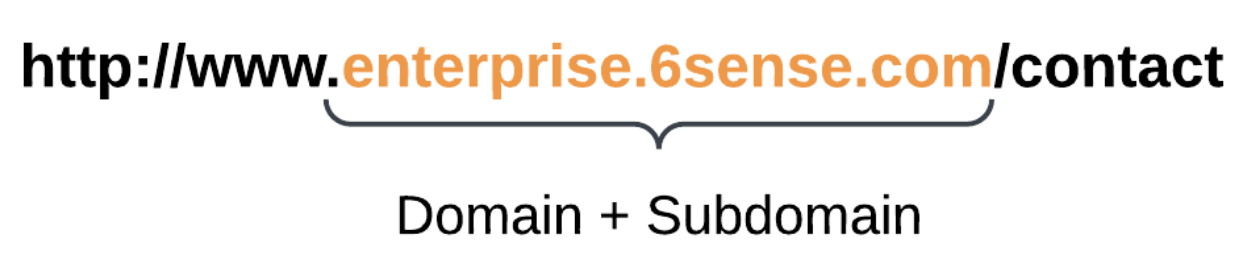
Website and domain match rules
Name | Example |
|---|---|
Strict | Performs a strict string match on the provide URLs. This is not the recommended option for website matching as it requires the URL formatting to be consistent with 6sense.
No match to each other
|
Domain + subdomain | Extracts the domain and subdomain of a website and compares them to identify a match.
No match to each other
|
Domain only | Extracts the domain of a website or email and compares them to identify a match.
No match to each other
|
 Match to each other
 Match to each other
Company name match rules
Name | Example |
|---|---|
Normalized company name | This removes variations like legal entity types (e.g., LLC, Inc., Limited Liability Company) and other unnecessary suffixes, leaving behind the core name of the company. For example, “Acme Corp LLC” and “Acme Incorporated” would be normalized to just “Acme.” These would be matches to each other:
|
General match rules
Name | Example |
|---|---|
Strict | This rule is a strict, case-insensitive string match on the provide fields. This works on any field-to-field match. Match to each other
No match to each other
|