This article explains how to configure SAML-based Single Sign-On (SSO) with Group-to-Role Mapping in 6sense. This feature enables you to automate role assignments for users based on SAML group attributes defined in your Identity Provider (IdP), ensuring access is provisioned accurately and efficiently during login.
With this configuration, you can:
Automatically assign roles based on SAML group attributes configured in your IdP.
Ensure controlled fallback access by defining a default role for users who authenticate successfully but do not match any mapped groups.
Default role and role mapping settings are included in Advanced Security as an optional feature and not enabled by default. To request enablement, please contact your Customer Success Manager (CSM).
This article guides you through the following steps:
Configure group attribute/claims in your IdP.
OKTA OIN legacy app
OKTA non-legacy
Microsoft Entra ID (Azure AD)
Google Workspace
Default roles
The default role feature can be used as a stand-alone configuration without setting up group-to-role mapping.
If you intend to use SSO with default role setup only (without group mapping), follow the steps below.
Prerequisites:
You have Administrator access to the 6sense application.
SAML SSO is already configured and successfully tested.
Configure default role
Navigate to Settings > Identity and Access > Authentication.
Select the Default roles section.
The default role available based on your package subscription will be displayed.
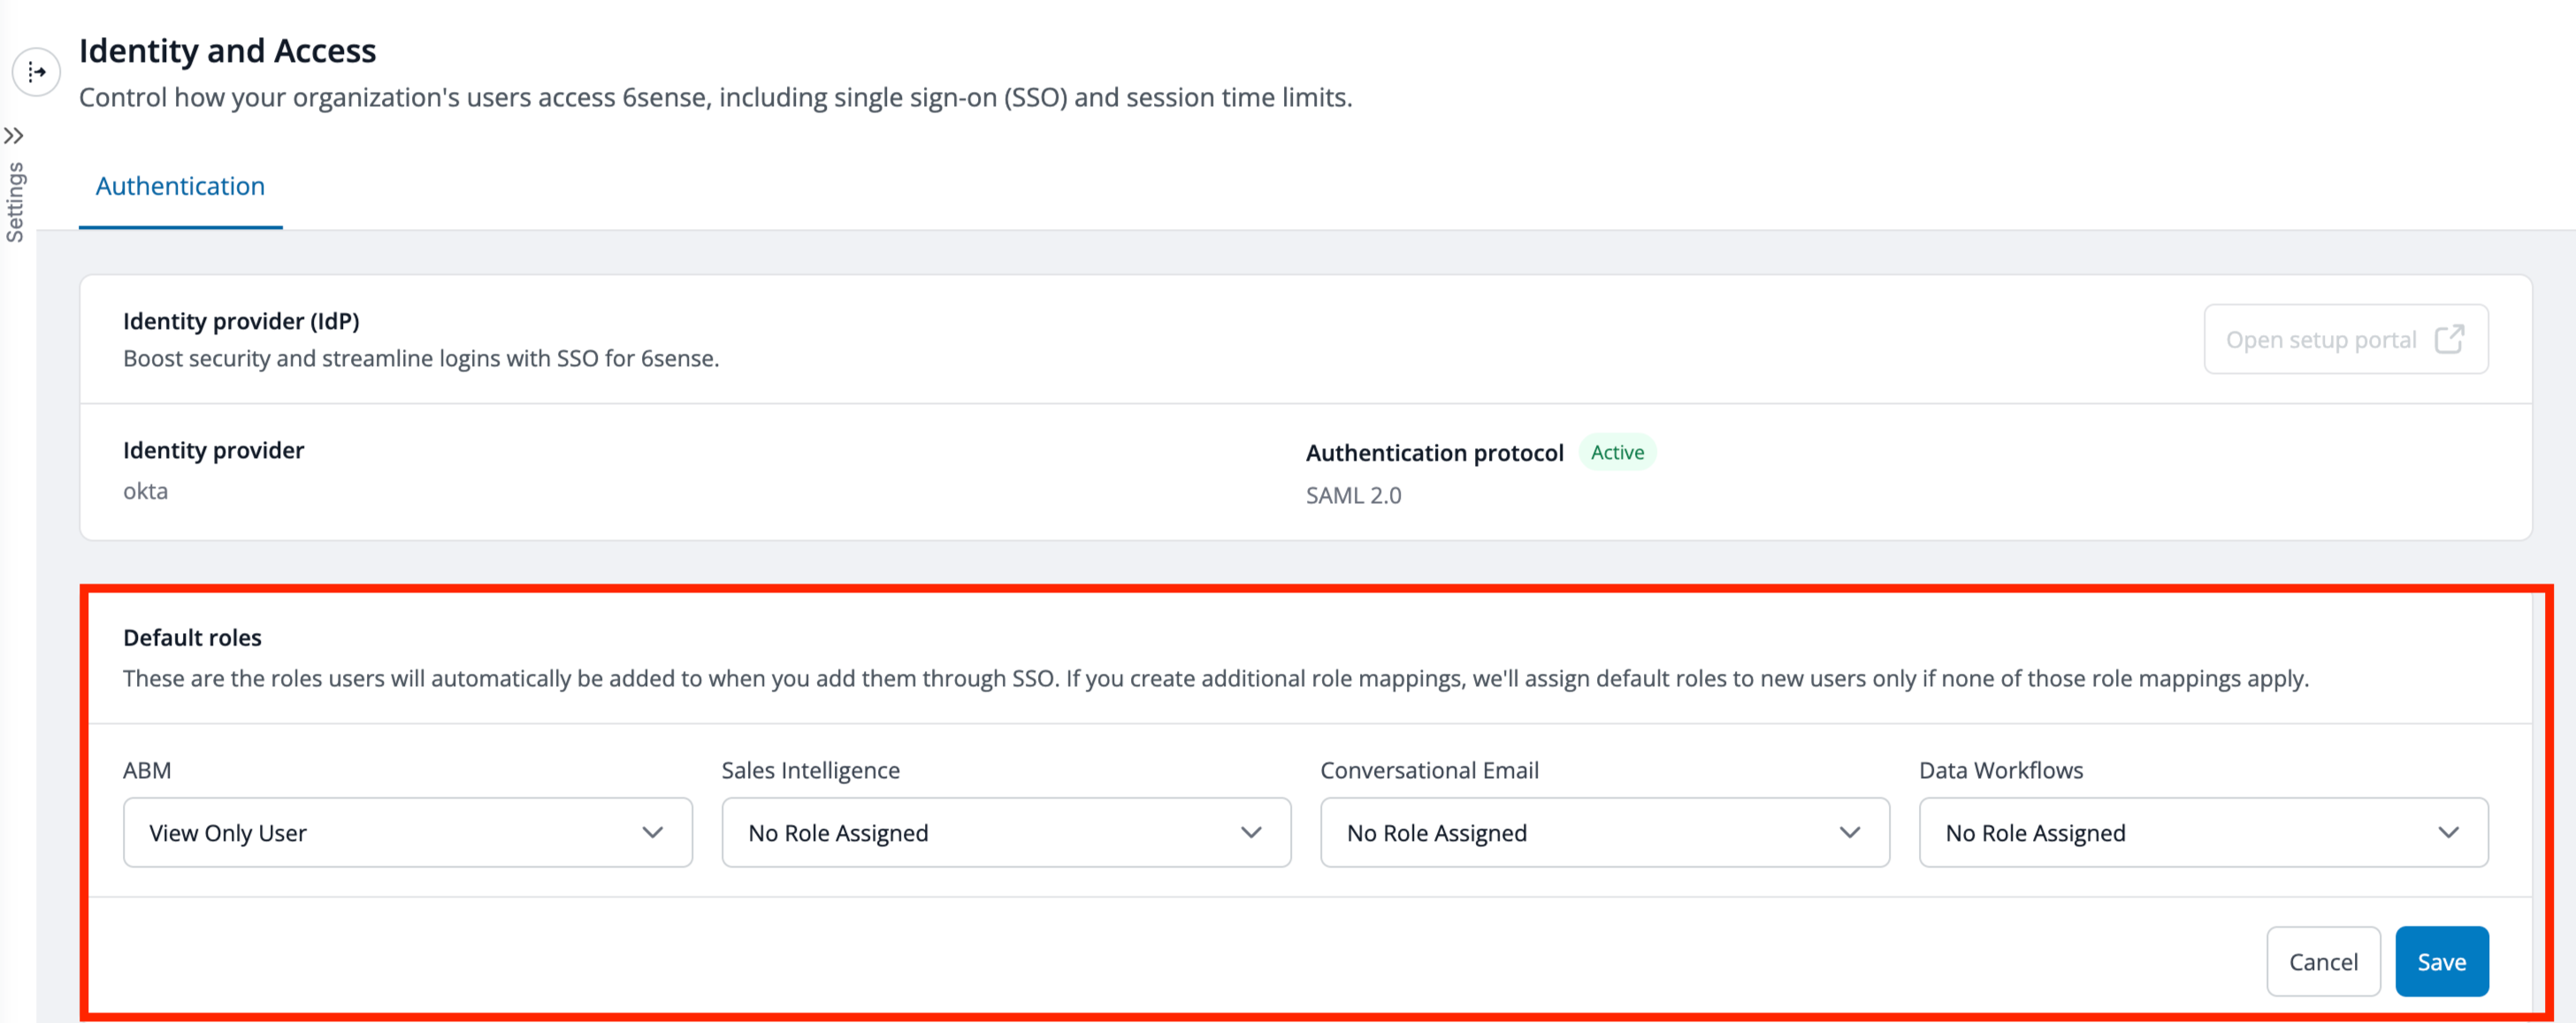
Use the dropdown to select the appropriate default role based on your security requirements.
We recommend selecting roles with minimal permissions to avoid unintended access.
Administrator roles are intentionally excluded from default role selection to prevent unintended elevated access.Select No Role Assigned for any application that users should not access by default.
Select Save.
Any newly provisioned user from your IdP will automatically be assigned to the selected default role upon login or during IdP sync. If SCIM provisioning is enabled, the default role assignment will be reflected in User Management in real time as soon as the user is provisioned.
License limit reached
If all Sales Intelligence licenses are exhausted and default roles for other applications have been configured, newly provisioned users will be assigned the other available roles, excluding Sales Intelligence.
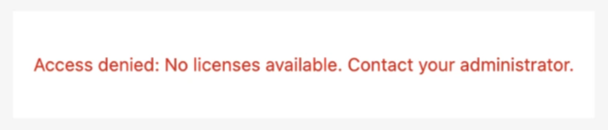
If the default role is set exclusively to Sales Intelligence and SCIM is not enabled yet, the new user will receive an error for access denial to contact administrator as there are no licenses available.
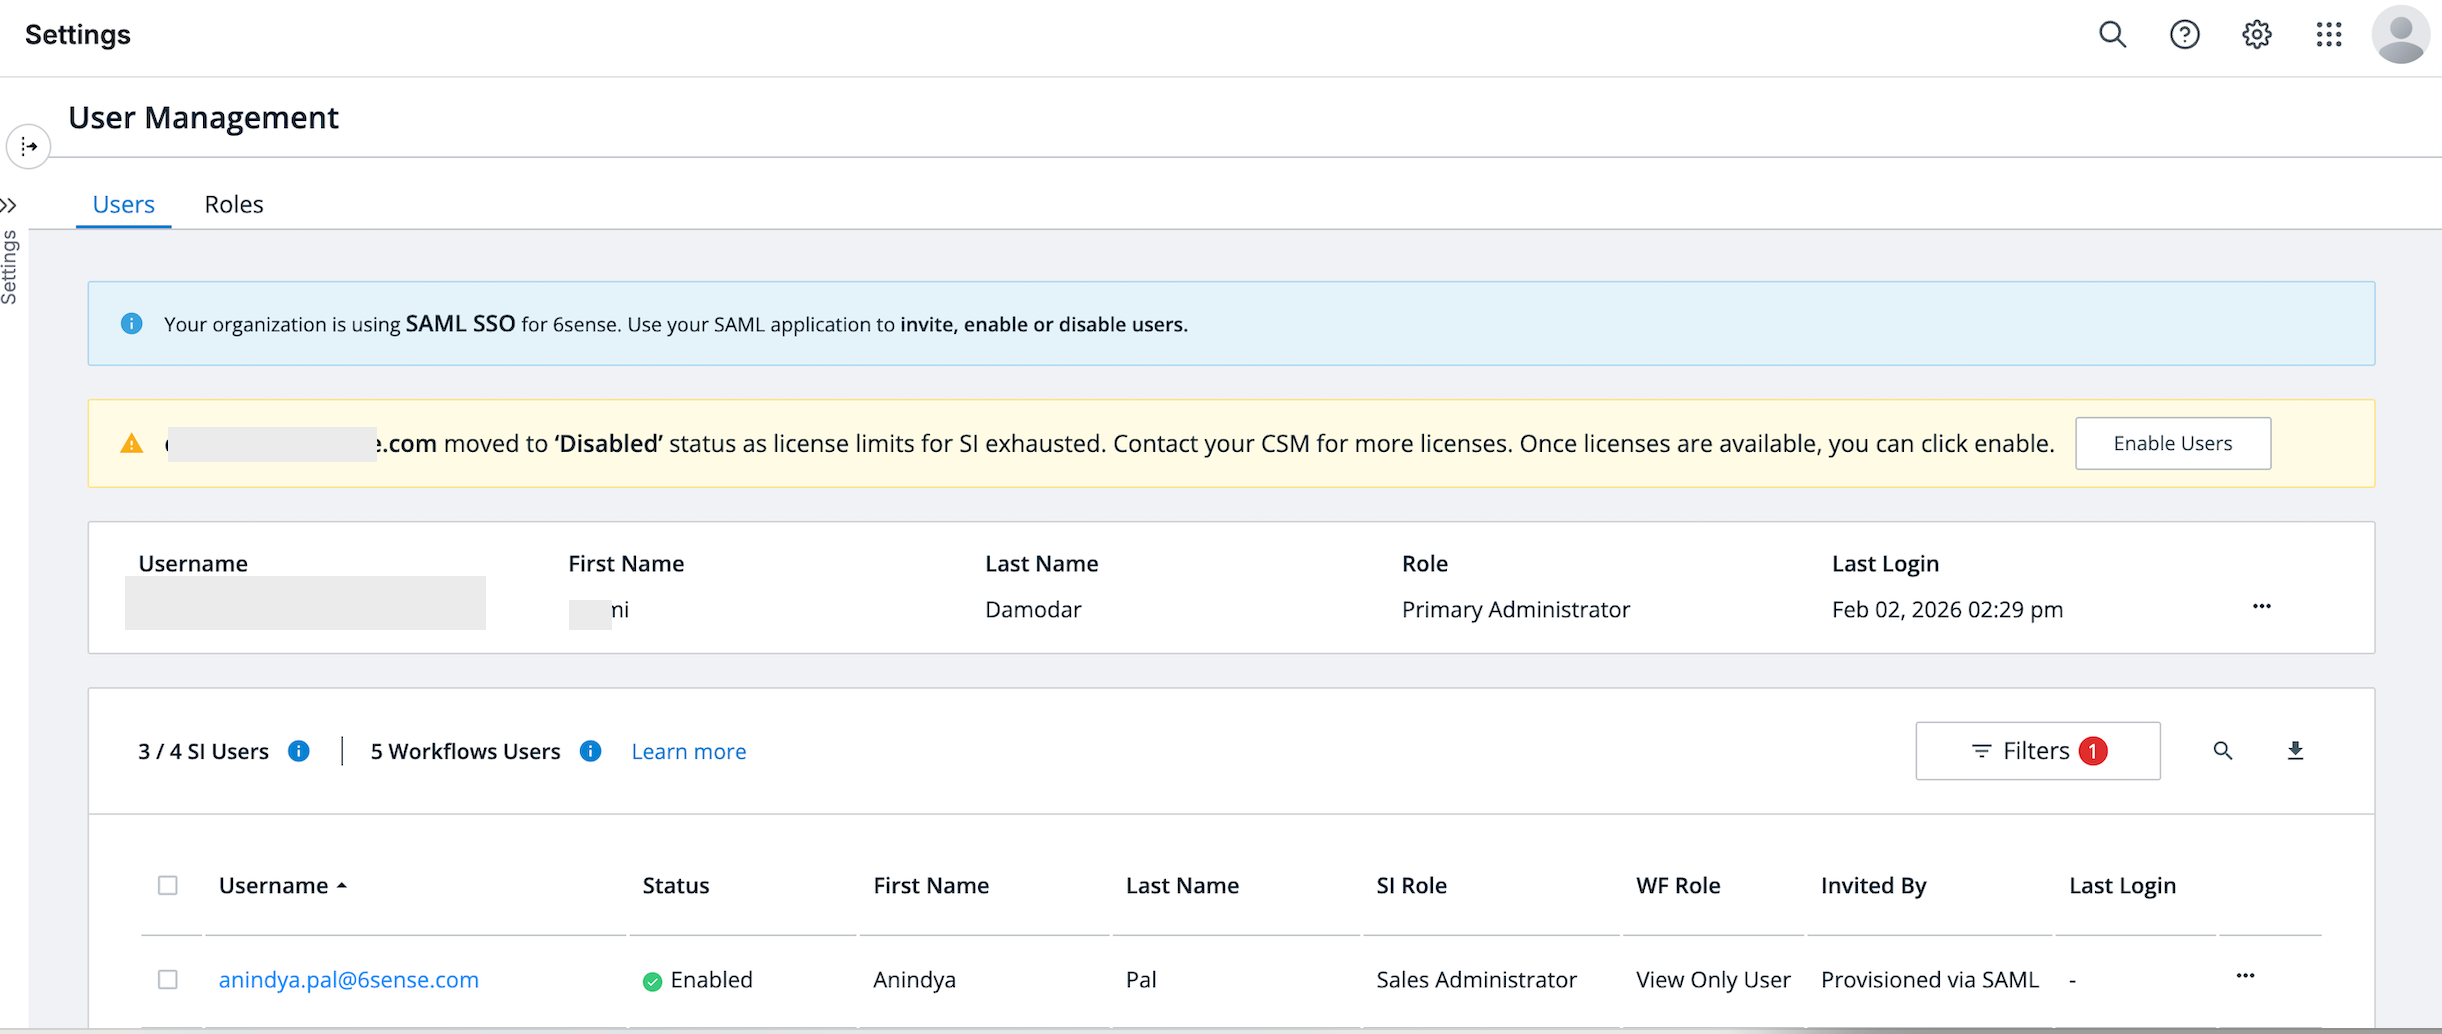
If the default role is set exclusively to Sales Intelligence and SCIM is enabled, the new user will be placed in a disabled state in 6sense. A warning will appear on the User Management screen for additional licenses.
Once additional licenses are procured and become available, the administrator can select the Enable Users button in the warning message to assign the role to the user and reactivate their access.
Group-to-role mapping
SAML SSO group-to-role mapping enables automatic role assignment in 6sense based on group attributes sent from your IdP during user login.
Prerequisites:
You have Administrator access to the 6sense application.
You have Administrator access to your IdP console.
SAML SSO is already configured and successfully tested.
You are able to configure and send a group attribute (for example, groups) from your IdP to 6sense.
The Primary Administrator in 6sense must NOT be assigned to any IdP groups that are mapped to roles in 6sense, to prevent unintended role overrides.
A one-time alignment setup is required to ensure correct role mapping and prevent login or access issues.
Perform the configuration steps during a low-traffic window to minimize the risk of login disruptions.
One-time alignment setup
This step ensures your existing users and their assigned roles align with the roles that will be sent via SAML group attribute/claims from your IdP.
Proper alignment helps prevent unintended access changes or login disruptions once group-to-role mapping is enabled.
Step 1: Export and review current users
Identify all unique role combinations currently in use for your users to configure them correctly in your IdP.
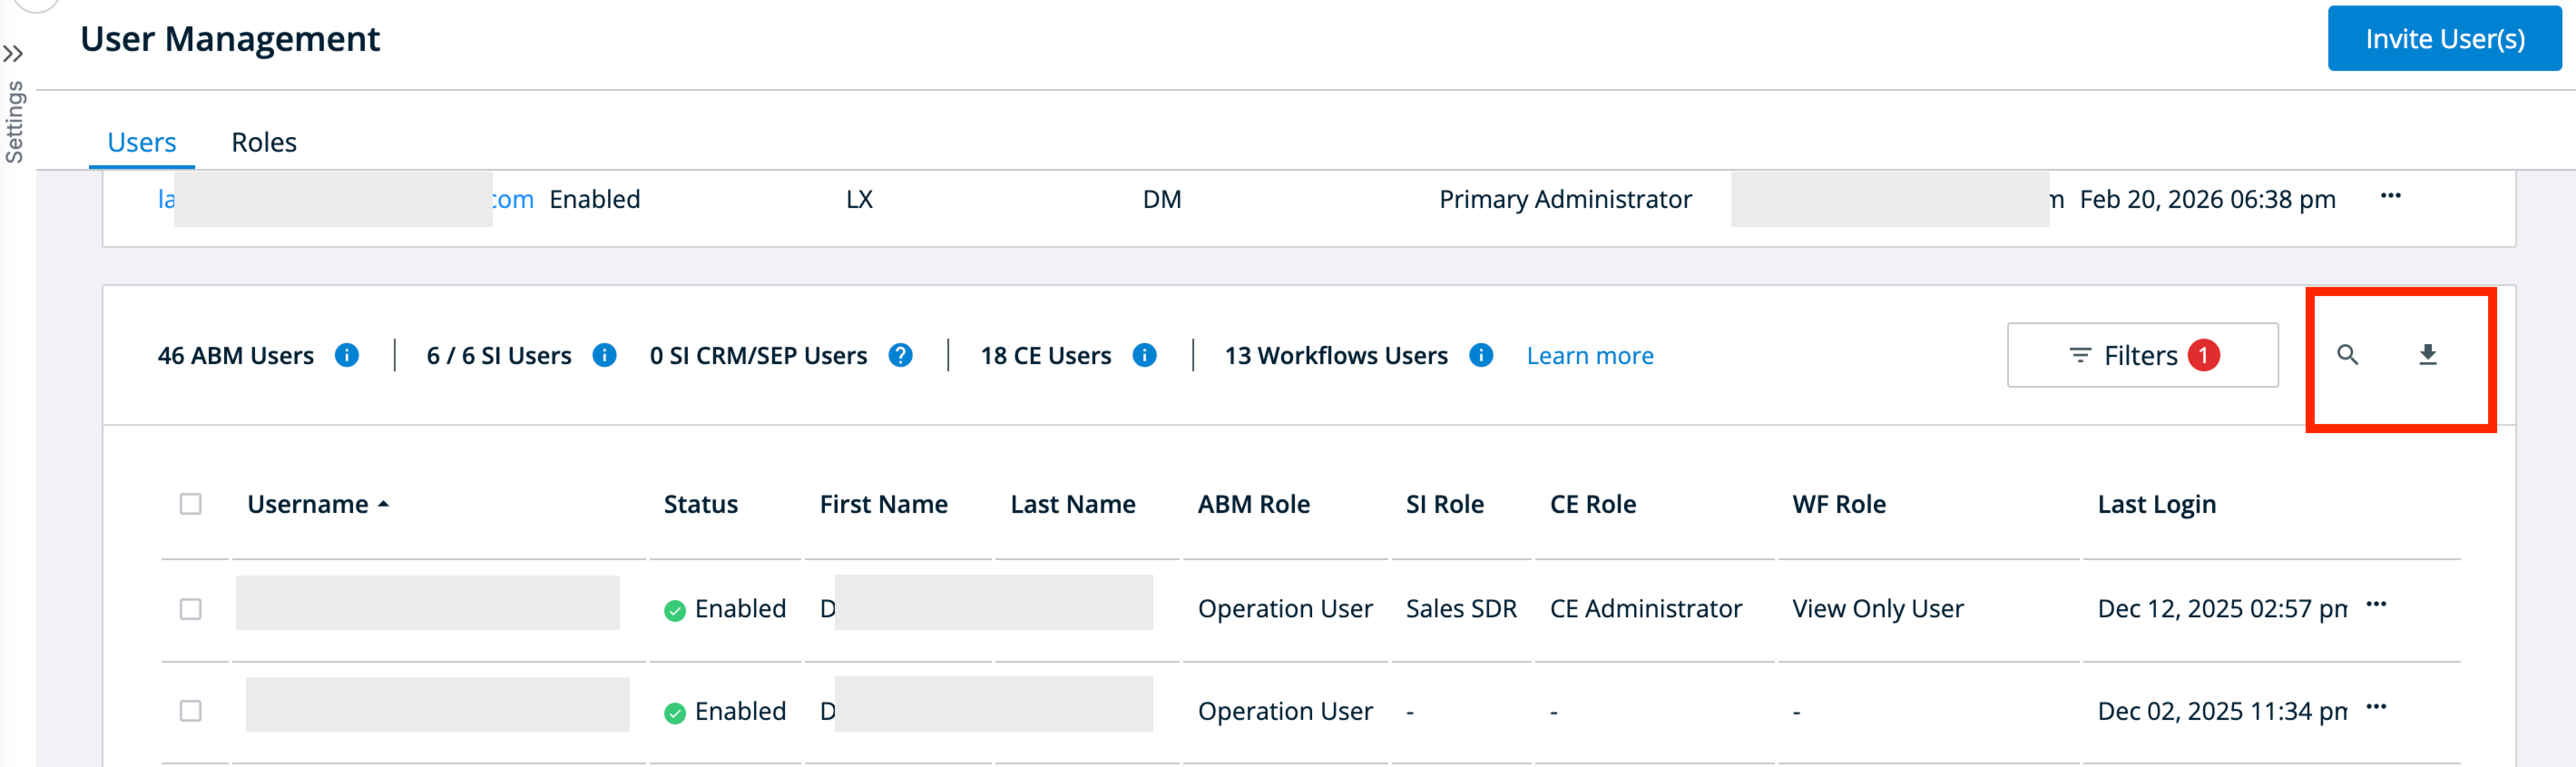
Navigate to User Management in Settings > User Management > Organization Users.
Select Download to export all the user details in a CSV file.
Review users:
For all users in the enabled state, review their assigned roles.
Identify and document all unique role combinations currently in use for audit purposes.
Step 2: Design your IdP groups and assign users
Design your Identity Provider (IdP) groups to mirror the exact role combinations identified in Step 1.
For accurate role mapping and to prevent conflicts, each user should ideally belong to only one IdP group that represents their exact role combination in 6sense.
Best practices to avoid role conflicts
If a user has multiple roles:
Create a single IdP group for each unique role combination documented in Step 1.
Assign the user only to that specific group.
Ensure the group is assigned to the 6sense application within your IdP.
This approach ensures that when SAML group attributes are sent during authentication, users receive the correct role mapping without unintended overrides or access issues.
Role in 6sense | Recommended IdP group name | Notes |
ABM Administrator + Sales intelligence Sales Administrator | 6sense_ABMAdmin_SIAdmin | Single IdP group representing users with both roles; assign only to users who need both. |
ABM Marketing User | 6sense_ABMMarketing | Assign users who have only ABM Marketing User role. |
ABM Administrator | 6sense_ABMAdministrator | Assign users who have only ABM Administrator role and no other roles |
Special rule: Primary administrator
The Primary Admin:
Must NOT be included in any IdP groups which are mapped to roles in 6sense.
This is to prevent accidental access downgrades, lockouts on admins, and overwrites during future SAML updates.
Step 3: Configure group attribute/claims in your IdP
Your IdP must send a group attribute in the SAML assertion.
Below are common configurations by IdP:
OKTA legacy
OKTA non-legacy
Microsoft Entra ID
Google Workspace
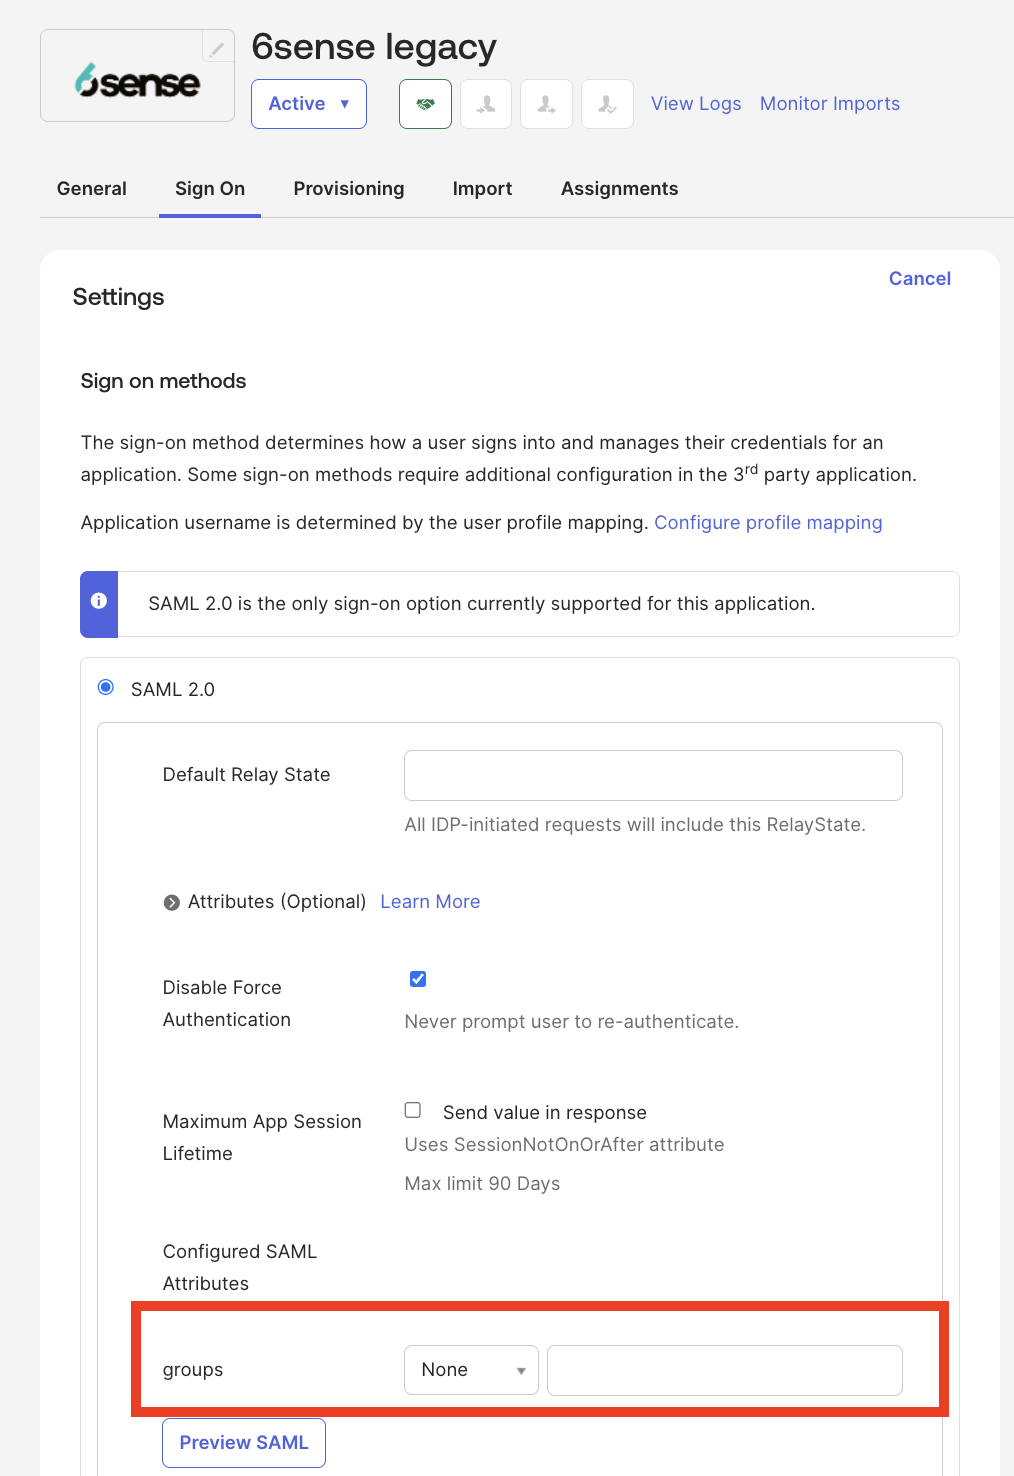
OKTA (for legacy OKTA OIN app for 6sense)
Legacy OKTA OIN app for 6sense should not be used for any new SSO deployments. Its only for supporting existing customers who had installed SSO before Nov 13th, 2025.
Select the Sign On tab and select Edit.
Choose a filter option for your expression (Starts with, Equals, Contains, Matches).
Select Save.
Your group attributes are now ready to be configured in 6sense. Skip to Step 4: Create matching groups in 6sense.
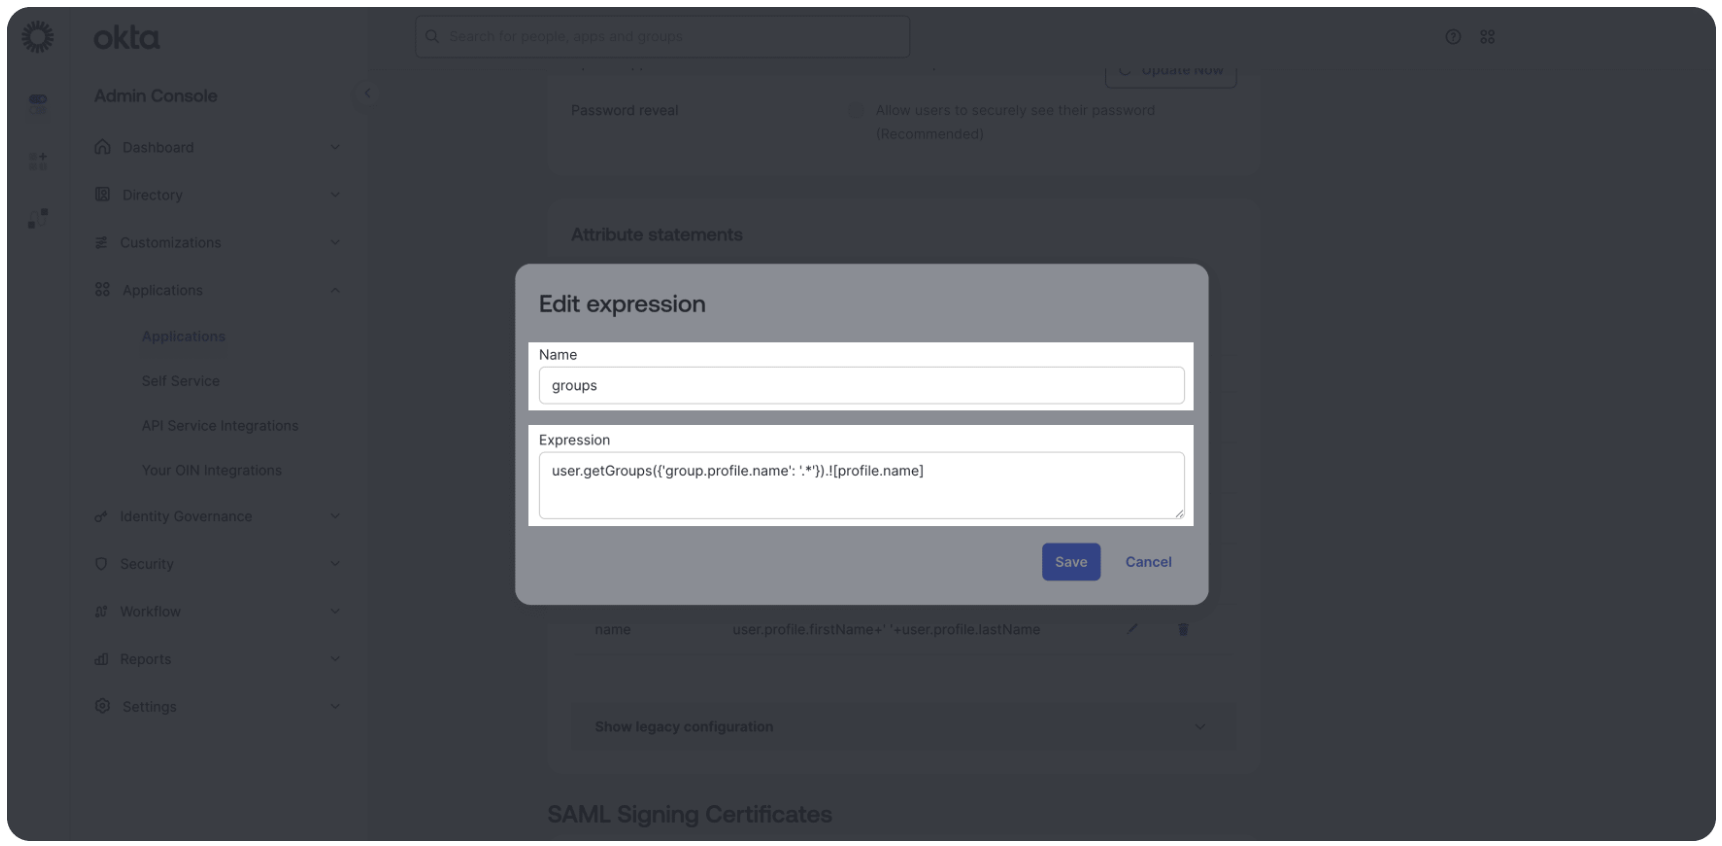
OKTA (for non-legacy)
Navigate to Applications > 6sense App > Sign On > Add expression.
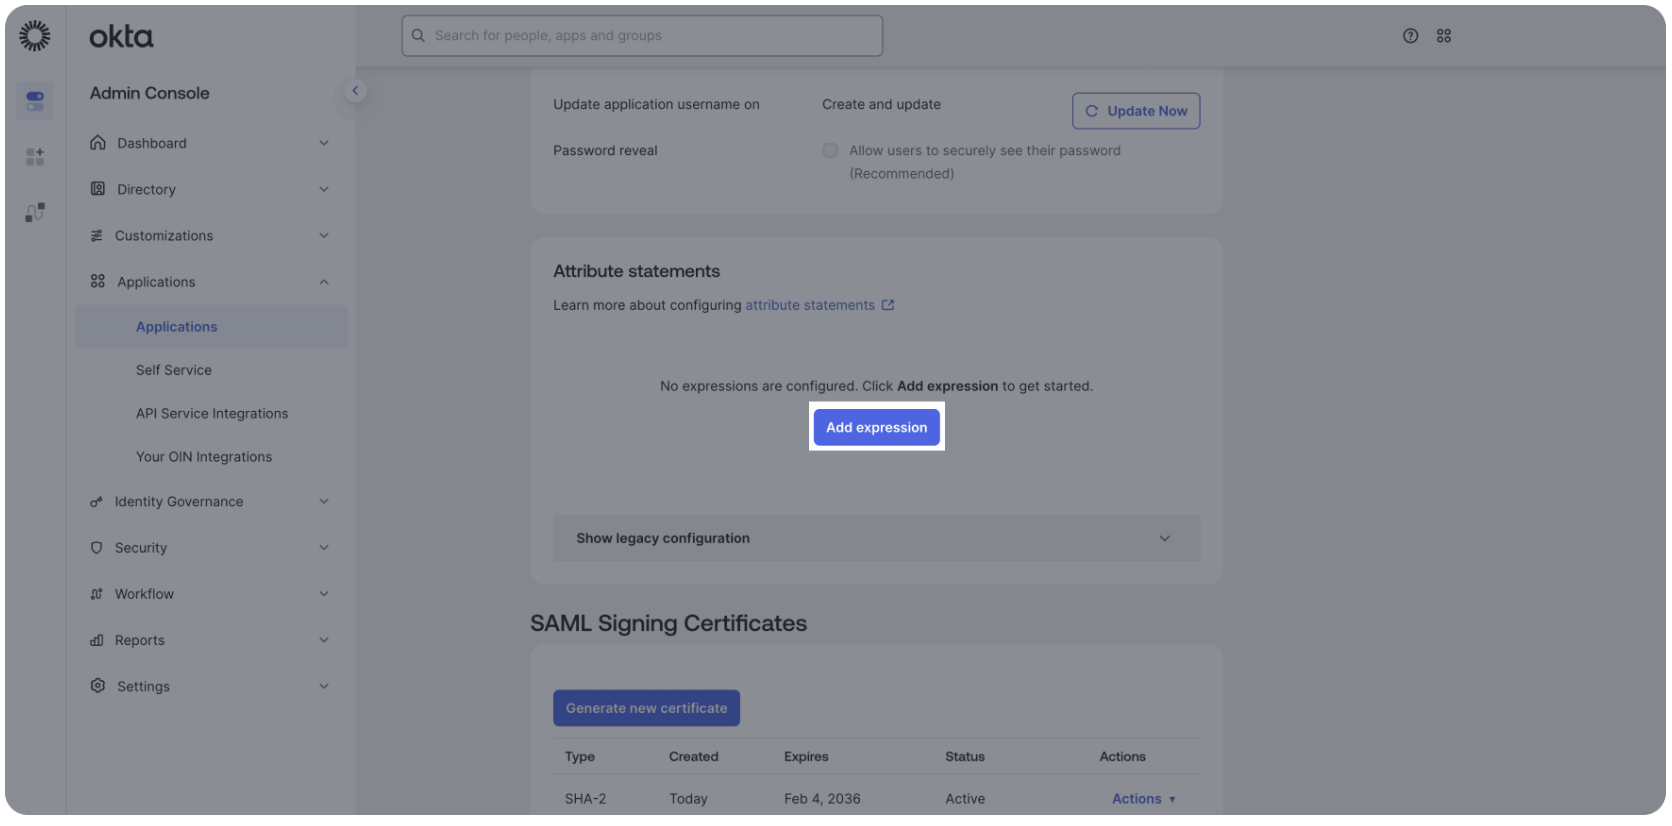
Enter the following:
Group attribute name: groups
Choose a filter option for your expression (Starts with, Equals, Contains, Matches).
Select Save.
Your group attributes are now ready to be configured in 6sense. Skip to Step 4: Create matching groups in 6sense.
Microsoft Entra ID (Azure AD)
Navigate to Enterprise Applications > 6sense App > Single Sign-On > Attributes & Claims.
To add a group attribute, follow these steps:
Select Add a group claim.
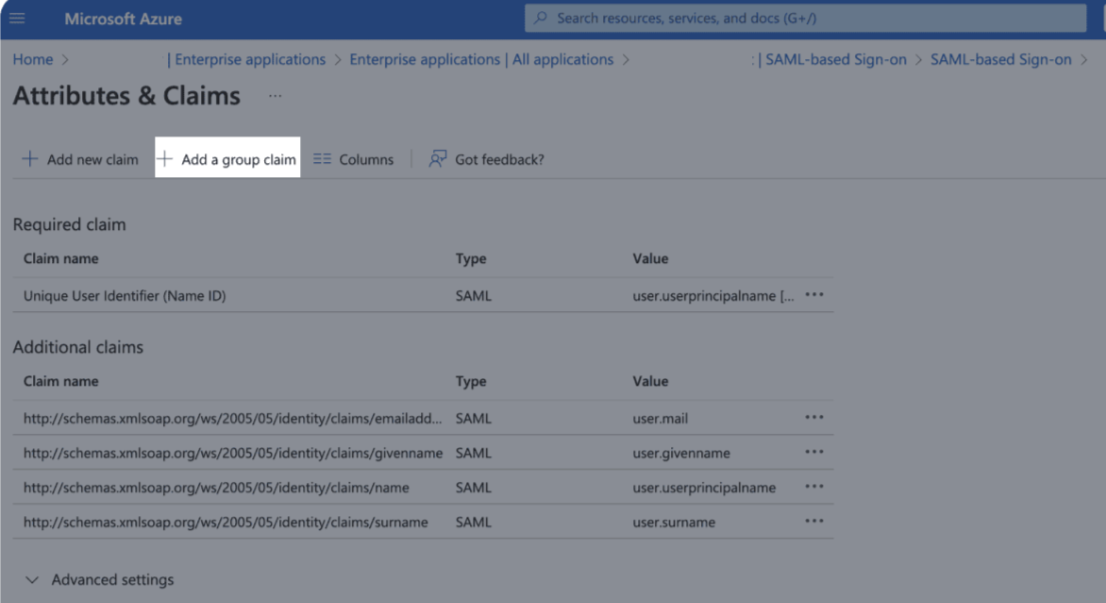
Select which groups associated with the user should be returned in the claim and the source format.
Select Save.
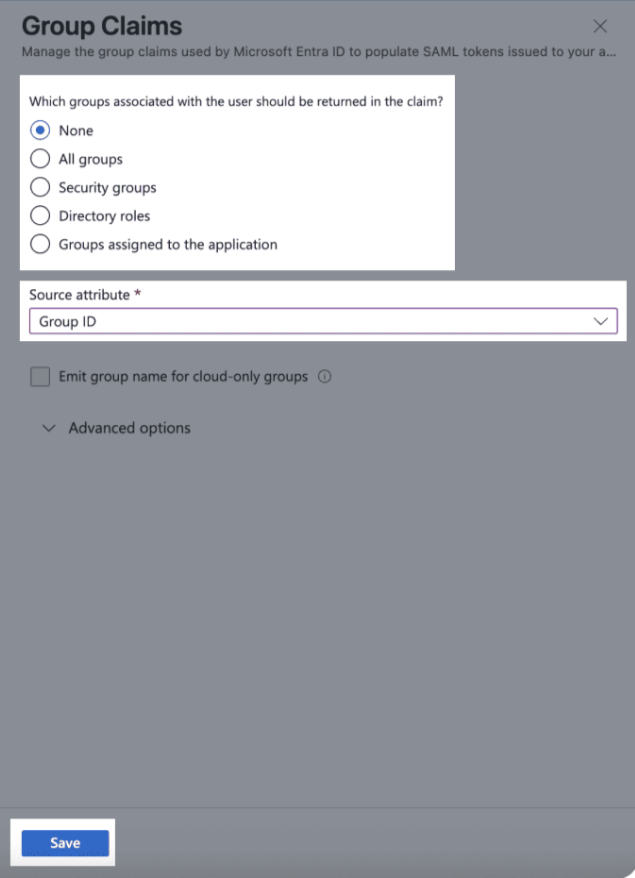
Learn more about group attributes in Microsoft: http://schemas.microsoft.com/ws/2008/06/identity/claims/groups
Your group attributes are now ready to be configured in 6sense. Skip to Step 4: Create matching groups in 6sense.
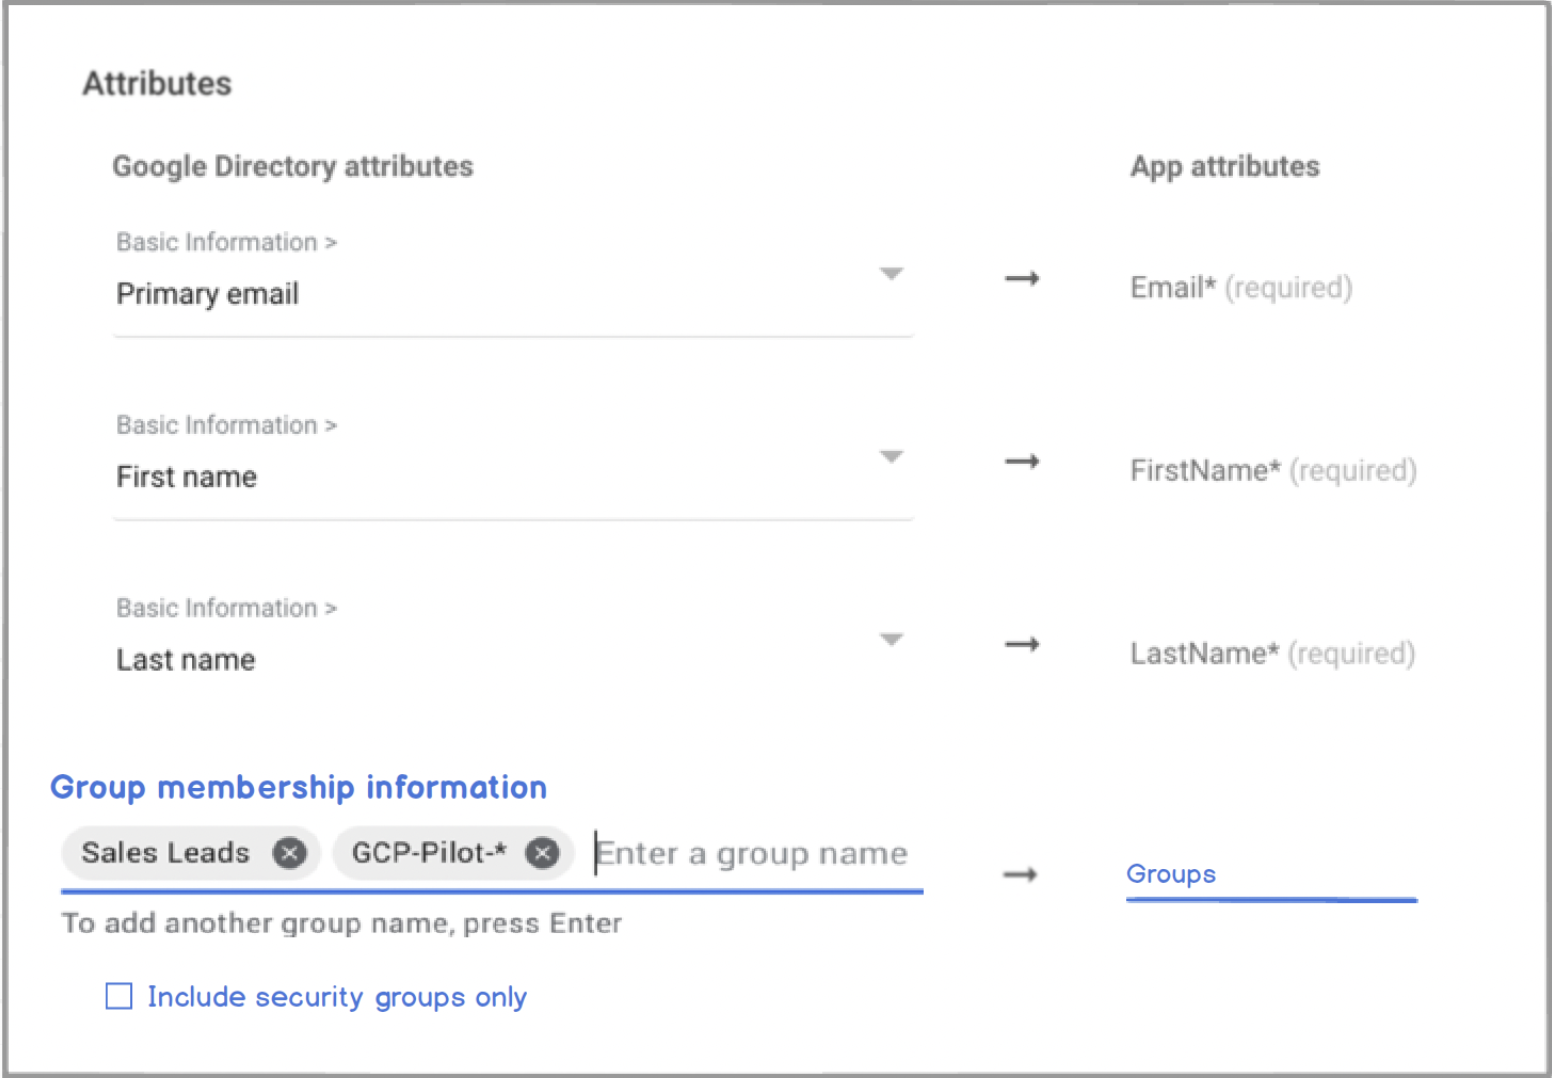
Google Workspace
Configure:
SAML attribute mapping.
Attribute name: groups.
Map to user’s Google Groups membership.
Ensure group email/name matches the 6sense group.
Group attribute: groups
Your group attributes are now ready to be configured in 6sense. Skip to Step 4: Create matching groups in 6sense.
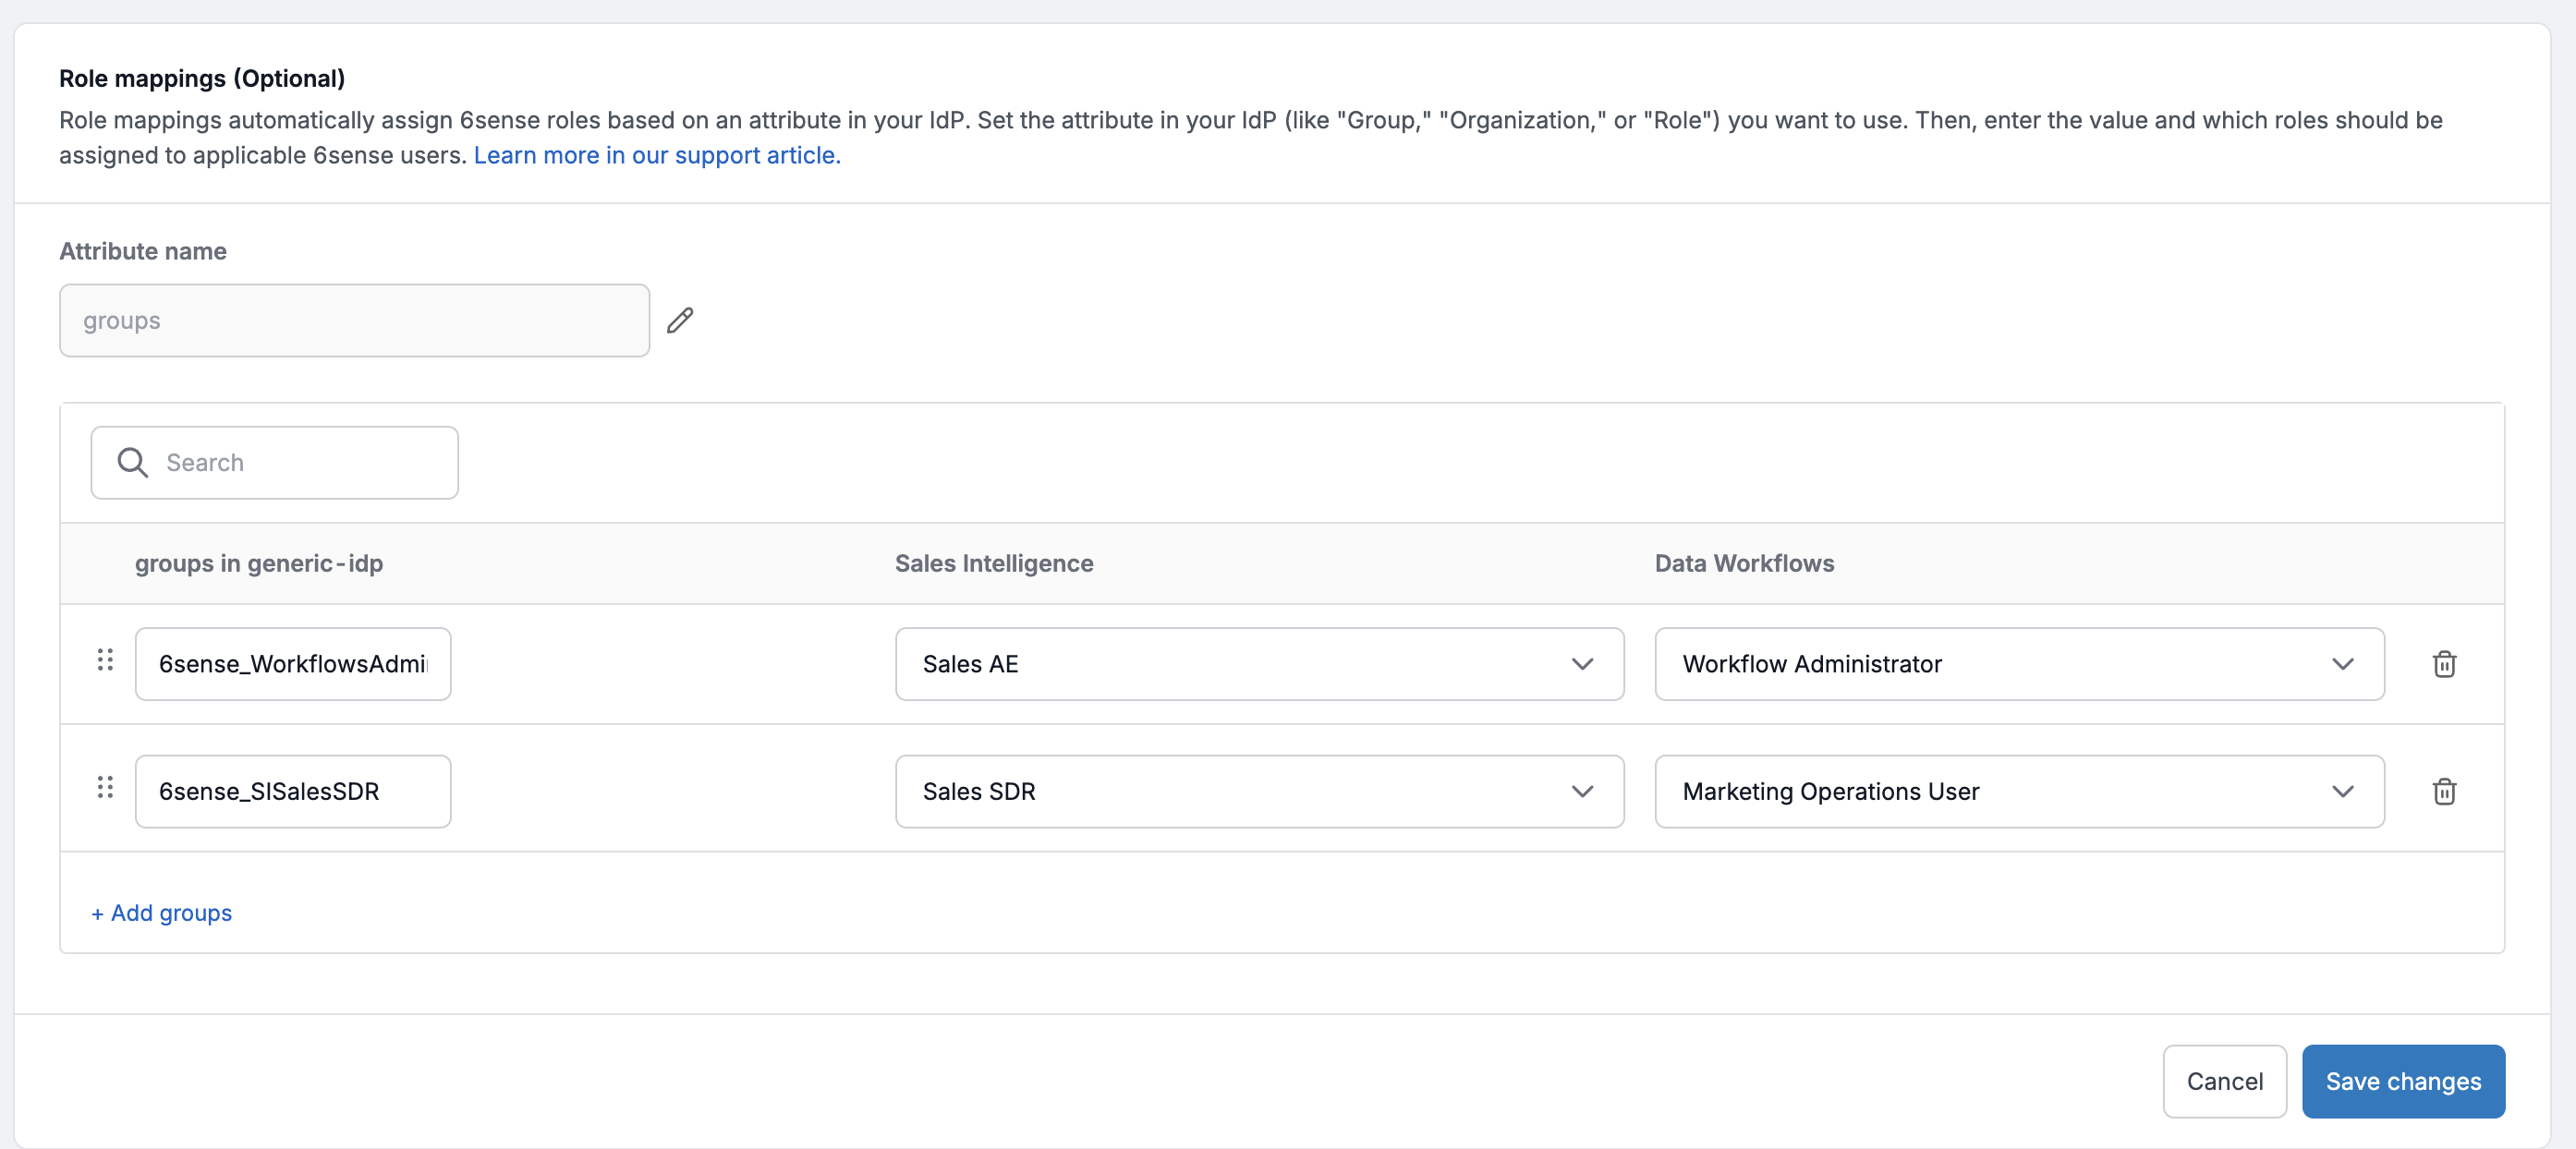
Step 4: Create Matching Groups in 6sense
Navigate to Settings > Identity and Access > Authentication.
Select the Role Mapping section.
Enter the name of the attribute used by your IdP for group associations.
Create groups with the exact same name as in your IdP for 6sense application.
Map that group to the appropriate 6sense role(s).
Select Save.
Test with one user login to confirm there are no role overrides.
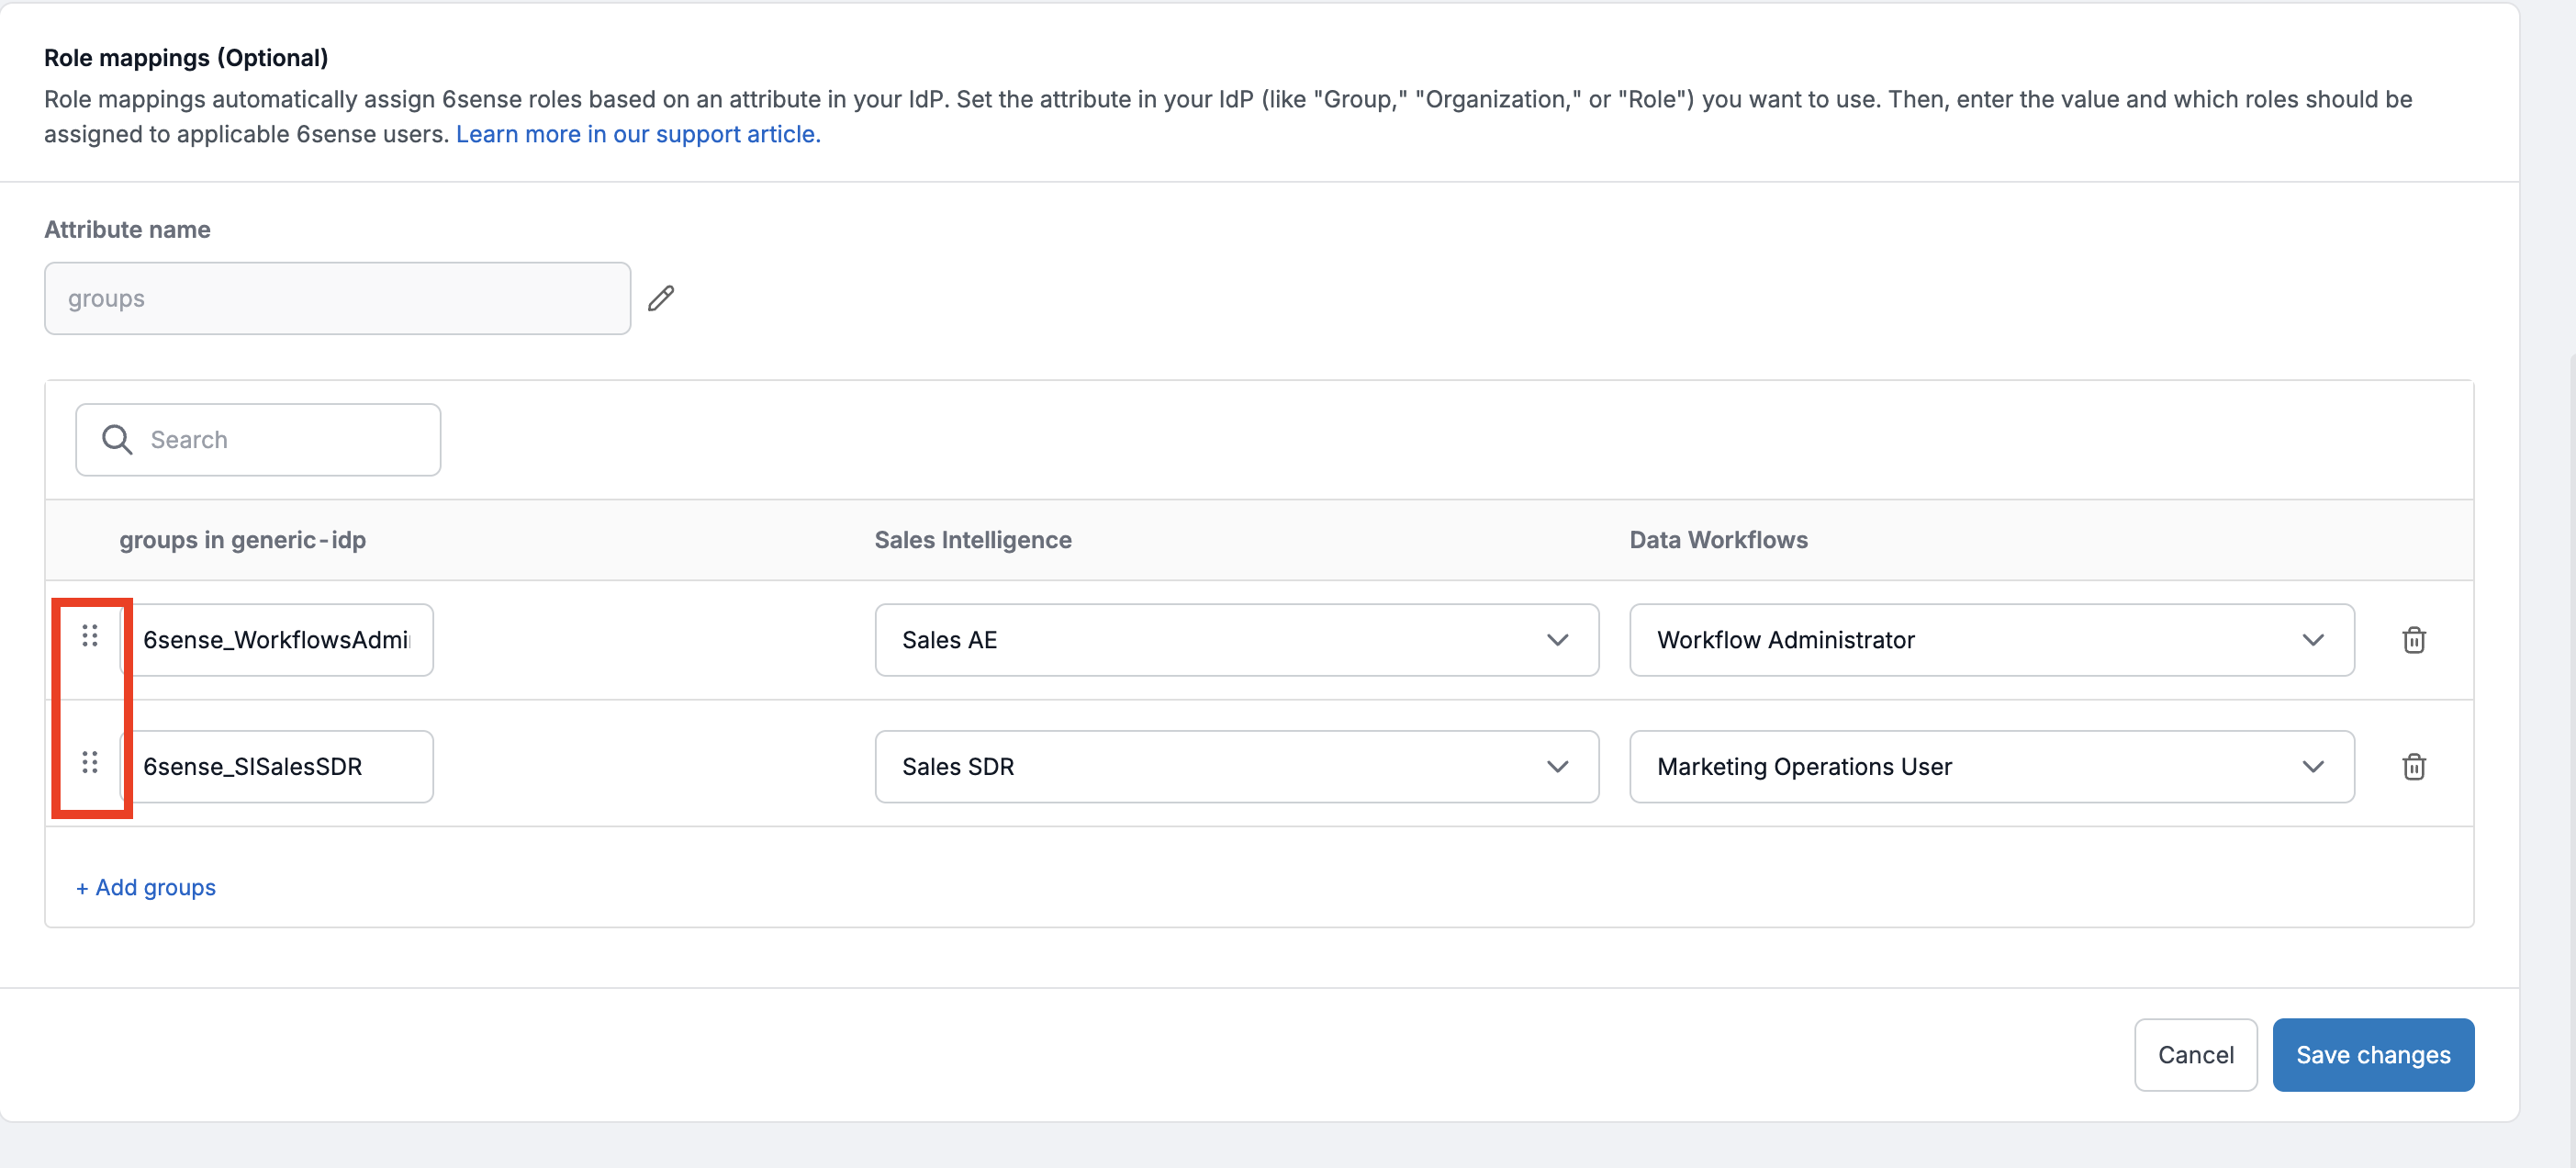
Group priority
While assigning a user to multiple IdP groups is technically possible, it is not recommended by 6sense. If a user belongs to more than one group, 6sense will apply the role based on group priority; the platform assigns the role from the first group listed in the Role Mapping section.
An administrator can use the drag option to order the groups to change priorities as shown below.
Validation checklist
Primary administrator is not mapped to any such groups that are used for role mapping in 6sense
All IdP groups match 6sense groups exactly
Each 6sense group is mapped to correct roles
Users belong to only one and the right group
Test login successful across at least 1- 2 groups to ascertain no role overrides.
⚠️ Names must match exactly (case-sensitive).
After groups are setup in idP for access to 6sense application, if corresponding groups are not created in 6sense, a user’s existing role will be overridden by the default role. This also applies to users not mapped to any IdP groups but have a 6sense application access in the idP. Primary Administrator is exempt from this behavior.
Change Primary Admin (if group role mapping is setup)
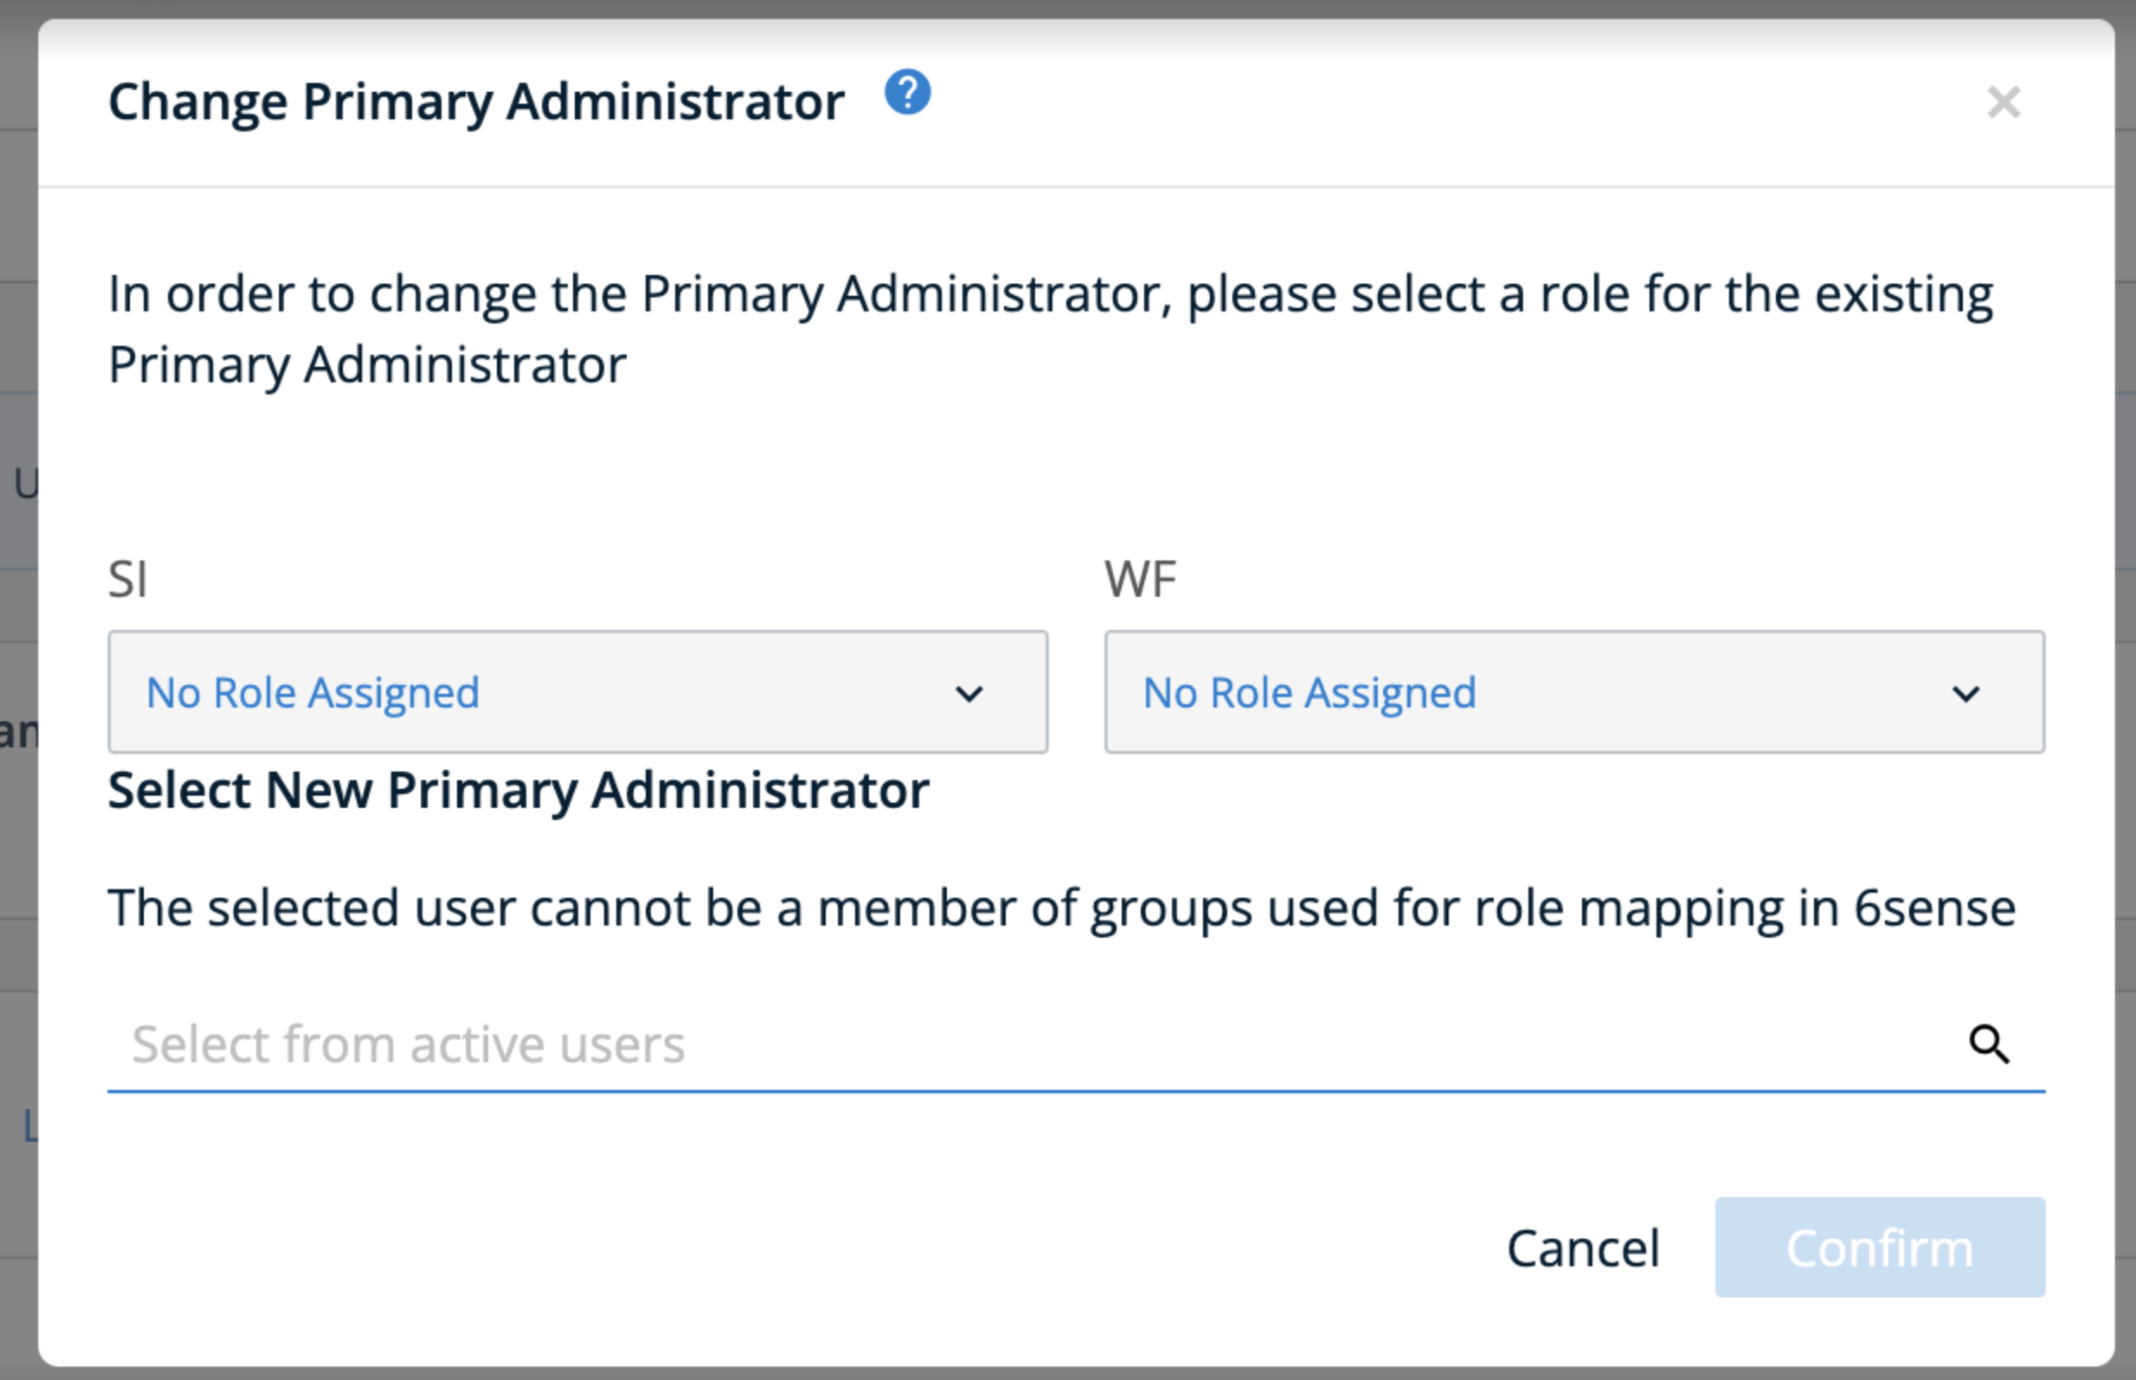
Prepare the new Primary Admin:
Ensure the user to be the new Primary Administrator is not assigned to any such groups in your IdP which are used for role mapping in 6sense.
Update the current Primary Admin (if they still need access):
If the existing Primary Administrator user still requires access to the 6sense with a different role, add the user back to the appropriate IdP group corresponding to the desired role.
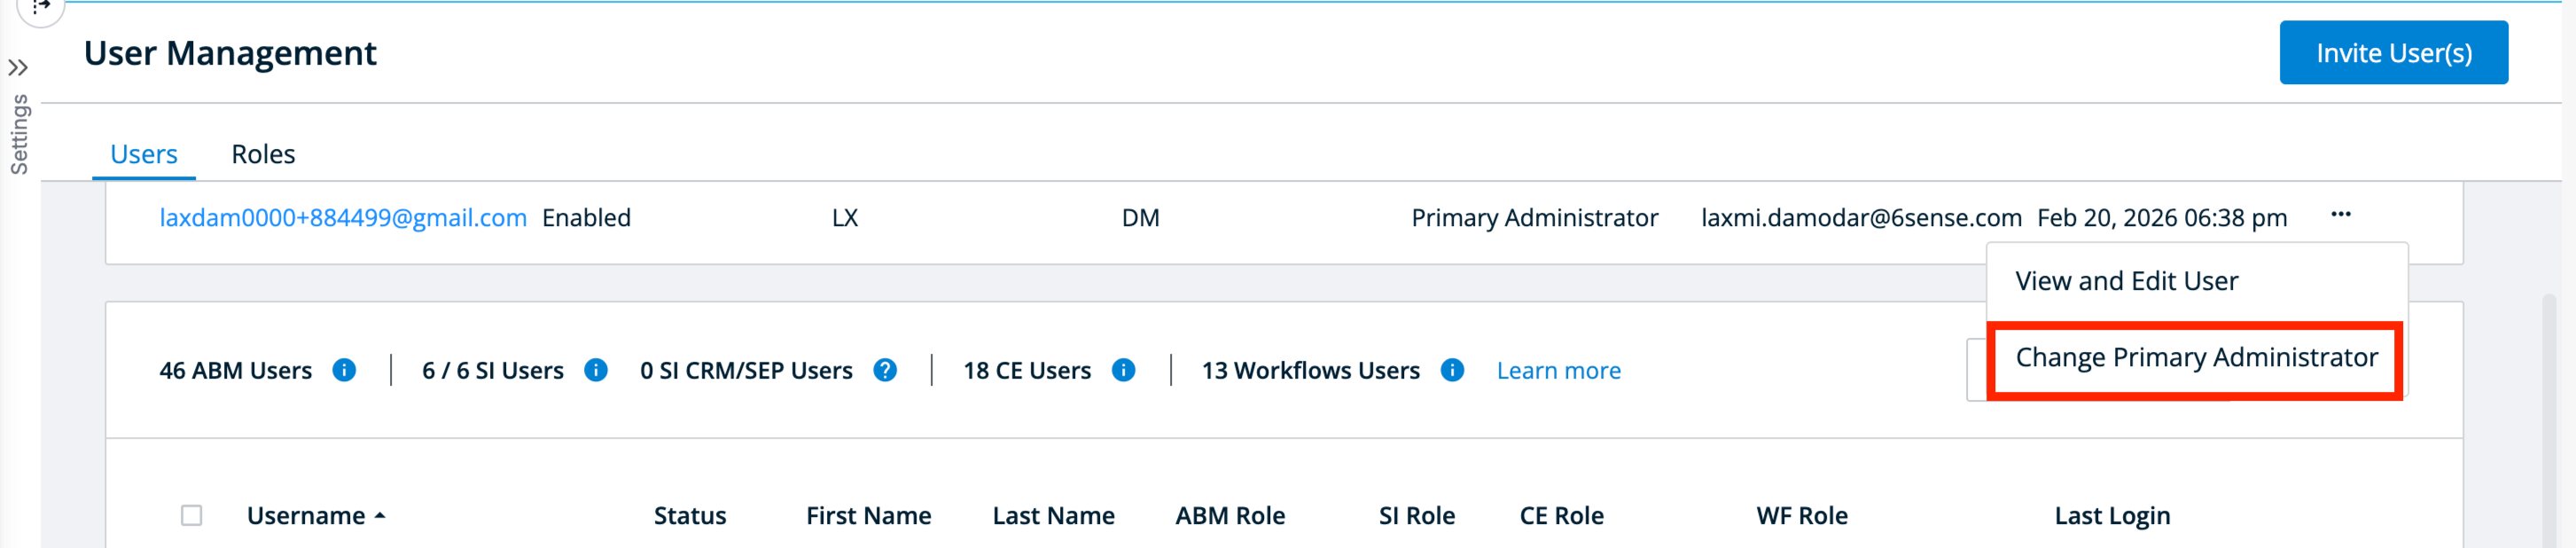
Navigate to user management:
Navigate to Settings > User Management > Organization Users in the 6sense application.
Change Primary Admin:
Select Actions > Change Primary Administrator.
Complete the update:
Assign the intended role to the old Primary Admin.
Select the user from Step 1 to be promoted to Primary Admin.
Select Confirm.
Disable the role mapping feature
If you plan to disable the automated role mapping feature, follow the steps below:
Select the pen (edit) icon for the Group Attribute and remove the attribute information.
Select Delete next to each of the groups.
Select Save.
Once this is completed, any newly provisioned users will be assigned to the default role you configured. However, role mapping will no longer be applied.
Troubleshooting
Issue | Possible Cause | Recommended fix |
User assigned incorrect role after login | IdP group name does not match group name created in 6sense | Verify IdP group names match exactly with 6sense groups (case-sensitive) |
User receives Default Role unexpectedly |
| Assign user to the correct IdP group Create missing group in 6sense |
Primary Admin loses access | Primary Admin included in group mapping | Create a case as soon as possible with 6sense Technical Support by visiting the RevCity portal (instructions here) |
User receives unexpected role | User assigned to more than one IdP groups | Reassign user to a single group representing their exact role combination; role assigned is based on first group in Role Mapping order |
Newly provisioned user are getting authentication error for license exhaustion on login. | Default role contains SI role and all licenses for Sales Intelligence have exhausted | Purchase additional licenses or remove access in idP for users to make licenses available. The next automatic sync will update the SI role for the user. |
User disabled automatically | Default role is set to Sales Intelligence only and SCIM is enabled. All licenses for Sales intelligence are exhausted | Purchase new licenses, then select Enable in User Management warning. |
Role changes not reflected immediately | User session cached or SAML assertion not updated | Have user log out and log in again; verify group attribute in SAML assertion is correct |
FAQ
What is the purpose of SSO group role mapping in 6sense?
Group role mapping allows you to automatically assign 6sense roles to users based on the groups sent in the SAML assertion from your IdP. It ensures that roles are consistent and reduces manual role assignment.
Can I use only the default role setting feature without enabling group role mapping?
Yes. You can configure a default role for users who are not mapped to any group. Newly provisioned users will automatically receive this role.
What happens if a group is not set up in 6sense?
If a group exists in the IdP but is not created in 6sense in role mapping section, any user associated with that group will have their role overridden by the default role on their next login/next automatic sync to 6sense. This applies to all users except the Primary Administrator.
How do I update the Primary Administrator if needed?
Ensure the new Primary Administrator is not in IdP group which are used for mapping roles in 6sense.
Use Settings → User Management → Organization Users → Change Primary Administrator action (on the Primary Administrator section.
Reassign a role to the old Primary Administrator if they still need access to 6sense
Select the new Primary administrator.
Why is the Primary Admin excluded from group role mapping?
The Primary Admin must not be present in any of idP groups that are used for role mapping in 6sense. This is to prevent accidental access downgrades or lockouts.
What is the recommended approach for group creation at idP for users with multiple roles?
Create IdP groups representing each combination of roles for users. Assign users based on those combinations to prevent conflicts or unintended privileges of escalation. Example given below.
Role in 6sense | Recommended IdP group name | Notes |
ABM Administrator + Sales intelligence Sales Administrator | 6sense_ABMAdmin_SIAdmin | Single IdP group representing users with both roles; assign only to users who need both. |
ABM Marketing User | 6sense_ABMMarketing | Assign users who have only ABM Marketing User role. |
ABM Administrator | 6sense_ABMAdministrator | Assign users who have only ABM Administrator role and no other roles |
Can a user belong to multiple groups in IdP?
While assigning a user to multiple IdP groups is technically possible, it is not recommended. If a user belongs to more than one group, 6sense will apply the role based on group priority, the platform assigns the role from the first group listed for that user in the Role Mapping section.
What should I do if a user receives the wrong role after login?
Check that the IdP group name exactly matches the 6sense group name.
Ensure the user is only in one group for their role combination.
After the corrections are made, the user can logout and login to check the role association.
What happens if licenses are exhausted for Sales Intelligence and the default role has been setup for it?
If all Sales Intelligence licenses are exhausted and default roles for other applications have been configured, newly provisioned users will be assigned the other available roles, excluding Sales Intelligence.
If the default role is set exclusively to Sales Intelligence and SCIM is not enabled yet, the new user will receive an error for access denial to contact administrator as there are no licenses available.
If the default role is set exclusively to Sales Intelligence and SCIM is enabled, the new user will be placed in a disabled state in 6sense. A warning will appear on the User Management screen for additional licenses. Once additional licenses become available, the administrator can select the Enable Users button in the warning message to assign the role to the user and reactivate their access.
Can I change group names in the IdP after mapping?
Changing IdP group names after mapping will break role assignments. Always exercise caution and update the 6sense group name to match the new IdP group name before assigning any new users.