Manage users and their access to different features by assigning the proper role following the principles of role-based access control (RBAC).
Built-in roles
Each user can be assigned only one role.
Role | Description |
|---|---|
Primary Administrator | This role has full access to everything on the ABM platform. It is the ultimate administrator who owns the 6sense ABM platform in your organization. |
Administrator | This role has full access to everything on the ABM platform except assigning the administrator role to a user. |
Operation User | This role has full access to 6sense insight features, Orchestration, alerts, administrator reports, and settings related to integration and sales enablement. It also has view access to campaigns and some other settings. |
Marketing User | This role has full access to 6sense insight features, campaign features, alerts, administrator reports, and view access to some settings. It also has edit access to the Ad Inventory Exclusion list. |
View Only User | This role has view access to all features and settings that the marketing user role has access to. |
Insights User | This role has full access to 6sense insights for segments and accounts. |
Sales User | This role has full access to 6sense insights for segments and accounts. Your sales reps should be assigned this role. |
Custom roles
Administrators can create custom roles to define additional roles with specific permissions beyond the default system roles. Custom roles are included in Advanced Security as an optional feature and is not enabled by default. To request enablement, please contact your Customer Success Manager (CSM). Review Custom User Roles for more information on configuring custom roles.
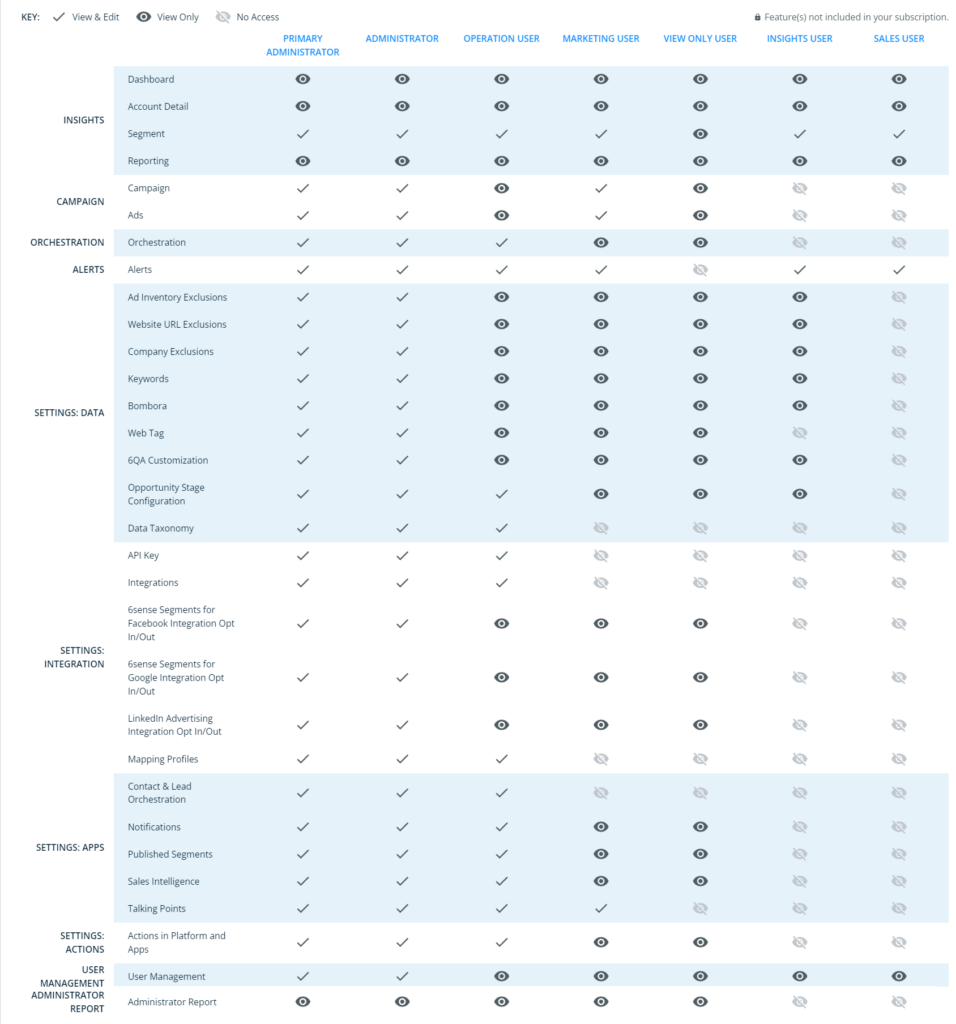
Permission matrix for built-in roles
Explore the permission matrix at Settings > User Management > Roles > View Role Comparison Table. Use the Choose App dropdown to select among the applications available.
Access User Management settings
As an Administrator, go to Settings> User Management > Organization Users .
![]()
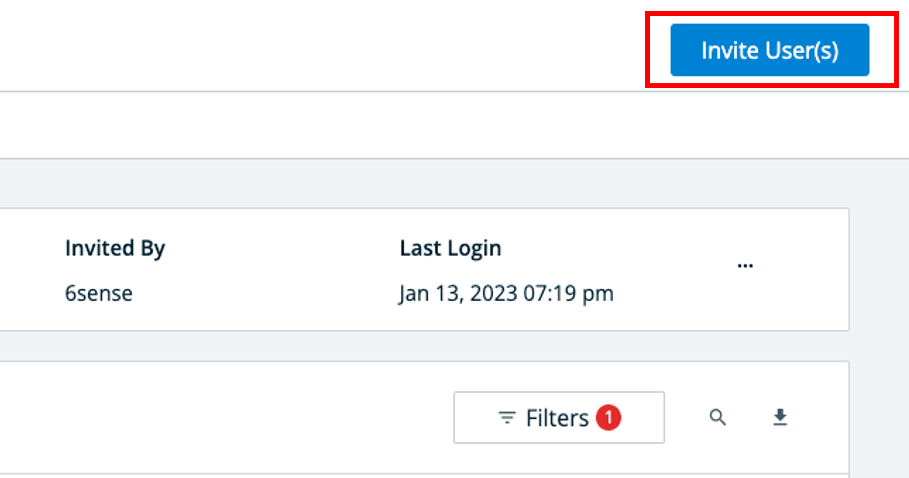
Invite users
Under the Users tab, click Invite User(s).
Select the role that you want to assign the new user.
Enter the email address of the new user. You can invite multiple users for the same role at once by inputting multiple email addresses, each separated by a comma.
Click on Send invite(s).
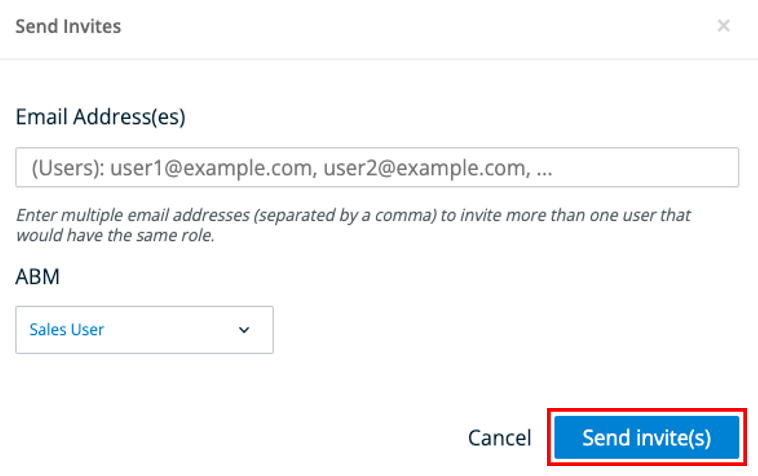
The invited users then receive an invitation email from 6sense.
The link in the invitation email expires after 72 hours.
Manage pending users
In the Users tab, click on Filters, go to Status, select Invited to see all the users that have been invited and are pending activation.
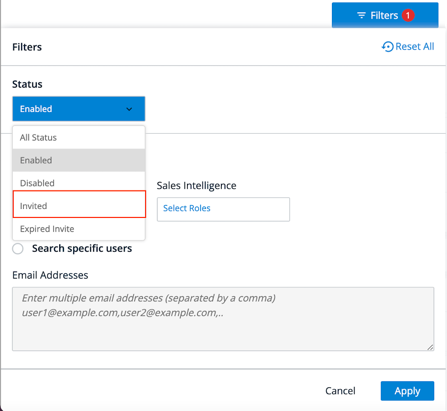
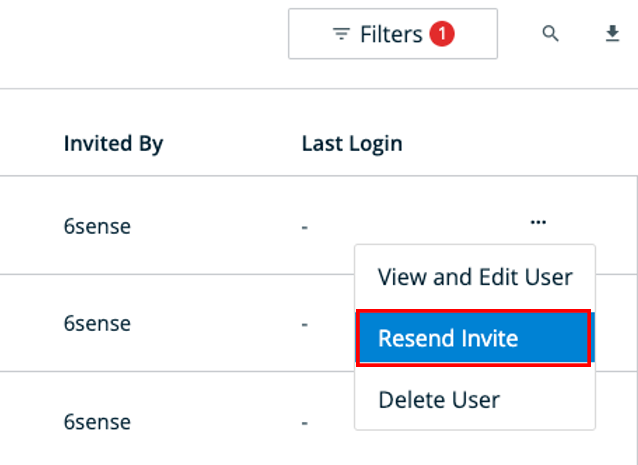
You can also select Expired Invite to see all the users that have been invited but the invitation is expired. To resend invites to these users, click the ellipsis (…) dropdown and select Resend Invite.
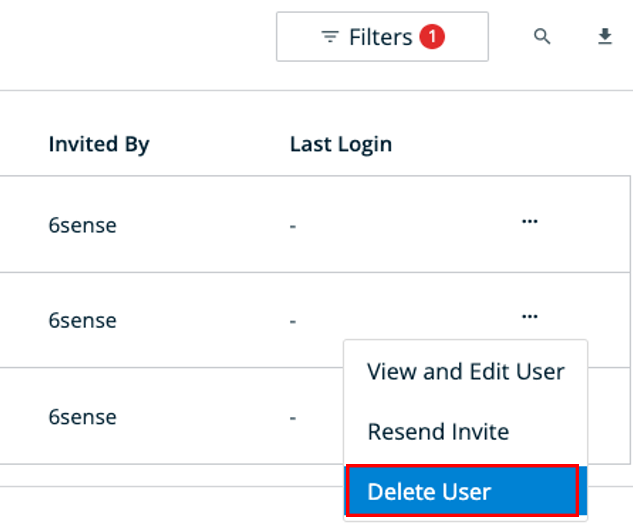
You can also delete any user in the Invited or Expired Invite invitation status by clicking the ellipsis (…) dropdown, selecting Delete User, and then clicking Delete to confirm.

Edit the roles of existing users
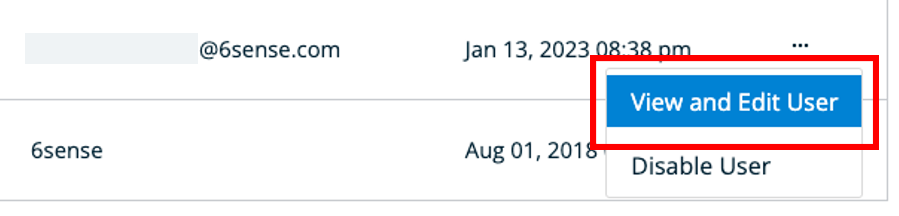
In the Users tab, click the username of the user, or click the ellipsis (…) dropdown and select View and Edit User.
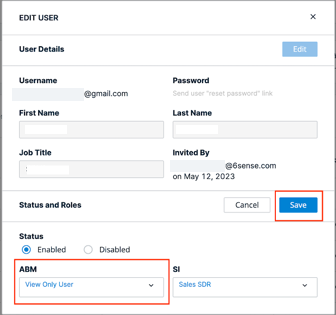
In the Role section select the new role from the list of available roles that you want to assign to the user and click on Save Changes.
You will get a message that the role was successfully updated.
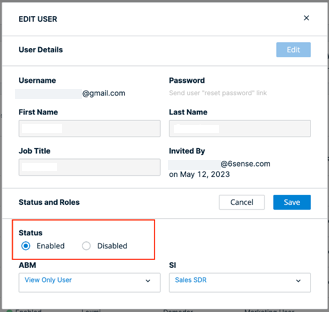
Enable or disable a user
In the Users tab, click the username of the user or click the ellipsis (…) dropdown and select View and Edit User.
In the Roles section, select the Disabled radio button.
To re-enable a disabled user, select the Enabled radio button.
You can also enable or disable a user, by clicking the ellipsis (…) dropdown and select Disable User or Enable User as applicable.
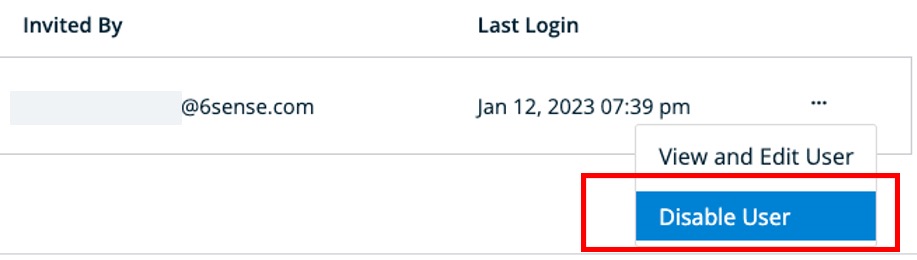
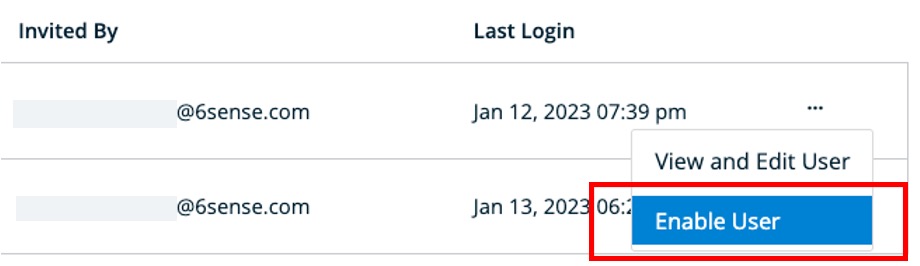
Note: Enabled users can be disabled from the ellipsis (…) dropdown. Conversely, disabled users can be enabled from the ellipsis (…) dropdown.
Update user information
Under the Users tab, click the username of the user, or click the ellipsis (…) dropdown and select View and Edit User. On this page you can update the user’s first name, last name, and job title.
Bulk actions
To make bulk actions to many users:
Select the users you want to make changes to by checking the box next to their usernames.
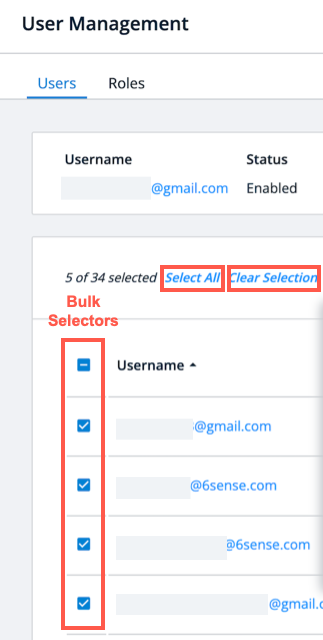
Select All selects all users shown on the list on your screen, and Clear Selection removes all selections with one click.
Click Bulk Actions to open the Bulk Actions dialog box.
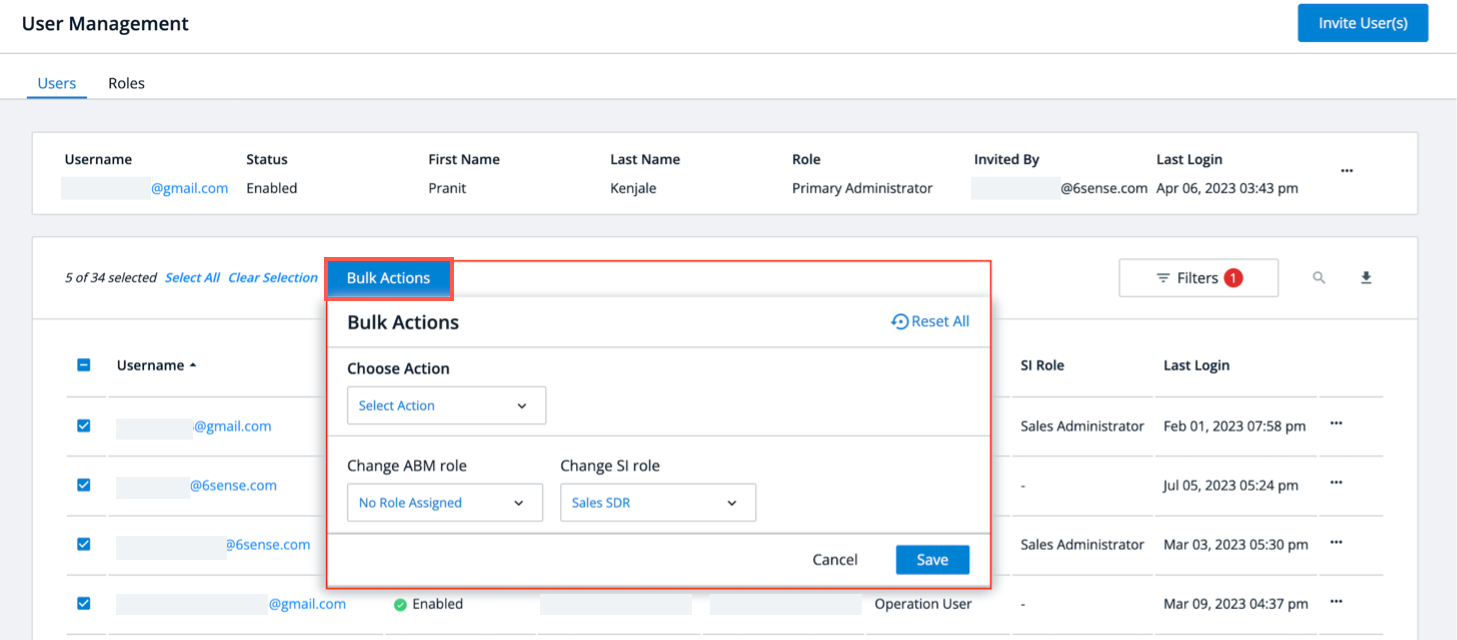
Choose actions to change roles, enable, disable, and delete/resend invites for users with ABM roles or SI roles. Select an action from the Choose Action dropdown and a type of user from the Change ABM role or Change SI role dropdowns. After you’ve refined your selection, save the changes to apply them in bulk.
Bulk Role-to-Role Changes: To move all users in a certain role, select the role using a filter, then select all users and choose the new role.
Bulk Unassignment: If you want to unassign a role for 6sense application for a selected set of users, choose No Role Assigned in the dropdown for that app.
Troubleshooting bulk actions
Be careful when selecting users in bulk that may have a mixture of statuses. If you select many users and try to take action for a batch of users with differing statuses, some interactions may be disabled (grayed out).
If your intended action is disabled, review the inline error messages to figure out which users are causing the action to be disabled.
Disabled Users: If you try to select a role change for a user that is disabled, that action is disabled.
Status Required to Delete: Only users who have the status Expired Invite or Invited can be deleted.
Filters
Use filters to speed selection of specific kinds of users.
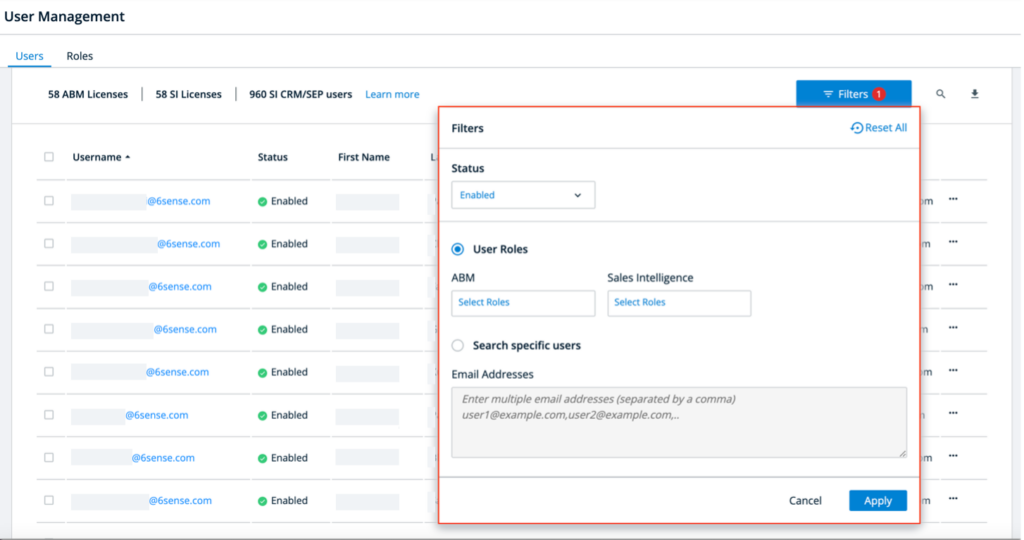
Combining Filters: You can combine some filters:
Combine the status filter with the user roles filter.
Combine the status filter with the email addresses filter.
Filtering by Roles Across Applications: To filter users with roles across each app, select the user roles filter, choose one or more roles in for the ABM platform and the SI application, and then click Apply.
Filtering Using a List of Email Addresses: If you have a list of user email addresses, select Search Specific Users and enter the email addresses in the provided space, separated by commas, and then click Apply.
User management filters
Filter | Values |
|---|---|
Status |
|
User roles | Roles specific to each app will be displayed.
If your company has licensed other 6sense applications, roles specific to those apps are available. |
Email addresses | Enter any number of email addresses separated by commas to filter specific users in the list |
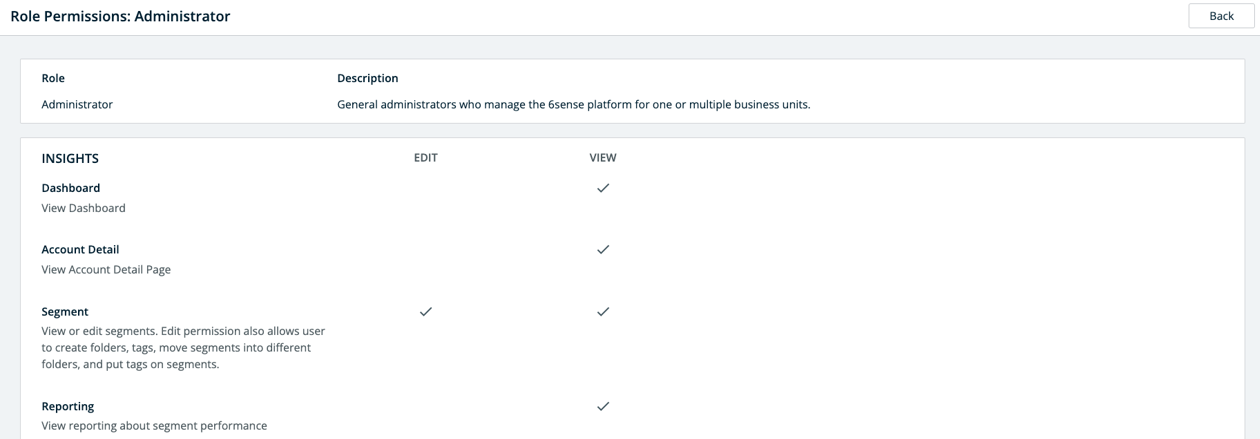
Check role permissions
In the Roles tab, you will see a summary of the pre-built roles, and the number of users for each role. Choose an App to view the different roles among ABM or Sales Intelligence. Click on each role to see permission details for that particular role.
Click View Role Comparison Table on the top right to see a quick permission chart among different roles as shown below. To go back to the previous view, click on View Role List.
Click on each role as shown above to see permission details for the particular role.
SAML SSO authentication
The 6sense platform supports SAML SSO (Security Assertion Markup Language single sign-on) authentication. Once your organization enables SAML SSO authentication for 6sense, you can create, enable, and disable users for the 6sense platform in your identity provider (IdP).
The first time a new user that has been enabled in your IdP logs in to 6sense via SSO, that user appears in 6sense User Management. New users are initially assigned the View Only role, which has minimal access to the 6sense platform. You can then assign that user to the proper role within User Management in 6sense.
Enabling SAML SSO makes it easier for a user to sign in to 6sense, but changing access to 6sense in the 6sense platform’s User Management does not by default change user access in your IdP. In the basic implementation of SAML SSO, the IdP manages user access at its end, and the 6sense platform manages user access and roles on its own end.
6sense team member access
Primary Administrators and Application Administrators can provide 6sense employees edit access to your organization’s 6sense applications for troubleshooting or maintenance. This access can help expedite problem-solving. Refer to 6sense Team Member Access.
FAQ: user management (RBAC)
Who can update the role of an existing Admin? When an Admin tries to update another Admin’s role, they receive the error: "You don't have access to change ABM administrator role/status."
Based on the permission model, only the Primary Administrator can update the role or status of an existing Admin user. Non-primary Admins do not have sufficient permissions to modify Admin roles, which results in the above access error.
How can we disable users after we implement a SAML single sign-on login approach?
Once you enable SAML SSO for 6sense, users can no longer log in to 6sense any other way except through SAML SSO. If you disable a user in your IdP, that user can no longer access the ABM platform because using an SSO managed by your IdP is the only way to log in.
If you have enabled SCIM in your IdP for 6sense, you can disable a user’s access to 6sense through your IdP dynamically by marking it as Disabled.
Can I remove users from the users’ list if they are disabled on my organization’s identity provider tool?
No, you cannot remove users from the User Management screen, but you can mark them as Disabled.
Who has access to bulk actions?
Primary administrators and administrators of any 6sense application have access to bulk actions. However, an application administrator can update only the roles for the app that they have access to. For example, someone who is only an administrator for Sales Intelligence (SI) can bulk update SI roles.
An application administrator can’t update roles of other administrators even if both administrators are administrators of the same application. Also, application administrators can’t update their own status or roles. The primary administrator must update the status and roles of application administrators.
Are there any license limit restrictions to bulk update?
Yes, license limit error will be thrown if user role updates are being made for SI and as the result, the license limit is exceeding. The user will receive an error and none of the role updates will be made.
How do I assign the Administrator role to someone?
You must be a Primary Administrator to assign the Administrator role to anyone else.
Who has access to change the Primary Administrator of 6sense?
The Primary Administrator role can be assigned to a different user only by the existing Primary Administrator or the account's CSM (if edit access has been granted).
How to grant edit access to CSM.
How long does an invited user have to respond to the invitation?
Once invited, a user will receive an email and the link will be valid for 72 hours from the time the invitation was sent out.