About 6sense Email Provider
6sense Email Provider is a programmatic-scale email solution built on SendGrid’s enterprise-grade infrastructure. It enables you to send large volumes of email reliably, manage responses automatically, and control deliverability within the 6sense platform.
While Gmail and Outlook are built for individual use, 6sense Email Provider enables scalable outreach without the limitations and risks, such as throttling and shared IP issues tied to consumer-grade email platforms.
6sense Email Provider vs. Outlook and Gmail
Feature | 6sense Email Provider | Outlook / Gmail |
|---|---|---|
Sending Scale | Up to 10,000 emails per day per inbox | ~3.6 K/day (Outlook) or ~1.6 K/day (Gmail) for highly warmed-up agents, with blocking risk |
Warm-Up Required | No inbox- or domain-level warm-up needed | Manual or 6sense auto-warmup required |
Access Method | Through 6sense AI Email app only | Through AI Email App + native web or mobile interfaces |
Volume vs. Engagement Trade- off | 5-10 percentage points engagement compared to Outlook and Gmail; 10-100x total outreach volume compared to Outlook and Gmail | Low total volume |
Benefits of using 6sense Email Provider
Speed and Scale: Launch high-volume campaigns instantly. No warmup, no volume ramp-up.
Simplicity: One-time DNS authentication; quickly create inboxes as needed.
Deliverability Assurance: Protect your brand by using a secondary or subdomain.
Common use cases
No 6QA left behind
Cold outreach or lead reactivation
Event invites and follow-ups
Product announcements and re-engagements
Daily send limit and best practices
Daily Limit: Up to 10,000 emails per inbox per day
Best Practices:
Maintain clean email lists by removing bounced or stale contacts.
Target opted-in recipients to maximize engagement.
Monitor the deliverability metric regularly.
Set up the 6sense Email Provider
Prerequisites
Before you begin, you must have the following:
AI Email administrator permissions.
Secondary or subdomain. For example, email.company.com or inbox.company.io.
Note: Avoid using the primary domain, for example www.company.com, to protect your main domain’s reputation.
Add and configure a domain
In the 6sense AI Email platform, select AI Email Agents.
Select Create email agent.
.png)
Under the 6sense section, select Go to domain settings. The Domains page lists the existing domains, if any.
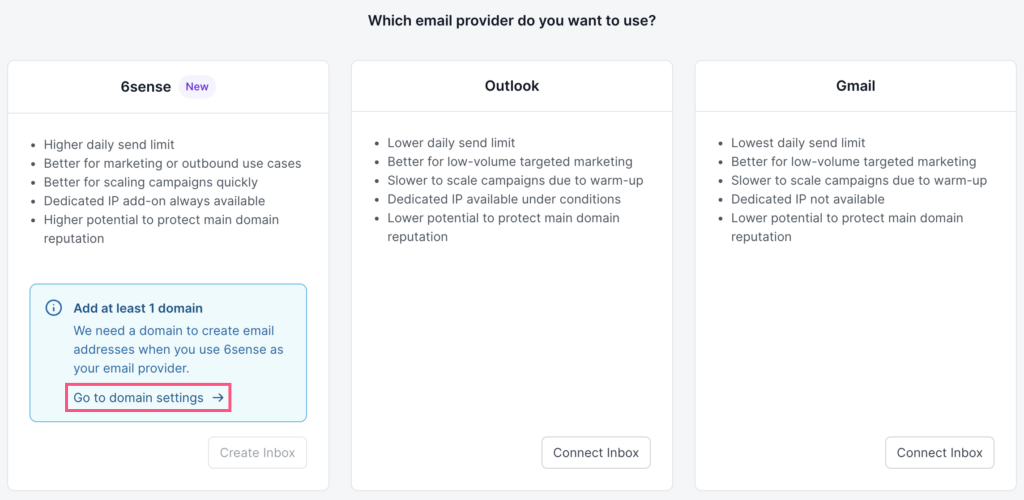
On the Domains page, enter your subdomain. For example, email.company.com, www.company2.com, inbox.company.io.
Note: Avoid using your primary domain such as www.company.com, especially if it’s used by Outlook, Gmail, or any other email service provider. This is to prevent interference and to minimize any possible risk to the reputation of your primary domain.
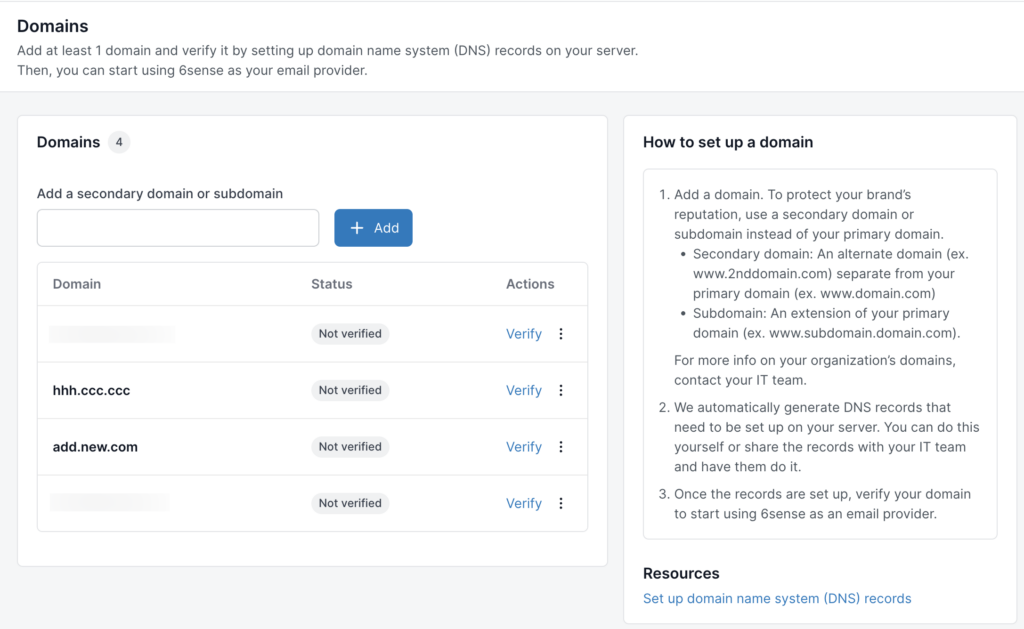
Select Add to add a new domain.
Retrieve DNS records
After you add a new domain, 6sense generates a list of DNS records and opens the Set up DNS records to verify your domain pop-up. DNS records are technical instructions that authenticate your domain for sending and receiving emails.

Record type | Purpose |
|---|---|
SPF | Authorizes 6sense to send emails |
DKIM | Verifies message authenticity through a digital signature |
DMARC | Guides ISPs on handling failed authentication |
MX | Enables email reception and reply handling |
These records are listed as CNAME entries in the setup window.
You can:
Enter an email address to send the records to your IT team.
Download the records as a CSV file and share them manually.
Add DNS records to your host
Provide the generated records to your IT administrator for addition to your DNS host.
It can take anywhere from a few minutes to 48 hours for the DNS records to propagate, depending on your DNS provider. Changes may be visible within 1–4 hours.
You can either:
Keep the setup pop-up open, or
Close it and return later using Do it later.
Verify DNS Setup
Navigate to General settings > Domains.
Locate your newly added domain.
Note: The status of the newly added domain is Not verified.
Select Verify.
If all DNS records are correctly configured:
Status updates to Verified
You may now create and activate AI Email agents. Refer to Set Up an AI Email Agent.
If verification fails:
Double-check DNS entries for typos, extra spaces, or quotation marks.
Wait for DNS propagation.
Select Retry or contact support if the issue persists after 24 hours.
FAQ
Why use a subdomain instead of my primary domain?
Keeps your main domain’s reputation intact; we manage deliverability on your subdomain.
What if DNS records never verify?
Confirm values match exactly (no extra spaces/quotes)
Propagation of DNS records can take time
Retry Verify; if still pending after 24 hrs, contact support
Is any warm-up required?
No. All sends flow through our pre-warmed IP pool. You get enterprise-grade reputation from day one.
What are my hard limits?
10,000/day per inbox
Can daily send limits be allocated across campaigns?
No. Daily send limits are implemented at the Email Agent level, not at the campaign level.
Can we disable old Email Agents?
Yes. You can manually remove old Email Agents. Note: If you remove an AI email agent, the campaign using that AI email agent will be paused. To continue running the campaign, reconnect an AI email agent and turn on the campaign.
Is there a way to move an existing Email Agent (Outlook or Gmail) to 6sense Email?
No. You cannot migrate an existing Outlook or Gmail Email Agent to 6sense Email. Instead, you will need to create a new Email Agent after setting up 6sense Email.
Can leads or contacts be automatically created if cc'd in an email?
Yes, but only within 6sense AI Email.
Can I use a sub-domain being used for another service for 6sense Email?
No. You must use a separate sub-domain for 6sense Email Provider.
What is the trade off of using 6sense Email vs Outlook and Gmail in regards to engagement metrics?
Engagement metrics such as open rate and response rate are typically 5–10 percentage points lower when sending via 6sense Email compared to Outlook or Gmail. From our tests and benchmarks, average opens on Outlook/Gmail were ~40–50%, whereas on 6sense Email they were ~35–45%. Similar drops are expected in reply rates. This is the trade-off for the increased volume we can send through 6sense Email.