The Data Workflows Job Change workflow helps you keep your CRM data up to date by detecting job changes and updating or creating records accordingly. 6sense learns when existing leads or contacts in your CRM have changed jobs and enriches your CRM with new job data or creates a new lead or contact.
Your team can quickly react when a previous user or decision maker has changed jobs to:
Revive dormant deals by re-engaging familiar champions in new roles
Accelerate pipeline with warm introductions into target accounts
Maintain data hygiene with up-to-date employment details
6sense provides two Data Workflow templates for job change scenarios:
Enrich Job Change Data: Automatically updates CRM contact or lead records when 6sense detects a job change.
Create New Lead/Contact in CRM: Creates a new contact or lead in CRM records where a job change is detected.
6sense detects and surfaces job changes only if the change occurred within the last 90 days. For new customers, only job changes detected in the last 90 days (date when 6sense detected the job change) will be available using the Job Change workflow.
Prerequisites
An integrated Salesforce or HubSpot CRM.
Available 6sense credits. Each job change update or new record consumes 1 credit. Refer to Credits Overview.
A special job change mapping profile for the Enrich Job Change Data workflow. You can create custom fields in your CRM for these mappings. Refer Set up the job change mapping profile below.
Considerations
Updates may affect CRM rules
Depending on how your CRM workflows are set up, updated fields could trigger changes.
We recommend that you review your lead scoring and routing logic to align with job change updates.
How inactive or deleted CRM records are handled
If a record is deleted or archived in your CRM, an update will fail gracefully.
6sense will not recreate deleted records unless you have opted into creating new records based on job changes.
How duplicate records are handled
Duplicate record handling is based on your CRM’s duplicate management rules. 6sense will attempt to create a new record, but your CRM settings may merge or block duplicates, depending on your configuration.
Effect on historical data
Updating fields like Title, Company, or Domain does not affect historical engagement or activity records tied to the contact or lead.
When job change data from the past 90 days is available
Job change detection starts once the workflow is enabled for your organization. However, 6sense has been accumulating job change data since April 2, 2025. When you enable an Enrich Job Change Data workflow, 6sense provides job change updates detected within the last 90 days starting from April 2, 2025 onward.
Credit usage
Job change workflows use credits as follows:
1 credit for creating a new lead or contact with new job data
1 credit for enriching an existing lead or contact with new job data
Subsequent actions taken on a record that was created or enriched within a 12-month maintenance window do not incur additional credit charges
There’s no credit charged for using the Update Record node to mark an existing record.
Set up the job change mapping profile
When 6sense detects a job change, 6sense can automatically update the associated contact or lead record in your CRM using an Enrich Job Change Data workflow. This requires a job change mapping profile dedicated to that workflow.
For the job change mapping profile, you select custom fields on the contact or lead object for the new enrichment data. This maintains the integrity of the existing record while giving you the necessary fields to validate, build reports, etc.
We recommend that you create new custom fields on your CRM object for these mappings, however you can use other existing fields if you prefer.
To set up the job change mappings:
Go to Settings > Data Settings > Mapping Profiles > [CRM].
Select the CRM object (contact or lead).
Select the Job Change Mappings (Workflows only) tab.
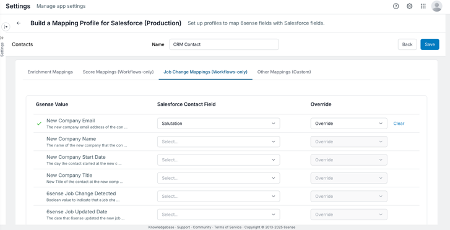
Select the CRM field for the relevant 6sense value fields. Map only the fields you want to update.
New Company Email: New email address.
New Company Name: Name of the new company.
New Company Start Date: The start date of the new position.
New Company Title: New job title.
6sense Job Change Detected: Indicates a job change was detected.
6sense Job Updated Date: Date the job change was detected by 6sense.
Select whether or not you want the workflow to override the fields.
Save the mapping.
Create an Enrich Job Change Data workflow
To create an Enrich Job Change Data workflow:
Go to Data Workflows > Data Workflows.
Select Create. The new workflow page opens.
Select the Job change detection category.
Select the Enrich Job Change Data workflow. The Create Workflow popup opens.
Enter a descriptive name for the workflow.
Select the frequency, how often the workflow runs. While testing you could run it on demand. Later, you could change it to run daily, keeping your CRM records consistently updated.
Select the CRM object to be enriched.
By default the Source System is the CRM that is already integrated.
Select Create workflow. The canvas opens with the default template nodes and flow.
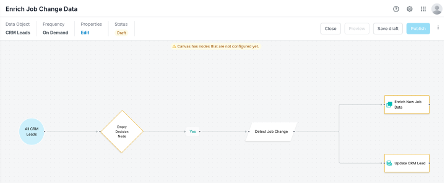
Set filters in the decision node
Use the decision node to narrow down the contacts to be enriched.
Tip: If you want to enrich job change data for all records, delete the node.
To specify conditions for the decision node:
Select the node’s Edit icon. The properties panel opens.
Update the label.
Enter a helpful description for future reference.
Select the Conditions edit button. The Edit Condition panel opens.
Select filters for the object. For example, you could select a subset of them based on the values in your CRM fields:
Job Title contains “Director”
Seniority Level is “Director” and above
Records created or updated within the last year
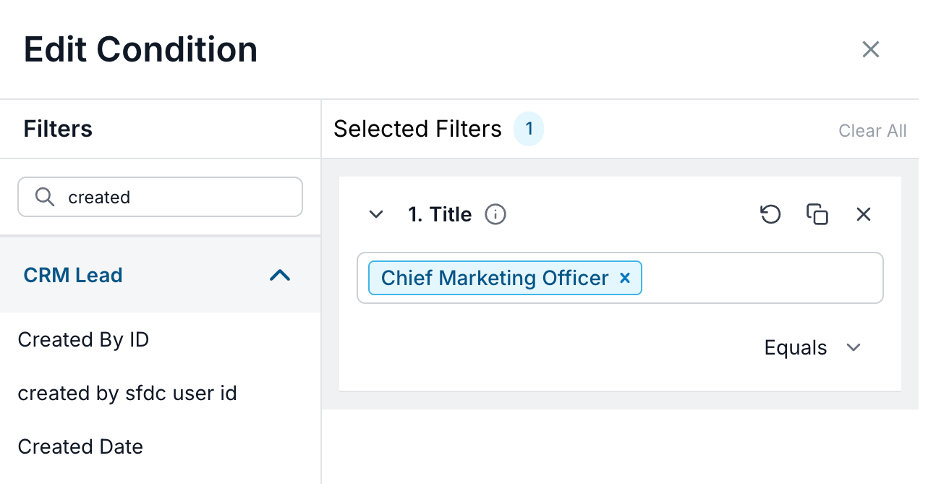
We highly recommend that you select only important contact or lead records to use in the job change workflow. Each job change update and each new record creation consumes 1 6sense credit per update.
Select Apply.
Keep Yes for If conditions are met.
Keep Do Nothing for When conditions are not met, unless you want to add another branch for more complex processing.
Select Save.
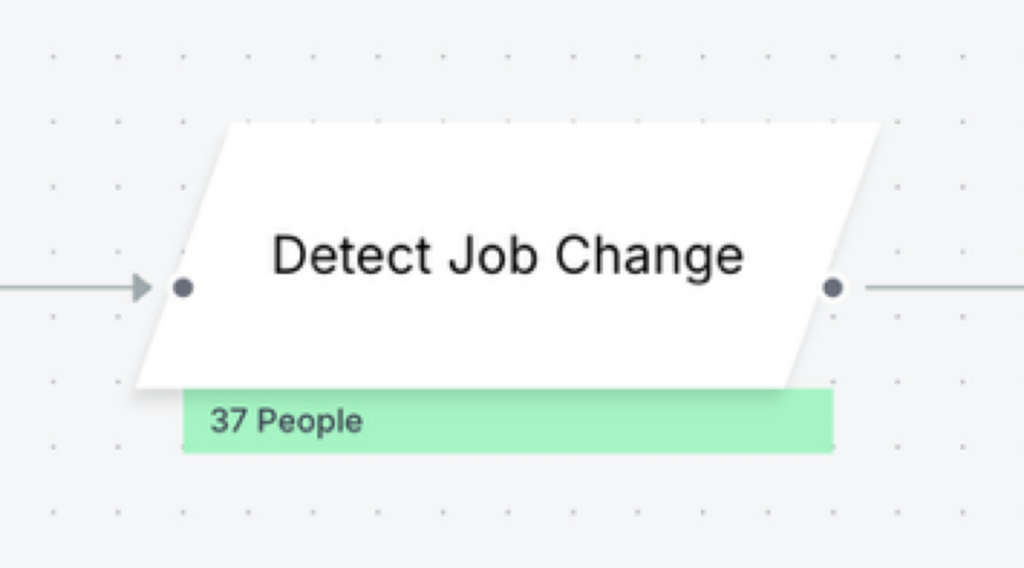
About the Detect Job Change node
The Detect Job Change node activates when 6sense detects job changes. You do not have to change anything for this node.
Set up the Enrich New Job Data node
The Enrich New Job Data node performs the enrichment. It requires the mapping profile.
To set up the Enrich New Job Data node:
Select the node and its Edit icon. The node setup panel opens.
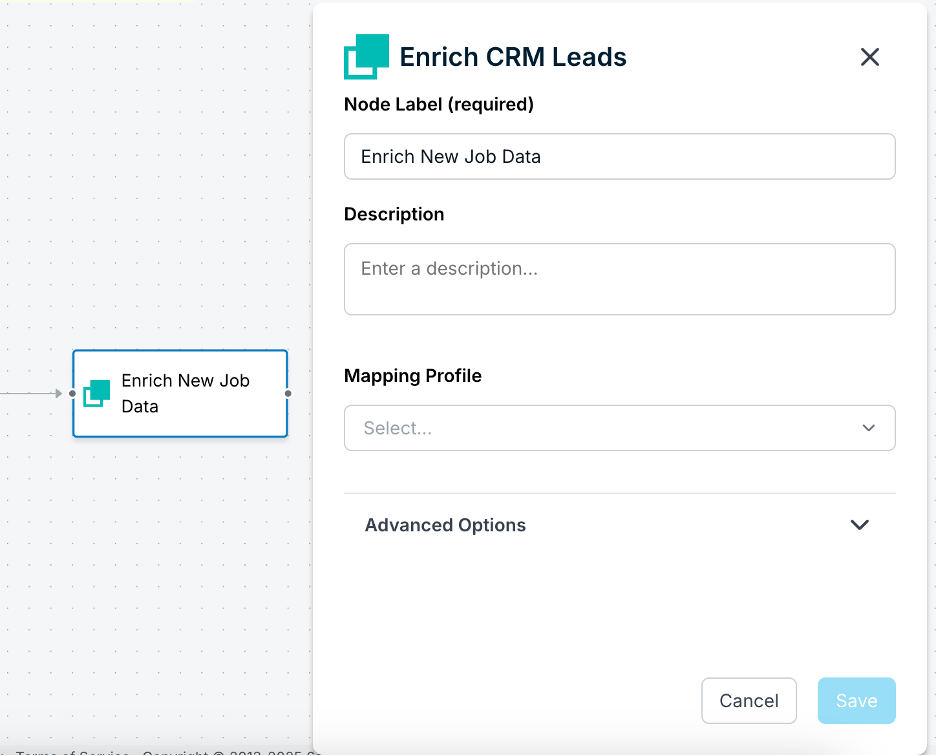
Optionally, update the node label.
Enter a helpful description for future reference.
Select the mapping profile that was created for this workflow. (Refer to the previous mapping profile section.)
Select Save.
Set up the Update Field in the CRM node
Tip: The Update Field in CRM node is optional, if you don’t need to update a field. You can select the node’s Delete (trash) icon to remove it from the workflow.
To set up the Update Field in CRM node:
Select the node and its Edit icon. The node setup panel opens.
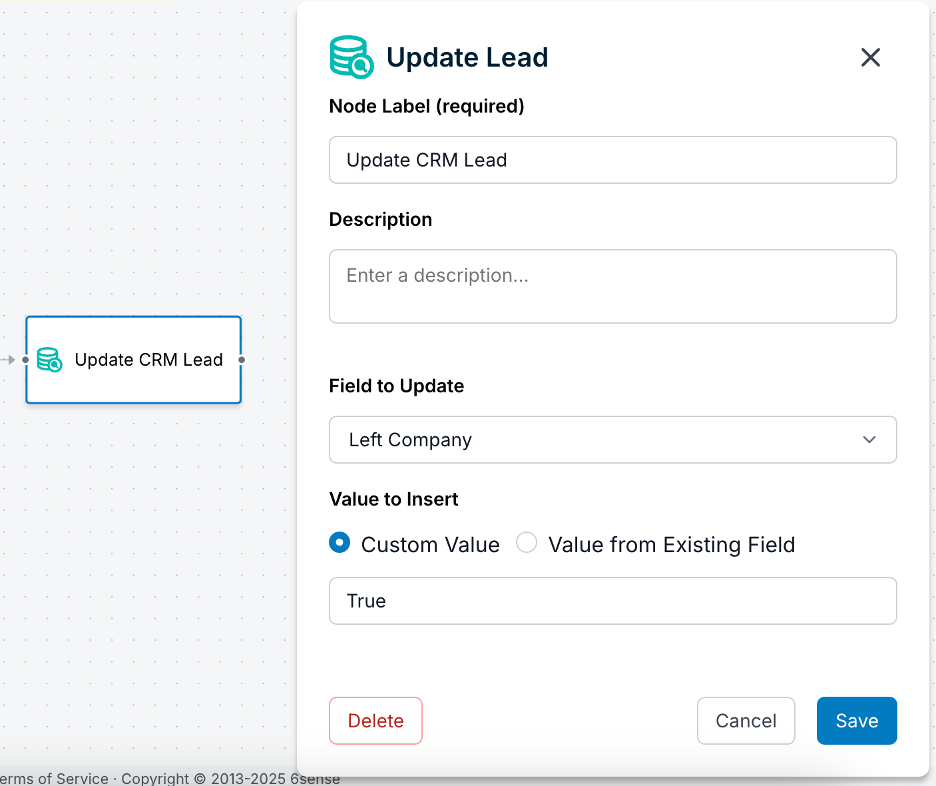
Optionally, update the node label.
Enter a helpful description for future reference.
Select the Field to Update. For example, you could:
Mark the record to designate that the contact or lead has left the company.
Mark the record as job changed detected by 6sense.
Designate it as record that needs to be reviewed by an account owner since a relevant lead/contact has left the company.
Select Save.
Save and preview the workflow
Also refer to Preview a Data Workflow.
At the top right of the canvas, select Save draft.
Select Preview. 6sense starts running the preview.
Tip: The preview may take some time to run. When the preview is done, 6sense send an email.
After the preview runs, notice that the Detect Job Change node displays the number of records it processed.
To see details, select the Detect Job Change node. The Preview popup opens with a list of up to 25 records.
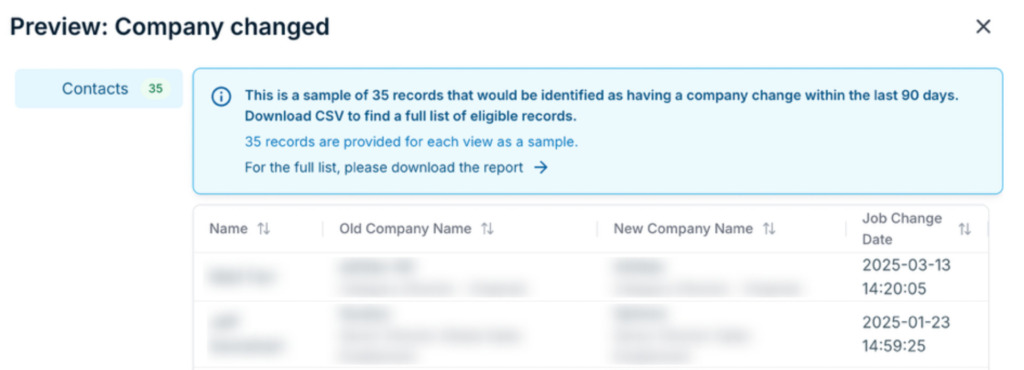
For a complete list of records, download the preview report.
Publish the workflow
When you are satisfied with the preview results and ready to run the workflow:
Update the frequency, if needed.
Select Publish.
Create a create or update leads/contacts in CRM workflow
To create a create or update leads/contacts in CRM workflow:
Go to Data Workflows > Data Workflows.
Select Create. The new workflow page opens.
Select the Job change detection category.
Select the Create New Lead/Contact in CRM workflow. The Create Workflow popup opens.
Enter a descriptive name for the workflow.
Select the frequency, how often the workflow runs. While testing you could run it on demand. Later, you could change it to run daily, keeping your CRM records consistently updated.
Select the CRM object to be enriched.
By default the Source System is the CRM that is already integrated. If you have multiple systems select the relevant one.
Select Create workflow. The canvas opens with the default template nodes and flow.
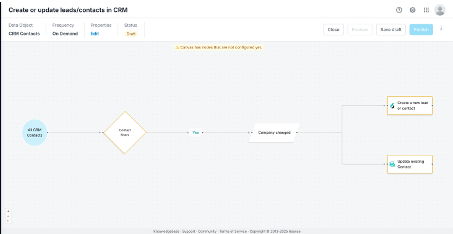
Set up the decision node
Follow the steps in the previous section (for the other template) to:
Update the decision node and add conditional filters.
Keep the Detect Job Change node the same, it doesn’t require configuration.
Set up the Create new lead or contact node
The Create new lead or contact node creates a new lead or contact when 6sense detects a job change.
Refer to Data Workflows Contact Purchase and Save to CRM or CSV Nodes page to learn how records are matched to accounts, and the full list of fields that are exported for new records.
To set up the Create new lead or contact node:
Select the node and its Edit icon. The node setup panel opens.
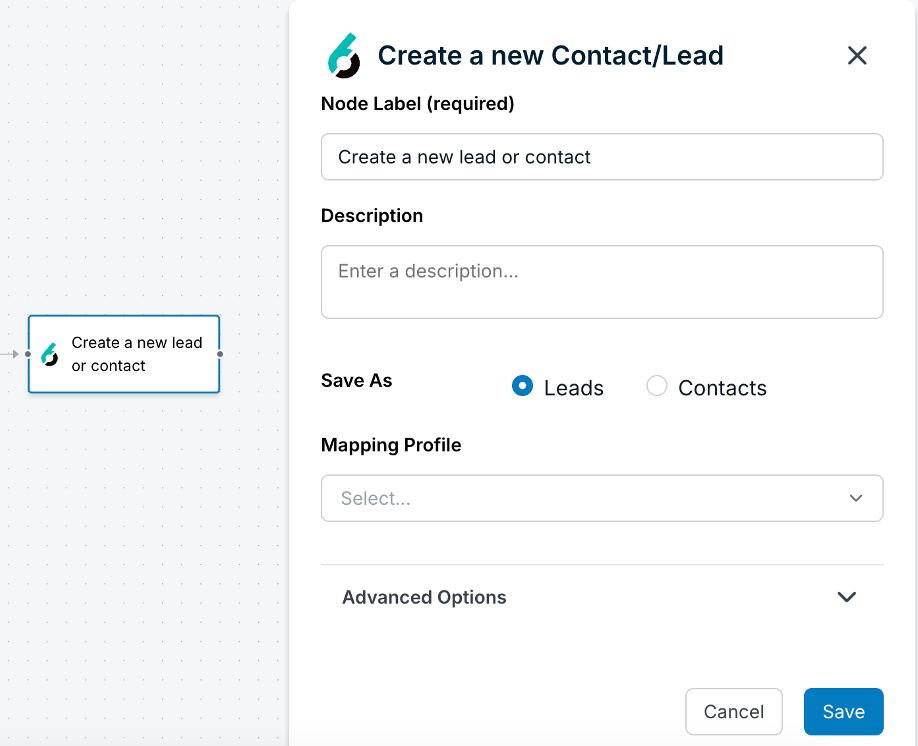
Optionally, update the node label.
Enter a helpful description for future reference.
Select whether to save the update as a lead or contact.
Select the mapping profile. (Use a standard mapping profile, not the special one created for the Enrich Job Change Data workflow.)
Select Save.
Set up the update existing contact node
This node works the same as in the Enrich Job Change Data workflow. Refer to Set up the Update Field in the CRM node above.
Save, preview, and publish the workflow
This node works the same as in the Enrich Job Change Data workflow. Refer to the previous sections. Also refer to Preview a Data Workflow.
Review job change activities
To see what job change records were updated or added:
Go to the Data Workflows > Data Workflows.
From the relevant workflow’s row, select View in the Run History column.