Overview
Tracking Pixels let you track, measure, and analyze engagement from media campaigns that run outside 6sense. Tracking Pixels provide a secure, simplified way to capture impression and click events across external channels and connect that activity back to accounts and buying groups for deeper insights.
With Tracking Pixels, teams can see which accounts are being reached, how those accounts engage, and how media exposure correlates with downstream website activity—without complex redirects or vendor‑specific implementations.
Key benefits
Validate account reach. Confirm which target accounts were reached by campaigns created on external platforms.
Identify active accounts. Find accounts showing visits, engagement, or opportunity activity during media exposure.
Analyze overlap. Compare accounts exposed to ads with those that later visited your website.
Build segments from Tracking Pixels insights.
Create segments using Tracking Pixels‑based signals.
Automate workflows with Tracking Pixels‑driven segments.
Sync segments to external advertising platforms, or use them directly for display targeting within 6sense.
Deeper ABM insights. Example metrics include: Accounts Reached, Account Visits, Accounts Engaged, 6QA / New 6QA, Form Fills, Opportunities.
Multi‑vendor support. Use Tracking Pixels across different external media platforms with a consistent setup and measurement model.
Security and reliability. Eliminate redirect‑based tracking to reduce risk and implementation complexity.
Tracking Pixels format and compatibility
Most advertising platforms support third‑party tracking pixels, but capabilities vary. Always confirm whether your platform supports third‑party pixels, which event types it accepts (impression or click), and what formats are allowed.
6sense Tracking Pixels use a universal 1×1 image (GIF) pixel.
Each pixel tracks one event type (impressions or clicks).
The image loads when the configured event occurs and sends a signal to 6sense for processing and reporting.
Important
Platform support and implementation requirements may vary. Validate compatibility with your ad platform before deployment.
Pixel URL example
https://t.6sc.co/img.gif?event=imp&pid=XXXXXXXXXXXXXXX
A 6sense‑generated Tracking Pixel URL delivered as a 1×1 image for measuring external media activity on supported advertising platforms.
URL components
Base URL:
https://t.6sc.co/img.gifA 6sense‑owned tracking endpoint that returns a transparent 1×1 GIF. Loading this image triggers a tracking request without impacting the ad creative.
event
event=imp → track impression events
event=clk → track click events
Each Tracking Pixel is configured to track a single event type.
pid
pid=XXXXXXXXXXXXXXX
A unique 6sense pixel identifier that associates incoming events with the correct Tracking Pixels configuration.
Optional: cache buster
If supported by your ad platform, append a cache‑buster macro to prevent caching by browsers or ad servers and ensure each impression or click triggers a distinct call.
https://t.6sc.co/img.gif?event=imp&pid=XXXXXXXXXXXXXXX&cb={PLATFORM_MACRO}
cb represents the cache‑buster parameter.
Replace {PLATFORM_MACRO} with the cache‑buster macro your platform supports, for example, {CACHEBUSTER}, {RANDOM}, or a vendor‑specific token.
Set up Tracking Pixels
Step 1: Create a pixel
Advertising → Tracking Pixel → Create Pixel
Select Create Pixel.
Enter a pixel name in the Pixel name field that clearly identifies its purpose. For example, campaign, placement, or channel.
Choose the Pixel event type:
Impression — fires when an ad or asset loads
Clicks — fires when a user clicks a tracked link
Note: Create one pixel for Impression and a separate one for Clicks to maintain clean event-level reporting.
(Optional) Add up to 10 tags to help organize and manage pixels. You can select an existing tag from the dropdown or type to create one manually. Use commas to separate multiple tags. For example, CM360 Q1 Campaign, EMEA.
(Optional) Enter pixel description.
Select Create Pixel to generate the pixel code.
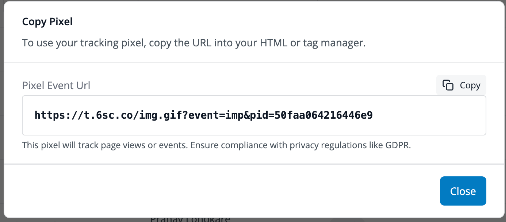
Once generated, copy the pixel URL:
To copy your tracking pixel:
In the Copy Pixel dialog, locate the Pixel Event URL field.
Select Copy to copy the full URL to your clipboard.
Note: If you close this dialog before copying the pixel, you can still copy the Pixel Event URL from the Tracking Pixel page.
To do this, go to Advertising → Tracking Pixel, select the pixel name, and copy the URL from the Pixel details panel.
Paste this URL into your HTML, tag manager, or your external advertising platform’s third‑party pixel field, depending on your deployment method.
Note: Some advertising platforms support only a tracking URL, while others require an HTML image tag. Use the format that matches your platform’s requirements:
* Use the Pixel URL if the platform accepts third‑party tracking URLs.
* Use the HTML <img> tag if the platform requires HTML, custom code, or explicitly mentions an image pixel format.
Example HTML image tag: <img src="https://t.6sc.co/img.gif?event=imp&pid=XXXXX" width="1" height="1" />
Tip
If your ad platform documentation mentions “image pixel,” “HTML,” or “custom code,” choose the HTML image tag option.
If it mentions “third‑party tracking URL,” use the URL version.
Select Close when finished.
Step 2: Deploy the pixel
Place the pixel in the correct location according to your ad platform’s requirements.
Impression Pixel
Deploy on ad landing pages, creative templates, or external media placements that support impression tracking.
Fires when the page or asset loads.
Click Pixel
Deploy on click‑through URLs, redirect links, or ad platforms’ click tracking modules.
Fires when a user clicks the creative.
Cache Buster (Optional, but recommended)
Add
&cb={PLATFORM_MACRO}to the pixel URL if your ad platform supports cache‑buster tokens.Prevents caching and ensures every event triggers a unique tracking call.
Each ad platform handles third‑party pixels differently. Always validate platform compatibility before deployment.
Once the pixel is deployed, the pixel automatically captures activity when traffic flows through the tracked creative.
Step 3: Verify pixel activity
After you deploy the pixel:
Allow time for traffic to flow through the creative.
Once the impression or click pixel fires, activity will begin appearing in the Reports page.
No additional activation steps are required — pixel events automatically sync to the Pixel Activity.
Step 4: Open the Pixel Activity
Reports → Campaigns → Pixel Activity or Advertising → Tracking Pixel → Pixel Activity
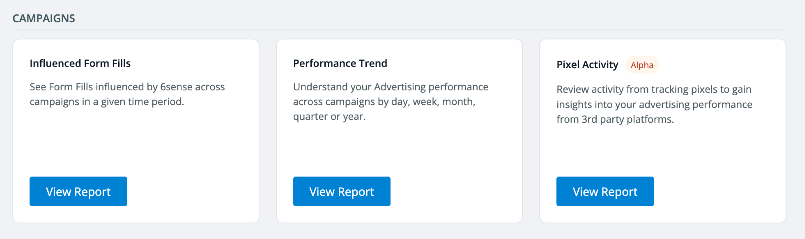
View consolidated pixel activity and account‑level insights.
Metrics reflect only events within the selected time frame and include only accounts with pixel activity.
Reporting is account‑level.
Step 5: Interpret trends and signals
Use the Pixel Dashboard to understand how accounts are interacting with your external media campaigns over time. Review changes in key metrics to:
Identify active and surging accounts that are showing increased impressions, clicks, visits, or engagement signals.
Understand lift driven by external media, such as whether exposure aligns with increased website activity or deeper engagement.
Spot drop‑offs or spikes in account activity that may indicate campaign performance changes, targeting shifts, or creative impacts.
Prioritize accounts with overlap, where ad exposure and on‑site engagement occur within the same time window.
Pixel Activity: Reporting metrics and definitions
.png)
Navigation: Advertising → Tracking Pixel → Pixel Activity or Reports → Campaigns → Pixel Activity
The Pixel Activity consolidates activity from your tracking pixels to help marketing and ABM teams identify active accounts, monitor engagement trends, and gain directional insights for optimization and reporting.
All metrics reflect pixel events within the selected time frame.
Only accounts with pixel activity in that period are included.
Reporting is account‑level only (not user‑level).
View options
You can select how pixel activity is displayed using the Dimension dropdown.
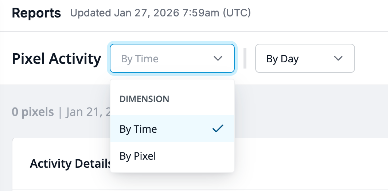
By Time
Shows how activity trends change over the selected date range.
Useful for analyzing:
Daily or weekly impression and click patterns
Spikes or drops in activity
Engagement lift during external campaigns
Timing alignment between media exposure and website visits
By Pixel
Shows activity broken down by each individual pixel.
This view helps you:
Compare performance across campaigns, creatives, or platforms
Identify which pixels drive the most impressions or clicks
Spot underperforming placements or audiences
Evaluate experiment‑ or channel‑level differences
Metric Selector: Impressions and Clicks
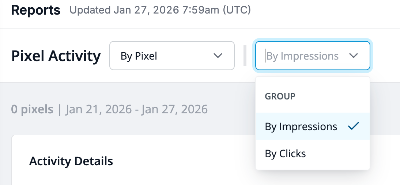
Use the metric selector. For example, By Clicks, By Impressions to toggle the dataset you want to analyze.
Impressions — Understand ad delivery volume
Clicks — Measure deeper engagement or action on the creative
Both metric views reflect account‑level activity, not user‑level interactions.
Filters
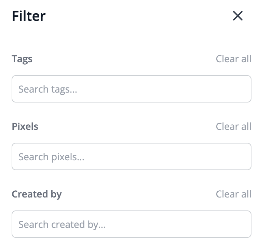
Select Filter to refine the dataset shown.
You can filter pixel activity by:
Tags
Search and filter by any tag applied during pixel creation.
Examples include:
Channel:
Display,Video,CTVPlatform:
CM360,DV360,TTDRegion:
EMEA,NA,APACObjective:
Awareness,ABM,Retargeting
Filtering by tags helps isolate results for a specific campaign type, region, or platform.
Pixels
Filter by one or more specific pixels to analyze individual campaign or placement performance.
Created By
Filter results by the person who created the pixel.
Useful for large teams or shared media operations.
Metrics and definitions
Impressions — An impression is logged when the ad renders on the page and the impression pixel loads successfully.
Clicks — A click is recorded when an account clicks an ad and the click pixel fires.
Accounts Reached — Accounts with ≥1 pixel event (impression or click) during the selected time frame.
Accounts Engaged — Visited accounts that interacted on your site (for example, video plays or link clicks).
Account Visits — Reached accounts that also visited your website in the same time frame.
Account Form fills — Reached accounts that submitted a form during the time frame.
6QA — Reached accounts that were in active 6QA status at any time during the time frame.
New 6QA — Reached accounts that became a 6QA for the first time during the time frame.
All opportunities — Reached accounts linked to relevant CRM opportunities that were open at any point during the time frame.
New opportunities — Reached accounts linked to CRM opportunities first opened during the time frame.
Use Tracking Pixels data for directional insights and influence analysis. It’s not a replacement for ad‑platform delivery or billing metrics and does not provide user‑level attribution.
Important limitations
When reviewing Tracking Pixel data in 6sense, keep the following limitations in mind to ensure accurate interpretation:
Only accounts with pixel activity are included.
Reporting shows only accounts that generated at least one pixel event during the selected timeframe. Accounts without pixel activity are not displayed.Metrics reflect activity only within the selected date range.
Reports show impression and click events that occurred during the chosen timeframe, regardless of when the pixel was created or first deployed.Pixel data retention is limited to 24 months.
Historical pixel data is stored for up to 24 months and may not be available beyond that window.All reporting is account‑level, not user‑level.
Pixel activity is attributed to accounts, not individuals. Metrics are intended for directional insights and influence analysis, not deterministic or user‑level attribution.Works only where third‑party pixels are supported. If an ad platform or placement does not allow third‑party image pixels, the pixel will not fire and no events will be tracked.
Coverage depends on identity resolution. If 6sense cannot resolve the pixel event to a known account, for example, unknown visitor/IP, some exposure will not map to an account.
Does not replace full ad‑platform metrics. Tracking Pixels do not capture delivery or billing metrics such as impressions, clicks, spend, frequency at the user level. Continue using your ad platform’s reporting for those insights.
Incorrect placement reduces accuracy. Inconsistent or incorrect placement across creatives, campaigns, or experiments will cause incomplete or misleading reporting.
Only supports 1×1 image pixels (GIF). Tracking Pixels do not support JavaScript‑based or HTML script tags; only image‑based pixel placements are allowed.
Best practices
Pixel creation and setup
Create separate pixels for impressions and clicks to keep reporting clear.
Use one pixel per campaign or experiment where possible to simplify analysis and troubleshooting.
Confirm the ad platform supports third‑party 1×1 image pixels and the required event type before deployment.
Ad platform configuration
Verify your platform’s third‑party pixel support and which events it allows (impressions and/or clicks).
Implement the pixel exactly as generated by 6sense; avoid modifying the URL or parameters.
Add a cache‑buster macro, if supported, to prevent caching and ensure accurate firing.
Ongoing management
Maintain consistent naming so pixels clearly align with campaigns and reports.
Avoid reusing the same pixel across unrelated campaigns.
Use tags to organize and manage at scale (Channel, Platform, Region, Objective).
Examples:
Channel: Display, Video, CTV
Platform: CM360, DV360, TTD
Region: NA, EMEA, APAC
Objective: Awareness, ABM, Retargeting
Reporting expectations
Use Tracking Pixels data for directional insights and influence analysis, not deterministic attribution.
Interpret results at the account level.
Platform support by provider
Tracking Pixels work only on advertising platforms and placements that support third‑party 1×1 image pixels. Support varies by provider, campaign type, placement level, and event type (impression or click).
For a detailed, provider‑by‑provider breakdown—including impression and click support, placement level, and implementation requirements, refer to Tracking Pixel Provider Compatibility Matrix.