In AI Email (AIE), you can customize the following:
An AI email agent by adding an email signature and a BCC email address.
Flexible business hours for AI email agents.
(AI email agents were formerly called “AI Assistants” and “AI inboxes”.)
Customize an AI email agent signature
The AI email agent’s signature is appended to each outgoing email from the AI email agent when AIE sends an email.
Prerequisites
Connect an email provider email account to AIE. Refer to Connect an Email Provider Email Account to an AI Email Agent.
Add the signature
To add an AI email agent signature:
Go to the AI & Sales Rep Settings page (the robot icon on the top right).
Open the Add a Signature section.
Add text, formatting, and images, and a job title.
We highly recommend adding an Unsubscribe option in your signature that says “If you would like to stop receiving these emails, please reply back unsubscribe.” The AI email agent can categorize unsubscribed contacts so you can avoid emailing them in the future. Check with your marketing team regarding your company’s compliance practices.
Note: For 6sense Email Provider, the unsubscribe link is enabled by default and cannot be turned off. However, you can customize the unsubscribe text to match your brand tone and messaging.
Preview the signature
When you edit your conversation flow and touchpoints, the preview section shows what the signature looks like alongside the outgoing emails.

Tips:
If you added a signature for the email user account in your Gmail or Outlook settings, the signature won’t be imported to AIE.
The email signature added in the AI email agent settings is used when you send an email using AIE. If you log in directly to the email user account in Gmail or Outlook and reply email directly to your contacts from there, the signature applied will be the signature saved in Gmail or Outlook settings, not the signature saved in AIE.
Add a BCC email address
You can add a blind-carbon-copy (BCC) address to all your AI email agent’s outbound emails, such that:
All outbound emails are sent to your CRM.
All qualified emails are sent to a specified recipient (in addition to the sales rep).
To customize your BCC preferences:
Go to AI & Sales Rep Settings (the robot icon at the top right).
Scroll to Add a BCC email address.
Enter one email address per option.

Tip: Ensure that the email address is whitelisted by the receiving inbox in BCC. This prevents automatic replies which will disrupt these email threads.
Customize Flexible Business Hours for AI Email Agents
Overview
You can set custom business hours for your AI Email agent to send emails. The flexibility helps your AI inbox operate in alignment with your global business hours and regional customer engagement windows.
Note: Replies to emails are sent immediately to respond to the lead as quickly and promptly as possible. Replies are not affected by business hours, custom hours, or holidays.
With flexible AI hours customization, you can:
Select any combination of days for your AI to operate, including weekends.
Set custom start and end times for each day.
Apply different hours across different weekdays.
Configure business hours in your preferred time zone.
Exclude specific holidays to pause AI activity automatically.
Customize flexible business hours
Sign in to the 6sense platform.
Go to AI inboxes > Business hours.
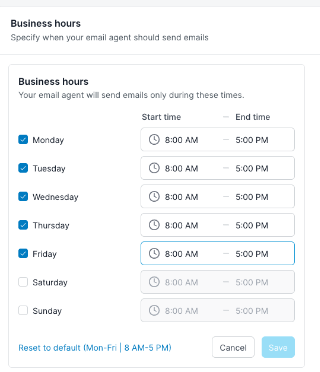
In the Business hours section, select Edit.
Check the days you want the AI to send emails. You can enable or disable each weekday, Saturday, and Sunday.
Set a Start time and End time for each selected day.
Note: You can customize each day individually. For example, 8:00 AM to 5 PM on weekdays and 10:00 AM to 1:00 PM on weekends.
Use the Reset to default link if needed to return to the standard Mon to Fri, 8 AM to 5 PM schedule.
In the Time zone section, select the appropriate time zone for your AI’s activity.
In the Holidays section, add any dates you want the AI to pause AI activity.
Select Save.