The AI Email (AIE) integration with Salesforce simplifies connecting with new leads using AIE. You can link a Salesforce report directly to an email campaign. This setup automatically checks for new leads and adds them for you, reducing manual effort and giving you more time to focus on important tasks.
For additional details, refer to AI Email – Salesforce Integration Details and Requirements.
You can also use a Salesforce sandbox if you want to test the functionality. The following instructions cover both active, production account and sandbox account installations.
Prerequisites
To integrate with AIE, your Salesforce account must have certain permissions. Refer to AI Email – Salesforce Integration Details and Requirements and AI Email – Salesforce Object Integration Permissions. Also refer to the Salesforce user permissions documentation.
Step 1: Configure AIE settings
Before connecting a Salesforce report, ensure your AIE team or Administrator has already:
Step 2: Connect AIE to Salesforce
In AIE, go to Account Settings > Integrations.
Locate the Salesforce or the Salesforce Sandbox tile and select Not Connected.


Log in with the desired Salesforce account and connect. Refer to Connect Salesforce to AI Email using OAuth.
Salesforce recommends you set up a separate API User for granting access.
Step 3: Install AIE packages into Salesforce
On June 10, 2025 AIE released a new package on the Salesforce App Exchange.
Install package from the Salesforce App Exchange
Salesforce now uses a trial-based process for AppExchange installations. The previous Get It Now → Install in Sandbox flow is no longer available.
Install AIE packages in a Salesforce Sandbox
Go to the AIE package listing on AppExchange.
Select Try It.
Choose the trial type:
Sandbox or Other Org, then select Continue to Installation.
Select Log In & Install, and sign in to your sandbox org.
Choose the user access level:
Admins Only, All Users, or Specific Profiles.
Review any additional resources.
Select Install to complete the process.
For more information, refer to Salesforce Article.
Step 4: Set up a Salesforce report
Set up a valid Salesforce report. Refer to the Salesforce Report documentation.
For details about the supported report types, refer to AIE – Salesforce Integration Details and Requirements.

If you don’t see 6sense supported report types in the search list, go to Setup > Report Types > Add new custom report type.

For more information see the Salesforce Report documentation.
Step 5: Connect your report to an email campaign
After you set up your Salesforce report, connect it to an email campaign:
In AIE, go to the Campaign you wish to connect.
In the campaign, select the Integrations tab.
Select Set Up Auto Enrollment.
Select the Salesforce Report to connect.
Note: When you select a Salesforce report, you’ll now see a preview of the number of contacts and filters detected before linking the report to your campaign.
.png)
Select the number of filters to view the actual filters detected from the report.
Ensure the number of contacts and filters matches your expectations.
If there are any issues (unsupported format/type, too many filters, missing permissions), you’ll see a clear error message.
Common Error Messages and Fixes:
Error Message
Fix
Unsupported report format. Contact the report creator to change its format to tabular, summary, or matrix.
Change report to tabular, summary, or matrix format
Unsupported report type. Contact the report creator to change it to a supported report type.
Change to a supported report type
Report already linked to another campaign.
Select a different report
Report must have 19 or fewer filters. Remove some and try again.
Reduce filters to fewer than 19
We don’t have access to all filters in this report. Contact your Salesforce admin.
Contact your Salesforce admin to provide access
Preview the AI email agent’s introductory emails with sample data from the report.
Note: Each report can only be connected to one AIE campaign. If your report is already connected, AIE displays the error “We can’t enroll this report. The report is already being used in another campaign”. Please select another report, or create a new report for the campaign.
Step 6: Review your leads and campaigns
The leads from the Salesforce report are enrolled automatically in the selected AIE campaign and reflected in the campaign’s Report Records.

You can turn off the auto enrollment anytime in the Integration Settings.
To review all leads imported and enrolled, go to Enrollment History.
You can also download a file of leads with import error to re-import them through our CSV.
Step 7 (optional): Let AIE push updates to Salesforce
If you would like AIE to send conversation statuses and emails sent/received by the AI email agent to Salesforce, toggle on the option in AI Email > Integrations > Sync settings. This setting is on by default.
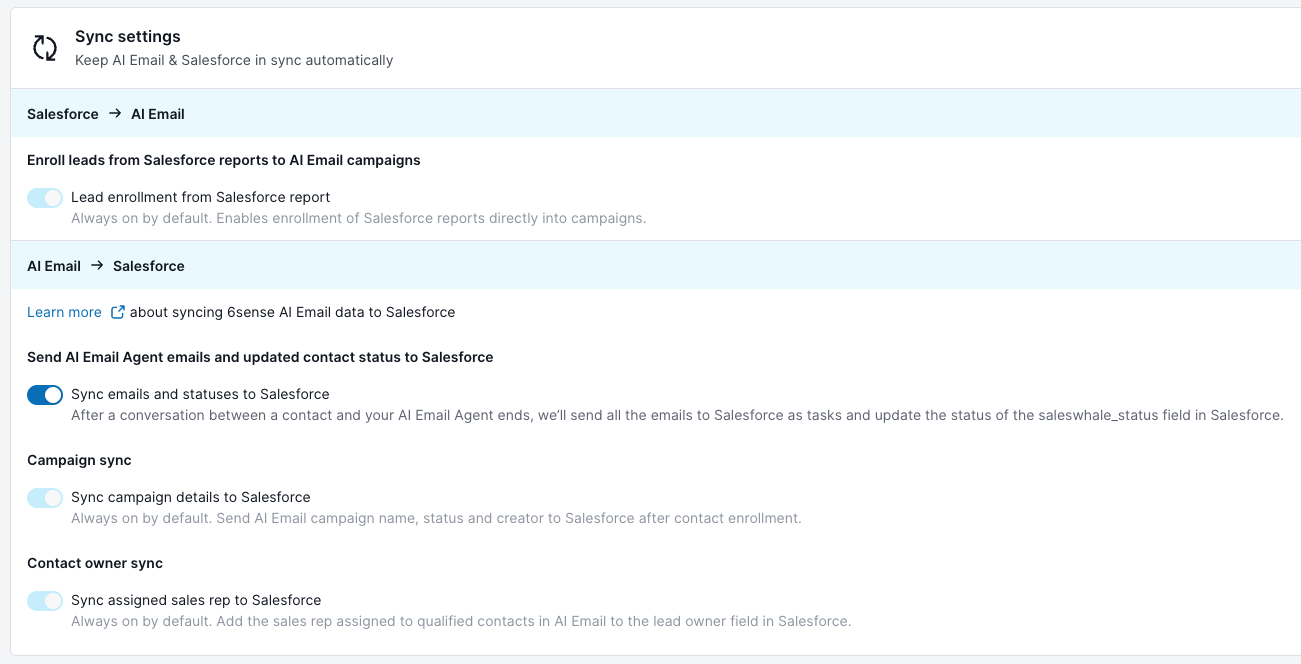
When the toggle is on, AIE sends:
Conversation statuses to the custom AIE Status field in Salesforce that you previously installed in Step 3. Refer to AI Email Conversation Statuses.
Emails sent and received are recorded in Salesforce Task objects. The Task Type list must be visible and accept the value “Email” for this to be successful.
When the AI email agent marks a lead as “Do Not Contact”, AIE can also send this information to Salesforce. Refer to Sync Do Not Contact Records Between Salesforce and AI Email.
After you’ve completed the previous steps, the AI email agent engages with the leads from your campaigns and starts the conversations.
FAQ
Can I integrate a different CRM with 6sense AI Email or does it have to be the same CRM across the 6sense Platform and 6sense AI Email?
You need to use the same CRM across the entire 6sense Platform and 6sense AI Email.
What data does 6sense use if job title, seniority, or function is not available in CRM?
If these fields are missing in your CRM, AIE automatically sources the data from the 6sense platform. 6sense enriches lead and account details using trusted third-party data providers.