Decision nodes provide condition filters that specify the kinds of accounts you want to run through an Audience Workflow. The conditional filters are the same as are used to define a 6sense segment. You can use a decision node anywhere in a workflow.
Think of decision nodes as “if” statements, while action nodes are like “then” statements.
You can chain decision nodes together for sophisticated filtering.
Types of decision nodes include:
True/False (Boolean)
Branching
Decision node conditions and filters
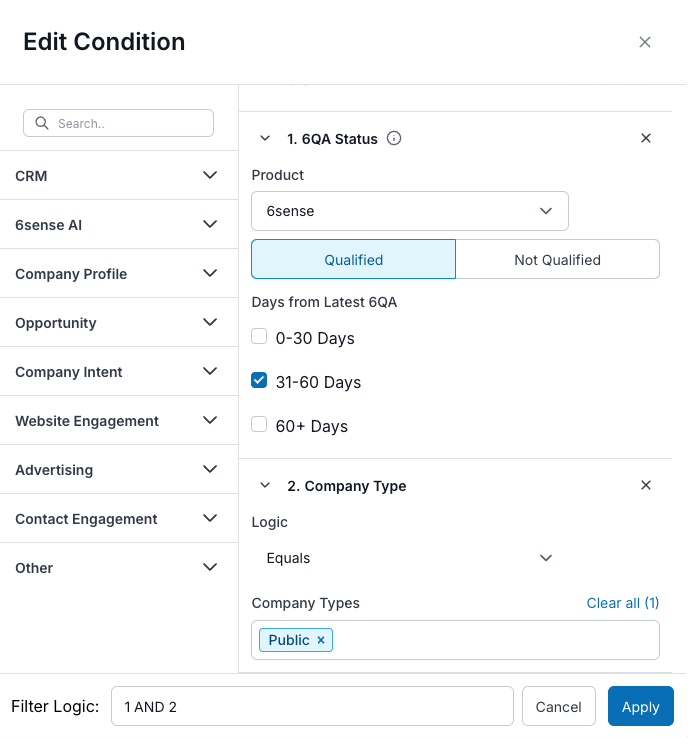
All decision nodes use the Edit Condition panel to apply filters for each condition of the decision. It provides a range of 6sense, CRM, and MAP filters, depending on how your instance is configured.
Tip:
Decision nodes are account-specific much like 6sense segments. This means that even if you select a people-specific filter, the decision node returns the accounts that have people who meet the people-specific filter criteria.
Edit Conditions panel example
6sense groups filters into categories. Each filter has its own properties or sub-filters.
Multiple filters and filter logic
You can add more than one filter to a condition and apply them in a specified order.
You can order them by the Filter Logic entry. By default, the first filter you create is labelled “1”. If you need to change the order of when 6sense applies the filters, change the Filter Logic entry. Filter logic also supports operators such as AND.
Apply conditions
The Apply button sets the conditions on the decision node, and you can specify what happens when the conditions are met.
True/False (Boolean) decision nodes
A True/False (Boolean, either/or) decision node specifies a set of conditions that an account, incoming on the workflow from the segment or a previous node, will either meet or not meet. As a result of the conditions, a True/False node creates two outbound paths, labelled “Yes” or “No”.
True/False node properties
Select the node and click its Edit (pencil) icon to open the Node Properties panel. The panel has the following settings:
Node Label: the default is “True/False”. We suggest you rename it to better represent the conditions you set.
Description (optional): a text field. For future reference, we suggest you enter a description of the node.
Conditions:
If there are existing conditions, the panel displays them.
If there are no conditions, the Add Condition button opens the Edit Condition panel and displays the conditions available for this type of node, such as 6QA Status, Account Buying Stage, and more. You specify the conditions for accounts to meet to qualify in the True (Yes) path. See Decision Node Conditions and Filters.
After you apply a condition to a node, the Node Configuration panel shows the new conditions.
You can rename the If conditions are Met text to something that makes sense for your workflow. By default, the text says “Yes”.
The When conditions are Not Met option lets you either end the processing for that condition, that is, Do Nothing, or you can Add Another Branch to the node to use as a False (No) path. If you select Do Nothing, the canvas does not display that path.
Branching decision nodes
Branching decision nodes allow you to specify multiple sets of conditions. Accounts can qualify in any one branch.
Tip: If an account qualifies for multiple branches, it will only be considered in the highest branch, so set up the branches according to your priority.
Branching node properties
Select the node and click its Edit (pencil) icon to open the Node Properties panel. The panel has the following properties:
Node Label: the default is “Branching”. We suggest you rename it to better represent the conditions you set.
Description (optional): a text field. For future reference, we suggest you enter a description of the node.
Branches: a set of conditions.
After you set a condition, it displays in the Branching properties Branches section.
You can label each branch with a new name.
The Add Branch button lets you define another branch’s conditions.
The When conditions are Not Met option lets you either end the processing for that condition, that is, Do Nothing, or you can Add Another Branch to the node to use as a False (No) path. If you select Do Nothing, the canvas does not display that path.
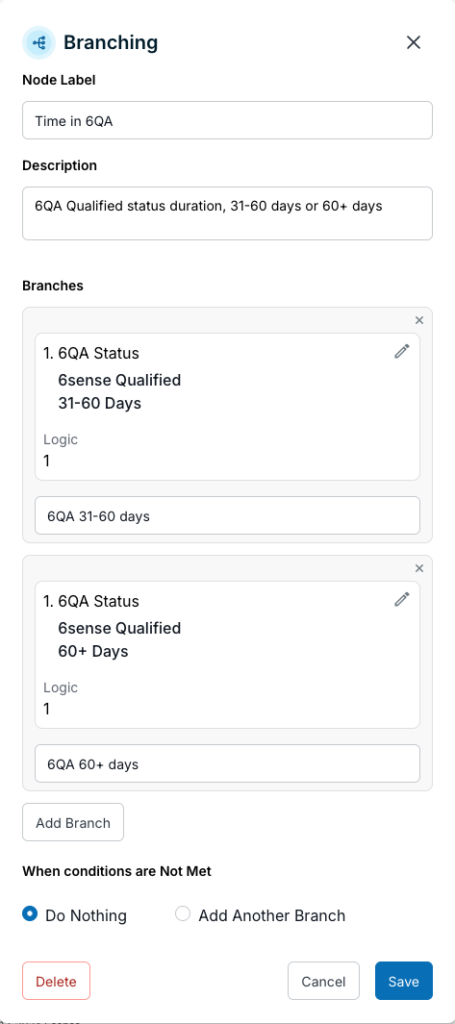
Branching properties example
The following image shows properties for a simple branching based on how long an account has been qualified as 6QA.
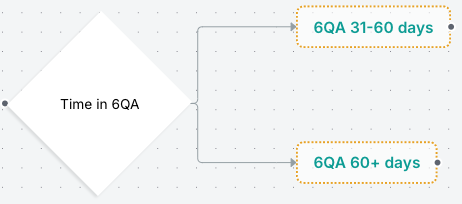
The saved node in the workflow, based on the setup above, looks like this:
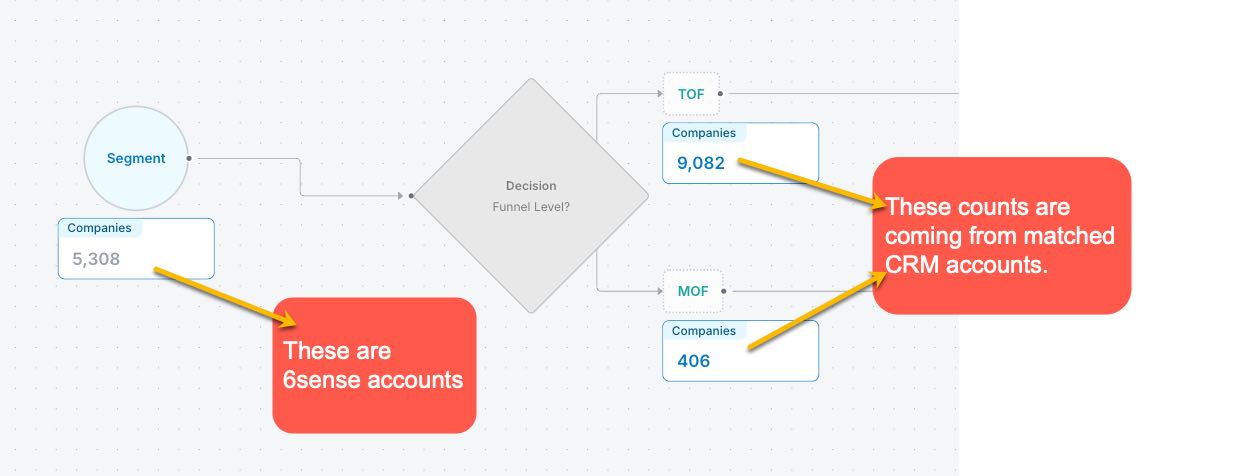
Decision node preview account totals
Account totals between decision node preview counts and segment totals may be different.
When you run a preview of a workflow, decision node preview counts are based on the total number of matched CRM accounts. As a result, this count may appear higher than the segment total. The segment account total is derived from 6sense accounts.
For more about previews refer to Preview an Audience Workflow.
Document changelog
Mar 24 2025: General Availability
1st Published Jan 15 2025: Beta