You can generate previews for certain nodes in the Data Workflow canvas. Use Data Workflow previews to make sure you are enriching the correct data, or creating the right new accounts and contacts. Previews are also helpful for estimating the number of credits a workflow may consume.
Previews are available for all nodes leading up to a timer node. Previews are not available for nodes that follow a timer node.
Previews can run with only a starting segment and at least one configured node. Incomplete or orphaned nodes are skipped, so you can test and visualize workflows as you create them.
Data Workflow previews can take some time to complete depending on the number of records being processed. You cannot edit a workflow’s canvas while it is generating a preview.
Create a Preview of a Data Workflow
To create a preview of a Data Workflow:
In Data Workflows, open a workflow’s canvas.
Make sure the workflow is saved as a draft.
Select Preview.
6sense prompts you to confirm that you will wait for the preview. Click Continue, or Cancel if you change your mind.
While 6sense generates the preview, it displays the Preview Generating popup on the workflow’s canvas. You cannot edit a workflow’s canvas while it is generating a preview. If needed, you can cancel the preview.
6sense generates the preview and sends you an email notification when it is completes.
Check your email inbox for a message that says the preview is ready, and select View Preview. 6sense opens the preview in Data Workflows.
On the canvas, nodes that have a preview are highlighted. Nodes that do not have a preview are grayed out. Select any highlighted node to see more about its preview.
Preview counts of records to be processed
Information below relevant node show you the expected count of the records processed through each node and branch.
You can make a quick assessment of whether your filters are configured properly depending on if the volume at each node meets your expectations.
Select a node in a preview to review a detailed report of what records will be processed. The example Preview popup below shows 35 records (standard limit) from a node. Click through the pages to see the preview listings.
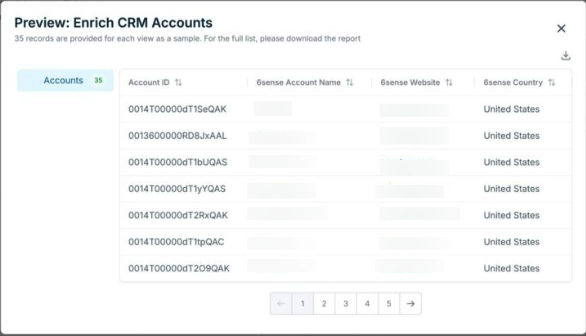
(Optional) Select the Download icon in the upper right corner to download the full preview file in CSV format.
To exit the preview, at the top right of the canvas select End Preview.
Make any adjustments if needed to your workflow, and iterate until you’re ready to select Publish.
Document changelog
Feb 10 2026: New functionality: previews can skip nodes that are not configured.
Nov 7 2025: New preview counts available for all nodes leading up to timer nodes.