This page describes the basic setup of a Data Workflow.
For an example, refer to Data Workflows Account Enrichment Example.
Data Workflow prerequisites
Your 6sense user account must be that of a Primary Administrator, Workflow Administrator, or RevOps User to create a Data Workflow.
Action nodes that process accounts to integrated CRM systems require that the integration be already set up.
6sense Email, if needed for your use case
6sense Advertising, if needed for your use case
Action nodes that purchase contacts or accounts from 6sense require 6sense credits. Refer to Credits Overview.
Access Data Workflows
To access Data Workflows:
If using Revenue Marketing (ABM), from the application picker at the top right, select Sales Intelligence.
From the Sales Intelligence application picker at the top right, select Data Workflows.
From the Data Workflows menu on the left, select Data Workflows.
The Workflows list page opens. If there are existing workflows, they are listed.
Create a Data Workflow
To create a new workflow:
From the Workflows list page, at the top right select Create.
The Create a Workflow page opens and lets you either pick a template or create one from scratch.
Create from a template
6sense provides many templates to support common use cases. They are grouped into categories.
To create a workflow from a template:
Go to Workflows list > Create > Create a Workflow > Choose a template or start from scratch.
Browse the available templates and decide which one to use.
Select its box.
Follow the steps in the Set the properties for a new workflow section below.
Create from scratch
If a template doesn’t suit your needs, you can start with a blank canvas to build your own custom workflow.
To create a workflow from a blank canvas:
Go to Workflows list > Create > Create a Workflow.
At the top right, select Create from scratch.
Follow the steps in the Set the properties for a new workflow section below.
Set up a new workflow
Whether you use a template or start from scratch, you enter the same information in the Create Workflow pre-configuration popup. The type of template is noted at the top of the popup.
Name your workflow.
If you have multiple Predictive product models for your organization, they are listed as Product Category. Select which one you would like to build this workflow around.
If you will set the frequency as realtime, then Product Category is only applicable when starting from a CRM account.
If you will set the Frequency as on-demnd, daily, or weekly, Product Category is only applicable when starting from a CRM account or segment.
Select a Frequency schedule, either:
Daily Recurring (data pipeline completion): the workflow runs each evening after the 6sense data pipeline updates.
Weekly Recurring (data pipeline completion): the workflow runs every week on your specified day after the 6sense data pipeline updates.
On-demand: the workflow runs only once after it is published, when you use the Workflows > Workflows List > Actions > Run Now option.
Real Time: the workflow triggers when a new record is detected. Refer to Real-time CRM Syncs.
(Optional) If you chose a recurring option, you can set the start and end dates now, or add them later (using the Edit properties button):
Select a Start option, either:
On Publish: The workflow runs when it is ready to be published and you select Publish, or:
Choose a specific date from the date picker.
Select an End date. Select to create either a workflow that runs indefinitely or specify a termination date.
Select the Start From setting, to be used as the starting node of the workflow.
If you select a CRM or MAP option, it uses the system integrated with 6sense.
(Optional) If you select Segment, also select the name of the segment to use. If you don’t set this now, you can edit the workflow properties later.
Select Create workflow.
The workflow’s canvas opens, showing the start node, the frequency schedule setting, a link to edit its properties, and its publication status.
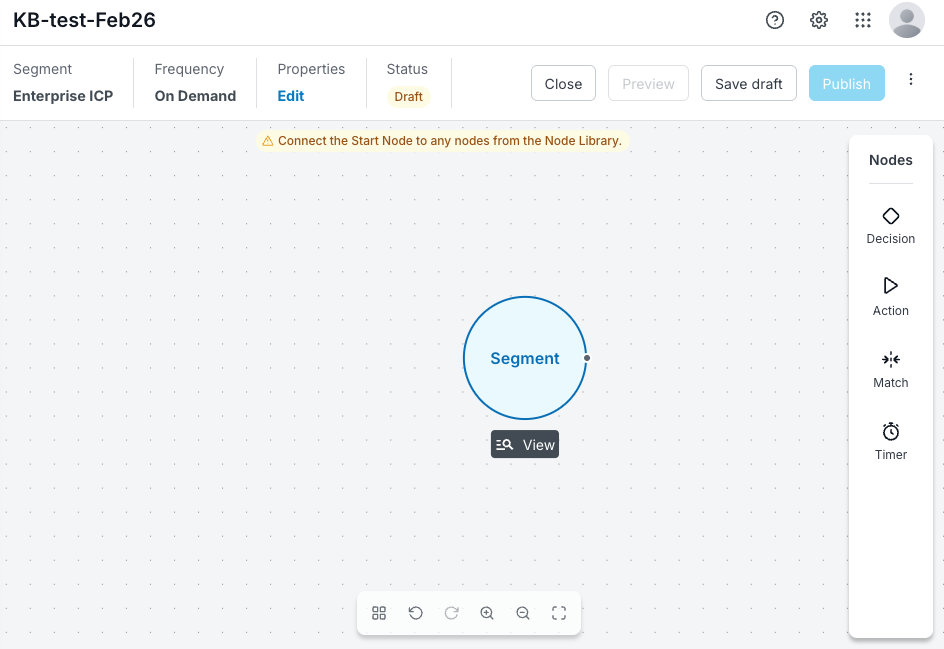
(Optional) Select the start node to reveal its View icon. Select the icon to view more information about the start node.
After setting up the workflow properties and creating the first canvas, you add nodes to control the processing of the workflow.
Add nodes to the canvas
A workflow consists of nodes with connections between them. Use the node menu on the right of the canvas to design your workflow. There are three main types of nodes:
Action nodes
Match node - Headquarters Match
To add nodes to the canvas:
From the node menu on the right, select the node type.
In the node list for the type, press the dots next to a node, hold, and drag it over the start node.
The node appears with its node menu icons below. If you dropped the node over the segment, a path automatically connects the two.
Each node has a menu that appears when you first add a node to the canvas, and when you hover over a node.
The node menu icons are:
Edit (pencil): opens the Node Configuration panel.
Duplicate (stack): copies the node.
Delete (trash can): deletes the node from the canvas.
Use each node’s edit menu to set up the node and further define your workflow.
Set up a node
Important: You can save a draft workflow, but you cannot publish the workflow if it has nodes that are not fully defined. The top of the canvas shows a warning message if there are any nodes that are not completely set up.
Select a node to reveal its menu below.
Select the Edit (pencil) icon of the node. The node’s setup panel opens. This example shows the panel for a True/False node.
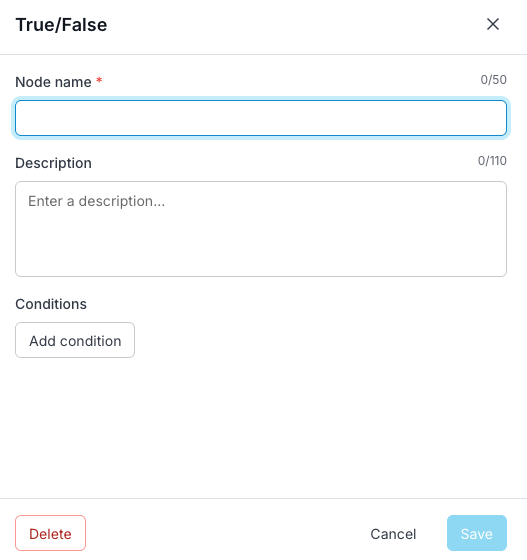
Describe the node.
Set its properties as indicated. Each type of node has its own setup details and conditions.
Select Save for the node.
Tip: You can save a node even if some properties are not yet set. This helps you set up placeholders in your workflow so you can visualize the flow before filling in the details.Select Save Draft for the workflow.
Iterate to add more nodes.
Example enrichment workflow
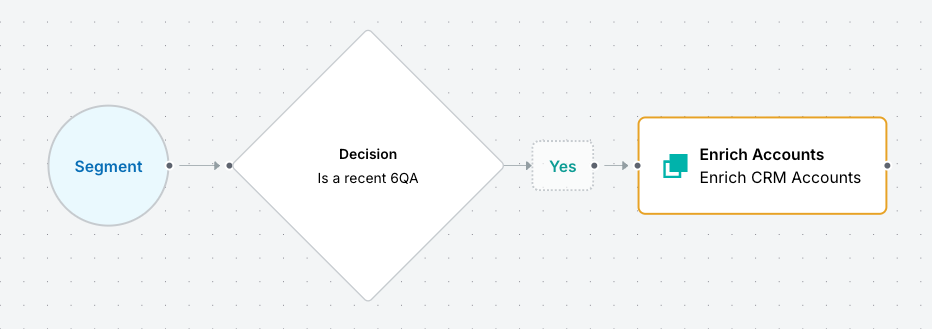
The following screenshot shows a simple example workflow that:
Only processes accounts from the segment that are recently qualified as 6QA.
Enriches accounts in the integrated CRM.
Canvas options
Each canvas has information and options.
The top left displays:
The workflow source’s name (as specified in its properties).
How frequently it runs (as specified in its properties).
A link to edit its properties.
Its publication status.
The top right shows actions to control the workflow:
Close: Closes the canvas.
Preview: Runs a preview of the draft. Refer to Preview a Data Workflow.
Save draft: Saves the current draft.
Publish: Starts the workflow, which will run according to its Frequency property setting.
More… Discard Draft: Removes all changes since the last saved draft.
The bottom has a floating menu of controls for the canvas:
Auto layout (cmd+shift+A)
Toggle smart guides (shift+G)
Undo (cmd+Z)
Redo (cmd+shift+Z)
Zoom in (cmd++)
Zoom out (cmd+-)
Fill screen (cmd+0)
Preview a Data Workflow
Use previews to make sure you are using the correct data. Previews are also helpful for estimating the number of credits a workflow may consume.
Important: A workflow’s segment and at least one node must be set up before 6sense can create a preview. You can add nodes, change start nodes, and use previews to iterate your workflow design.
Refer to Preview a Data Workflow.
Publish a workflow
Publishing a workflow means that it will run according to its schedule settings.
Tip: Workflows have required settings for the workflow itself and every node, as indicated by red asterisks in the setup panels. Ensure that all required workflow and node fields are set up prior to publishing.
When you are satisfied with your setup and ready to run the workflow, select Publish.
When a published workflow runs
Workflows run only after they are published. You cannot run a draft workflow (you can preview it).
If you set up your published workflow to run on a recurring basis (either daily or weekly), then the workflow runs automatically with the scheduled day’s evening pipeline.
If you set up your published workflow to run on-demand (once), then it runs when you select Publish.
Manage workflows after they are published
After you create and save a draft workflow, it displays on the Workflows list. After you publish it, you can find information about the workflow and manage it from there. Refer to Manage Data Workflows and Data Workflows Run History and Performance Details Page.
Document Changelog
May 12 2026: Clarifications when setting up product category and frequency
Feb 11 2026: First published