A 6sense segment is a list of companies that you create in Revenue Marketing (RevM). Use segments in activations (processes such as an Ad campaign or syncing to LinkedIn) to fulfill various purposes, including running multi-channel campaigns to engage accounts, tracking campaign performance, alerting sales reps, purchasing contacts, enrichment, etc. With the ability to consolidate 6sense data, CRM, and MAP data, segments help you build audiences.
Also refer to FAQ: Segments.

6sense Master Company Database (MCD) accounts
Segments are based on accounts from 6sense’s master company database (MCD). These accounts may not have a one-to-one relationships with the accounts in a customer’s CRM database. For example, account x in 6sense’s master company database may map to accounts A, B, and C in a customer’s database if the customer is tracking each of the account’s business units separately.
To learn more about this process, refer to 6sense Company Accounts.
Create a segment using filters
You create a segment using filters on the available account data.
To create a segment:
From the RevM left menu, select Segments (New).
On the right, select Create Segment.

Select filters from the filter list on the left panel and preview the list of filtered accounts on the right.

Edit and apply filters if needed to achieve the desired results.
Select Save Segment.

Name the segment, select a folder, and add tags to it.

Create a segment from one or more external lists
To create segments from external lists, there are two high-level steps:
Create an external list for use in a segment
6sense currently supports creating external lists from the following data sources:
CSV upload
CRM list sync
Supported CRMs: Salesforce, Dynamics
CRM report sync
Supported CRM: Salesforce
Upload a CSV file
Click on the arrow icon next to Create Segment Button, and select Upload CSV.

Upload a CSV file with the following characteristics.
Company Match Type file format and maximum file sizes:
Country-specific
Each company entry must include either the “Name” field (company name), “Domain” (company domain), or both.
“Country” is optional and recommended.
Maximum file size: 25k rows
All matches
Each company entry must include either the “Name” field (company name), “Domain” (company domain), or both.
Maximum file size: 500 rows
Custom fields (Optional)
New Feb 10 2026: In addition to the required fields, you can include up to five additional fields. 6sense includes these fields in the download (output) file of total matched accounts. In the following example the fields Country and CRM ID were added.

The download file contains the fields in the same order as in the uploaded file. If an input field has the same name as a 6sense field, the field name will have a prefix “Uploaded”. See Step 5 below.

Select Next.
Review the match statistics.
(Optional) Download the Total Matched accounts CSV file.
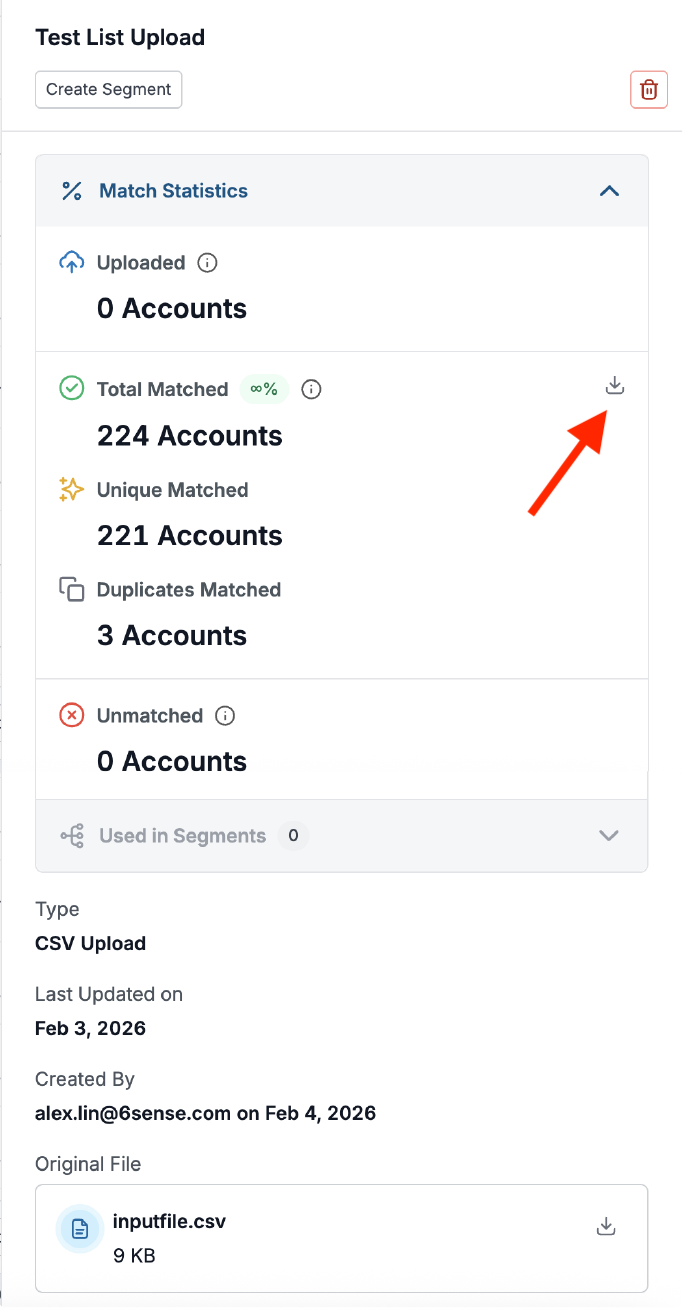
New Feb 10 2026: If you added additional custom fields to the uploaded file, the downloaded file has them as well. If there was a duplicate field name, 6sense prepends the download name with “Uploaded”.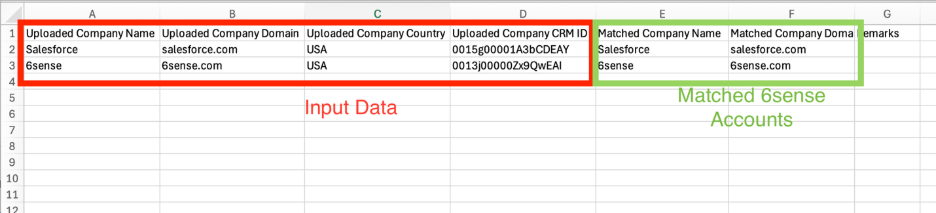
Select Save.
Sync from a CRM list
To sync data from a CRM list for use in a segment:
Select the arrow icon next to Create Segment button, and select Sync from CRM.
Depending on your CRM, choose Salesforce List or Dynamic List as the Data Source.
Select a viable CRM account list and start syncing. Depending on the size of the list, syncing can take from a few seconds to over a minute.
Viable CRM account list restrictions:
The list must contain 100k rows or fewer to be synced.
The list must be public, with the view setting of “All users can see this list view”.
6sense must have permission to view all the fields used in the Salesforce filters that define the list.
Review match statistics.
Select Save.

Sync from a CRM report
Select the arrow icon next to the Create Segment button, and select Sync from CRM.
Select Salesforce Report.
Select a viable Salesforce Report and start syncing. Depending on the size of the list, syncing can take from a few seconds to over a minute.
Viable Salesforce Report restrictions:
The report must contain 100k rows or fewer in order to be synced.
The report must be built based on CRM Accounts, Leads or Contacts in order to be synced.
The report must include a column representing the Account ID, Lead ID, or Contact ID, depending on the respective Report type.
The report must be Public.
Review match statistics.
Select Save.
Create a segment from saved external lists
Option 1: Select the name of an external list.

Option 2: Select the plus sign icon of an external list.

Option 3: Select multiple external lists, and then click on the Take Action button, and select Create Segment.

After selecting Create Segment with any of the above three options, the Configure Filters tab of Create Segment page opens with all the selected external lists loaded in filters.
You can finish creating the segment following the same steps as creating filter-based segments.

Option 4: Create segments from existing external lists in the segment creation flow with corresponding filters under Segments and Lists category.

Create a segment from a template
You can create a segment using an out-of-box template or user-defined custom template. Templates are listed next to the filter list. Templates are recommended for new users who need instructions on best practices.

6sense segment templates
6sense currently provides out-of-box templates for common use cases.
Templates include:
Ideal Customer Profile
Brand Aware
High Engagement
Competitor Intent
6sense High Intent Accounts
Missed Opportunities
Custom segment templates
You can define custom templates to conveniently reuse filters with value inputs to create new segments, or to train team members with best practices.
Any user who has edit access to segments can create templates.
Templates can be updated.
Users can create new templates from existing templates.

Add an activation to a segment
An activation is a process that uses a segment. You can see all of them in the segments list Activations column.
Add an activation to a segment on the Segment page
To add an activation to a segment:
In Revenue Marketing, go to Segment (New).
Locate the segment in the list.
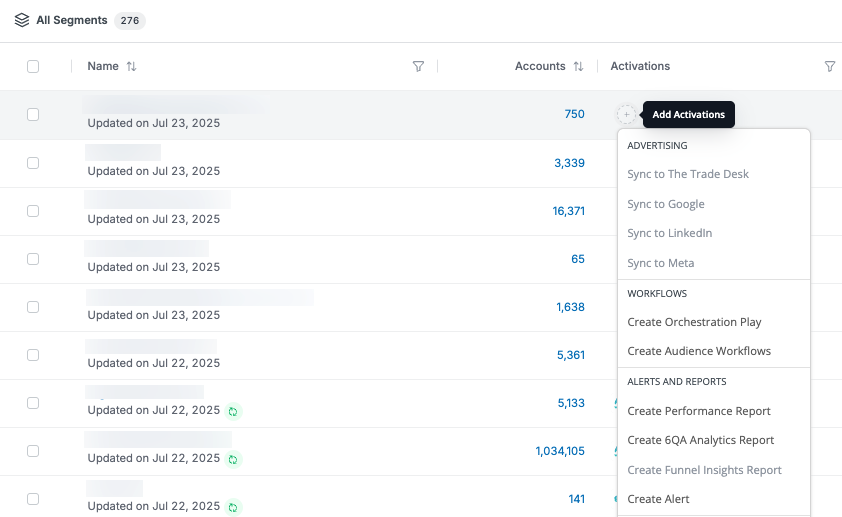
In its Activations column, select the plus (+) icon and choose an activation from the menu.
Tip: If the menu option is grayed out for Advertising, the integration is not yet available.
Identify segment activations
To find out what activations apply to a segment:
In Revenue Marketing, go to Segment (New).
Locate the segment in the list.
In its Activations column, hover over the listed icons and review the details.
Supported activations
6sense supports the following activations on segments:
6sense Advertising
Segment syncs
Google
LinkedIn
Meta
The Trade Desk
Orchestration
Audience Workflows
Data Workflows
Revenue Marketing alert (formerly ABM alert)
Segment Performance, 6QA Analytics, and Funnel Insights reports
Segment statuses
Active Segment: Segments that are used in at least 1 activation. Data refreshes nightly for active segments.
Inactive Segment: Segments that are not used in any activations. Data does not refresh nightly for active segments. It only refreshes when a user clicks into the segment to view data.
Broken Segment: Segments that contain invalid filters or invalid filter values. Data can not be refreshed for these segments, even if the segment is used in activations. The segment displays the last successful data update. Various reasons can cause this. A common one is that filters use deleted CRM fields.
Exclude specific accounts from a segment
If you need to exclude accounts from a segment on an ad-hoc basis, you can quickly and directly exclude selected accounts from within a segment’s account list. Refer to Exclude Specific Accounts from a Segment.
Preview segment or list details
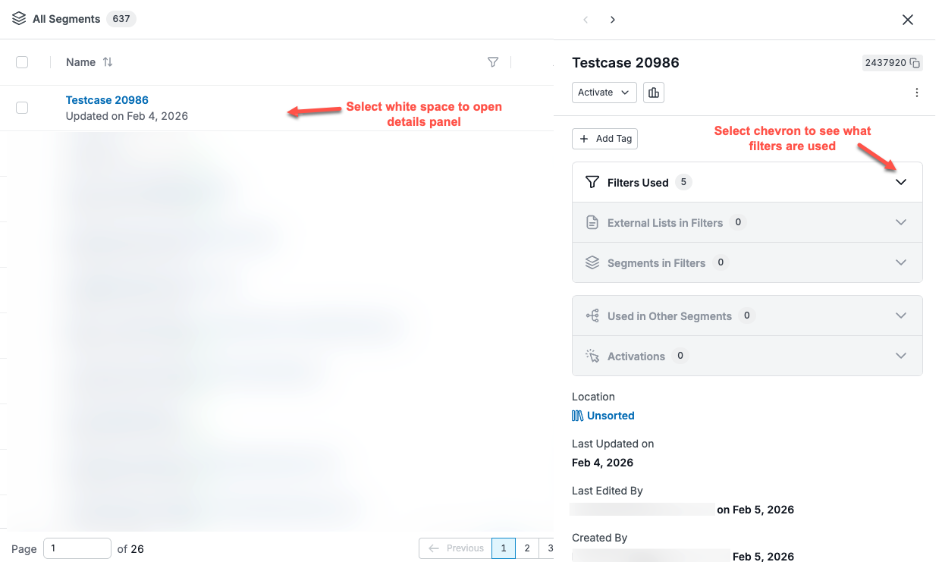
To quickly preview information about a segment or list:
Go to the Segments > Segments or External Lists tab.
Select the white space of the row. A panel opens to show information about the segment or list.
Example segment information:
Tip: If the logo of an account also has a 6sense icon, it means that the account is qualified as 6QA. Refer to 6sense Qualified Accounts (6QAs).
Example external list information:
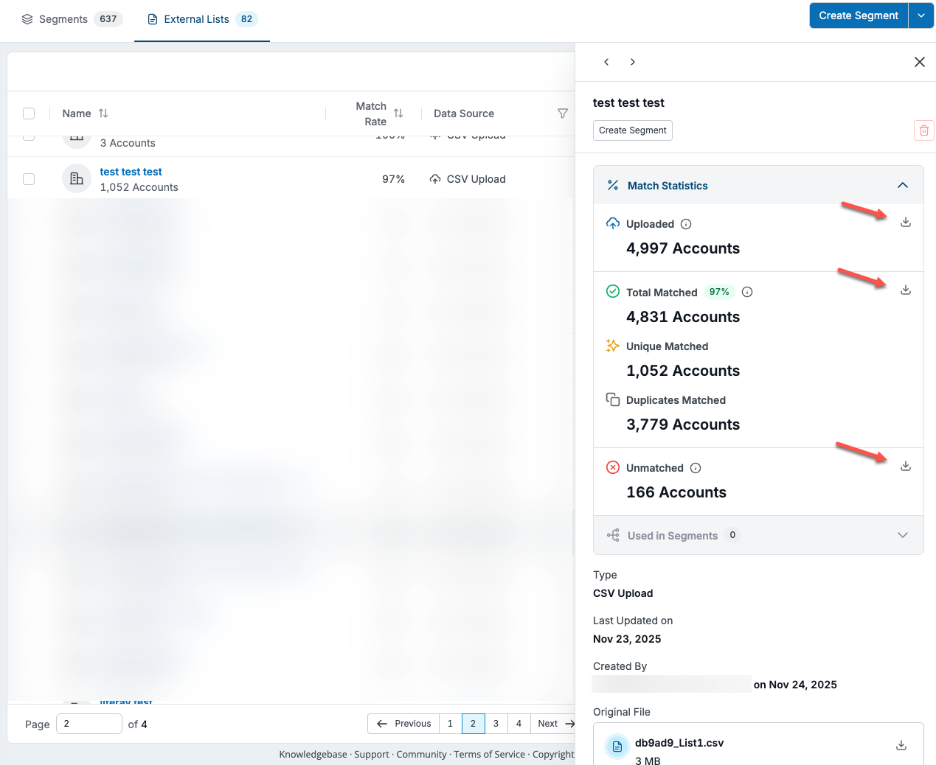
Download external list account matching details
You can download CSV files of the Uploaded, Total Matched, and Unmatched accounts. Use the download icons as shown above.
Review segment analytics
There are two ways to review segment analytics.
Option 1: Select the Segment Analytics icon on the segment preview side panel.

Option 2: Select the segment name and select Analytics.
There are three types of analytics:
Predictive analytics
Behavioral analytics
Profile analytics
With these analytics, you can look at the segment data from different angles and get meaningful insights.

Organize segments
Use folders and sections to categorize your segments. Use tags to add metadata about a segment.
New Feb 10 2026: You can drag-and-drop segments into and between folders.
Organize segments with folders and sections
You can put segments into folders and sections to keep them organized. Using well-structured folders and segments with regular cleanups and reorganization will keep segments well organized.
Segments that are not part of any folders are listed in the Other Folders > Unsorted folder section.
Folders that are not in any sections are in Other Folders sections.

Organize segments with tags
You can leverage tags to flag segments for various purposes. For example, you can tag segments for certain events, research purposes, or even archive candidates.


Archive and delete segments
You can archive or delete segments. Only segments that are not used in any activations or other segments can be archived or deleted.
Archived segments are in the Archived folder.
An archived segment can be restored. It will be put into the Unsorted folder instead of the original folder.
Deleted segments no longer display in the interface.
User permissions for segments
RevM user roles with edit access to segments
Primary Administrator
Administrator
Operation User
Marketing User
Insights User
Sales User
RevM user roles with view access to segments
View Only User
RevM user roles for edit, archive, or delete
Only the creator of a segment, Primary Administrator, and Administrator can edit or delete existing segments.
Same applies to external lists and custom templates.
Document Changelog
Jun 15 2026: Moved FAQ section to FAQ: Segments.
Feb 10 2026: If you add custom fields to an uploaded CSV file, the downloaded file has them as well.