The purpose of this guide is to help you create, configure and integrate your Google Analytics (GA) account with the 6sense Company Identification API. This process provides the capabilities to configure reports regarding the users account information both in real time and historically to track your goals, as well as, to push these custom audiences into Google Audience Manager for use in Google Adwords campaigns etc.
Note: You will need your Company Identification API key to complete the set up below. API key can be found in the 6sense UI under Settings > API Key.
Instructions
Step 1. Determine which 6sense attributes to capture
The 6sense Company Identification API returns several different data points that can be consumed as a custom dimension within Google Analytics. Which attributes of the Company Identification API data object you decide to pass into GA will depend based on your use case and will determine what GA custom dimensions need to be created. Below are the possible values returned by the 6sense Company Identification API:
company_name
domain
country
address
company_state
city
zip
country_iso_code
industry
sic
sic_description
naics
naics_description
employee_range
employee_count
revenue_range
region
segments
buying_stage
profile_fit
In Google Analytics ( GA ), you will see 6sense segment names separated by a comma; this is not a bug, this is expected behavior. To simplify this, assume:
There is a segment A with 100 accounts.
Each account in segment A has 5 visitor average (therefore 500 visitors in total).
Are we showing all segments like B, C, D, E … where accounts in segments have at least 1 visitor from segment A ( any 1 out of a pool of 500 )? -> The answer is ” Yes “. If the visitor satisfies the segment B, C, D, E, they will all be returned.
Step 2. Set up Custom Dimensions in GA
In Google Analytics navigate to the Admin section. Under Properties select Custom Definitions then Custom Dimensions
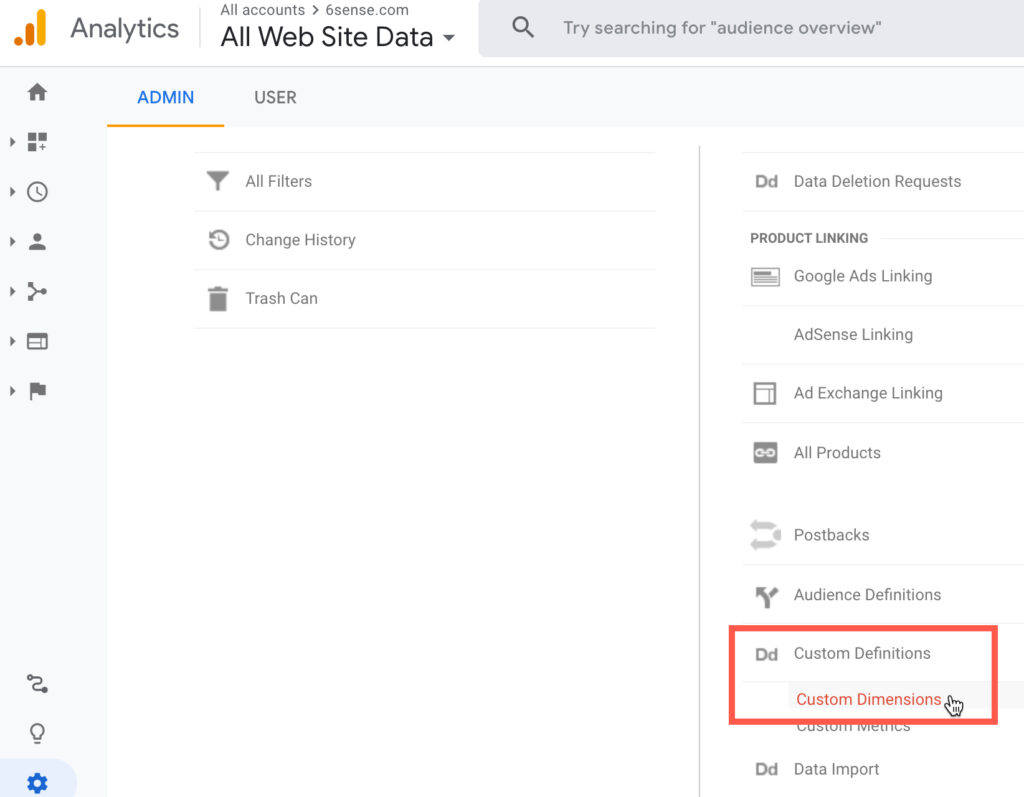
Click New Custom Dimension.
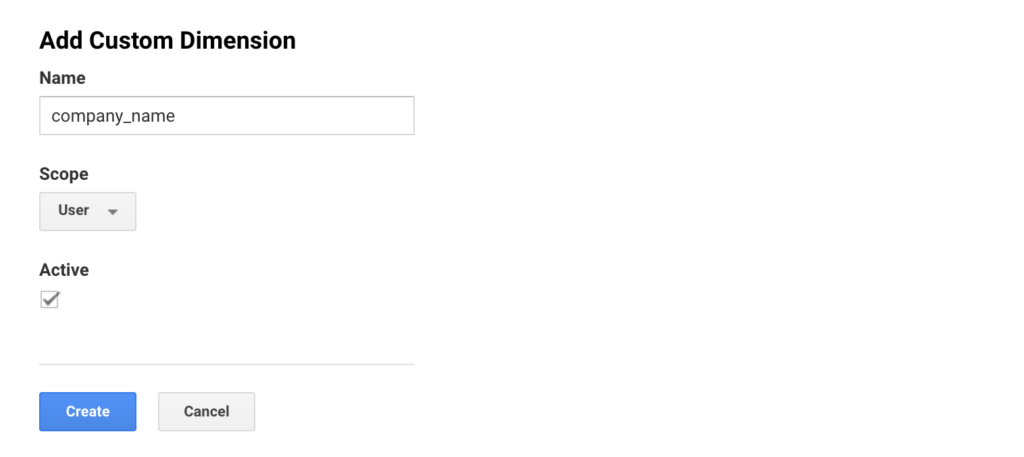
Create a Custom Dimension for each 6sense attribute you plan on capturing. For the Scope select User.
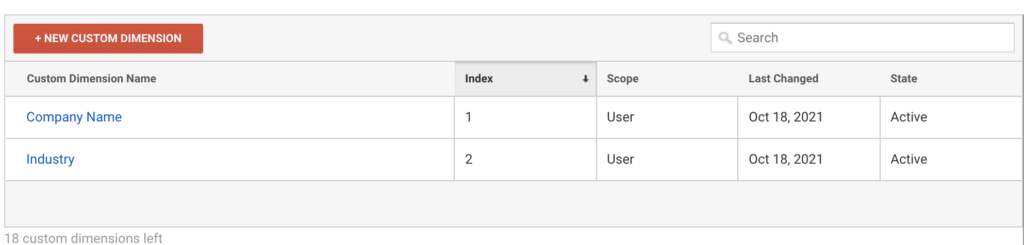
Once all of the Custom Dimensions are set up make note of the Index for each 6sense Custom Dimension. This will be extremely important in Step 4. In this example, Industry has an index value of 2 and Company Name has an index value of 1.
Note: Based on the type of Google Analytics Account you have there are limitations on the number of custom dimensions and custom metrics you can create. Analytics accounts are limited to 20 custom dimensions. Google 360 Analytics accounts are limited to 200 custom dimensions. Custom dimension configuration: https://support.google.com/analytics/answer/2709829 What are custom dimensions and metrics? https://support.google.com/analytics/answer/1033861
Step 3. Create GTM Custom Variables
You will now create Custom Variables within GTM for each 6sense attribute selected and created as Custom Dimensions in GA. These variables will be responsible for capturing the 6sense Company Identification API response and mapping it into your GA as Custom Dimensions. For the sake of these instructions, we will use the example of mapping 5 of the 6sense data points to GA.
Within GTM go to Variables > User-Defined Variables > New.
Variable Configuration > Choose variable type = Data Layer Variable.
Enter the exact attribute name from the list above in Step 1 as the data layer variable name. For example “company_name” and “industry”.
Repeat this process for all of the 6sense attributes selected. All of the Data Layer Variables will be referenced in the next step!
For multi-model, Advanced customers:
If following set-up instructions in Deploying 6sense Company Identification API with Google Tag Manager Event Trigger, the above attributes/variables will work only for single-predictive-model customers.
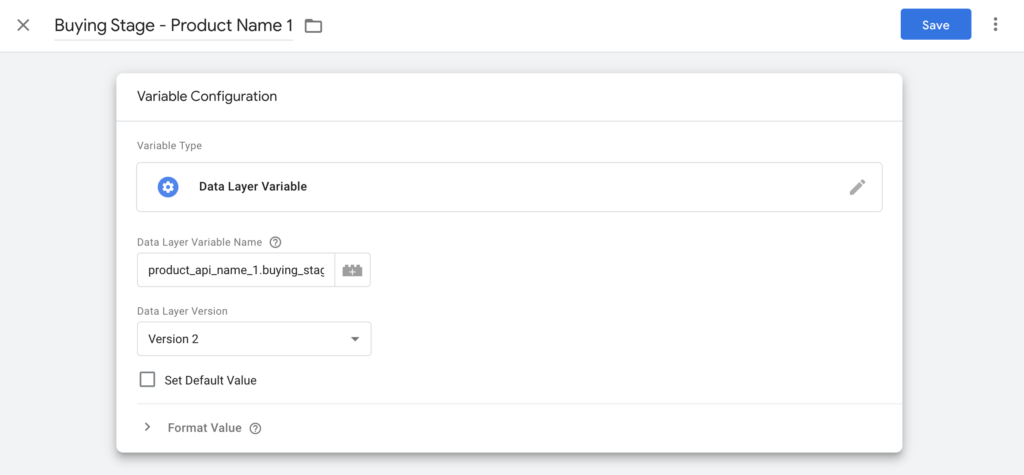
To properly send the predictive account attributes for each of the multiple products, special set up is needed.
Find the “API Name” for each of your multiple products. If your device has been de-anonymized by the 6signal API, you can do this by opening up the developer console (PC: CTRL+SHIFT+I / Mac: CMD+OPTION+I), navigate to the “Console” tab, and type the following code in and hit Enter: JSON.parse(localStorage._6senseCompanyDetails).scores If your device is identified, you will see the product names. Record each product name next to product“.
Back in Google Tag Manager, instead of typing buying_stage or profile_fit, simply take your Product API names and create a set of Custom Dimensions for each product, putting the API Name in front of each value, separated by a period. For example: product_api_name_1.buying_stage and product_api_name_2.profile_fit
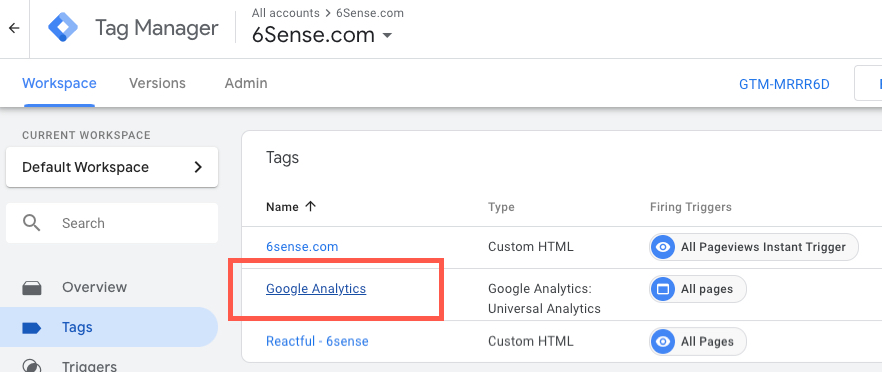
Step 4. Attach Data Layer Variable to GA Tag within GTM
We will now attach the Data Layer Variables to the Google Analytics Tag within GTM. This step will actually submit the data sent by 6sense to Google Analytics.
Select your Google Analytics tag within Google Tag Manager.
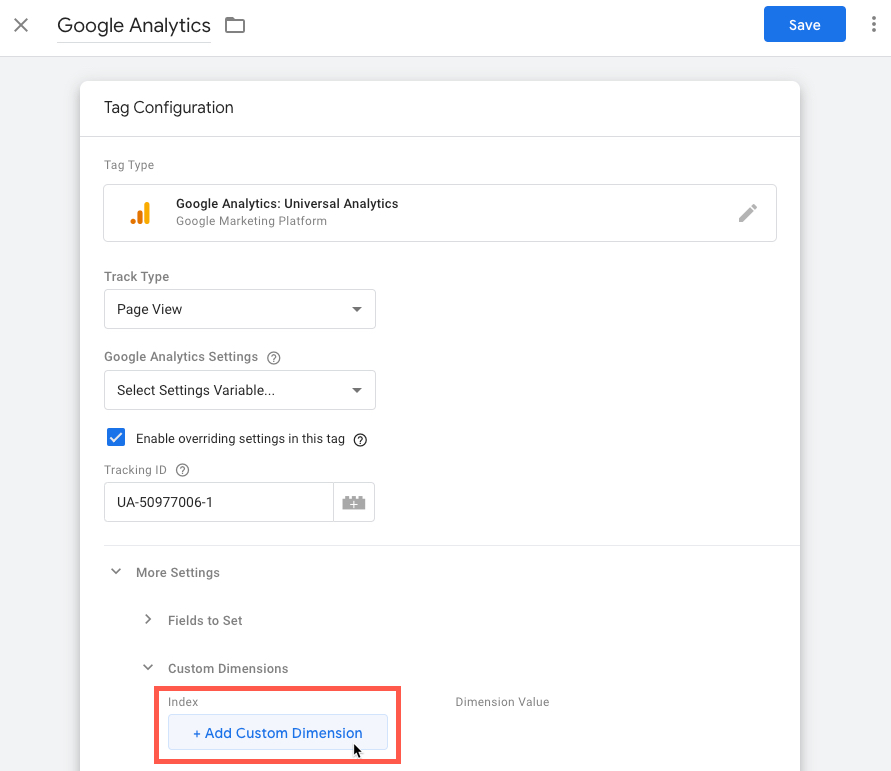
Edit the tag. Under “More Settings” select “Custom Dimensions” and click + Add Custom Dimension. If this section is not seen, check the “Enable overriding settings in this tag” checkbox.
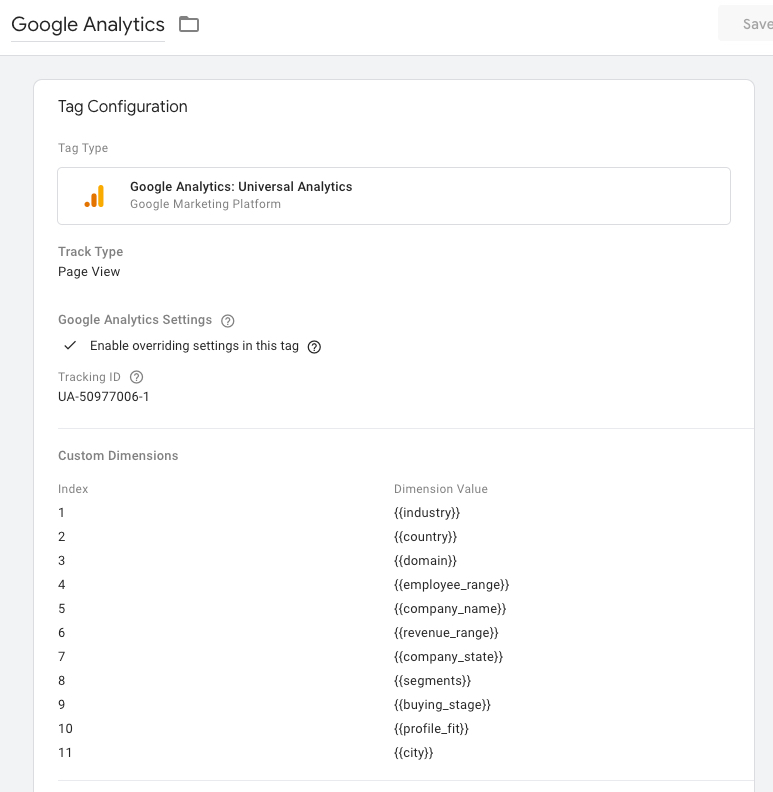
For each Custom Dimension add the Index number to the corresponding GTM Custom Variable. You can add the Custom Variable by clicking the + button. This will ensure the correct formatting is applied to each of the Custom Variables with the {{double brackets}}.
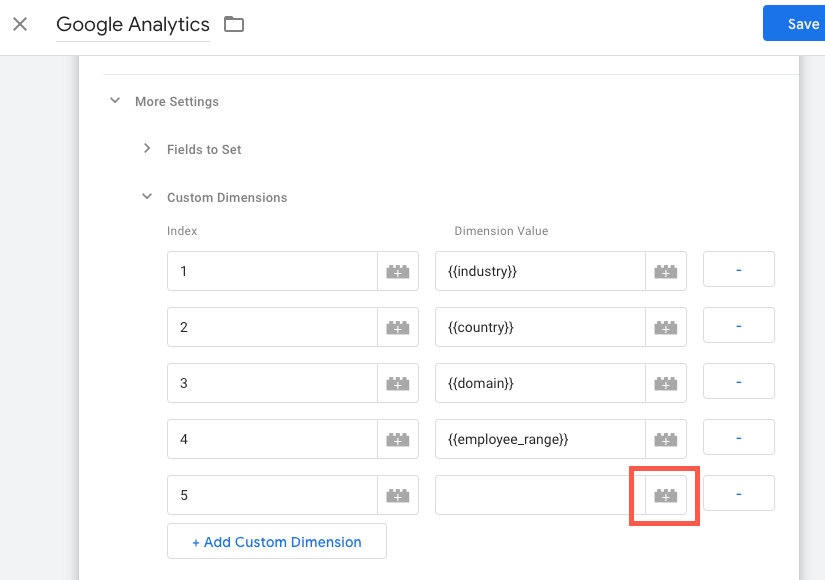

Complete this step for all of the Custom Dimensions set up within Google Analytics.
We recommend setting the Triggering for the GA Tag to be set to Window Loaded. This will help ensure that the data from the API will be available to be passed into GA.

Don’t forget to publish the changes made within GTM!
Note: Once published the data is captured in real-time, your custom dimensions will generally not show up in GA until 48 hours later.
Step 5. Ensure 6sense Company Identification API is Deployed in GTM
To deploy the 6sense Company Identification API within GTM follow the instructions here: Deploying 6sense Company Identification API with Google Tag Manager Event Trigger
You can now create custom reports within Google Analytics using account focused data provided by 6sense.
Troubleshooting & Common Errors
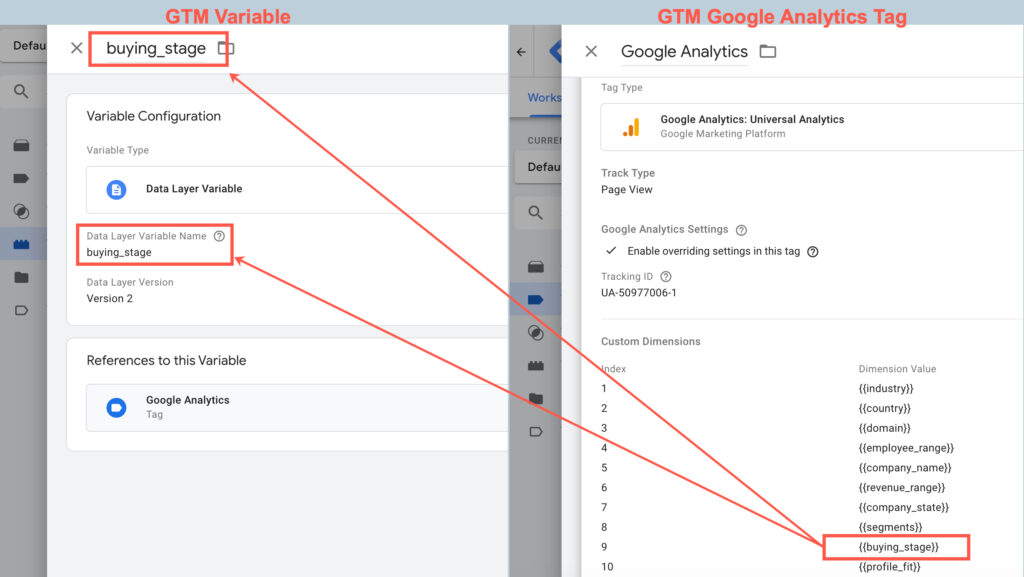
Ensure GTM/Variable Name and GTM/Tag match exactly. The image on the left is the GTM Variable and the image on the right is the GTM Google Analytics Tag defining the variable.
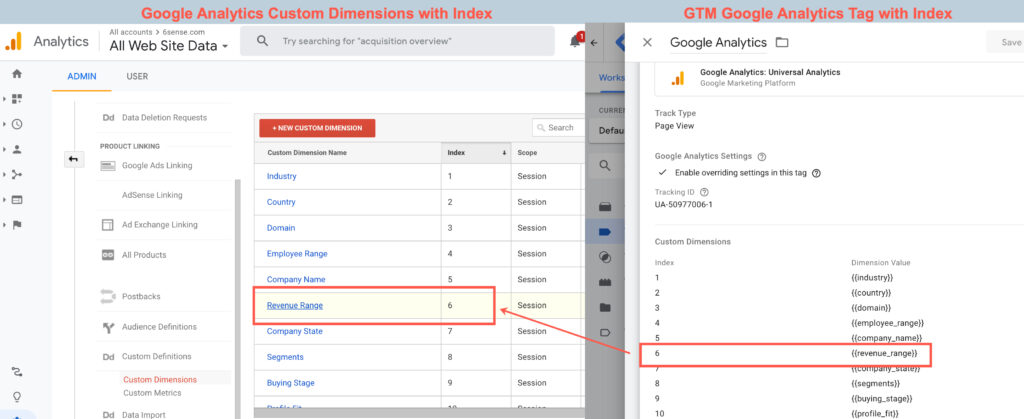
Ensure the Index for the Custom Dimensions match. The image on the left is the Google Analytics list of Custom Dimensions with corresponding Index assignment. The image on the right is the GTM GA Tag where the user must define the index for each GTM Variable that corresponds to the GA Index.
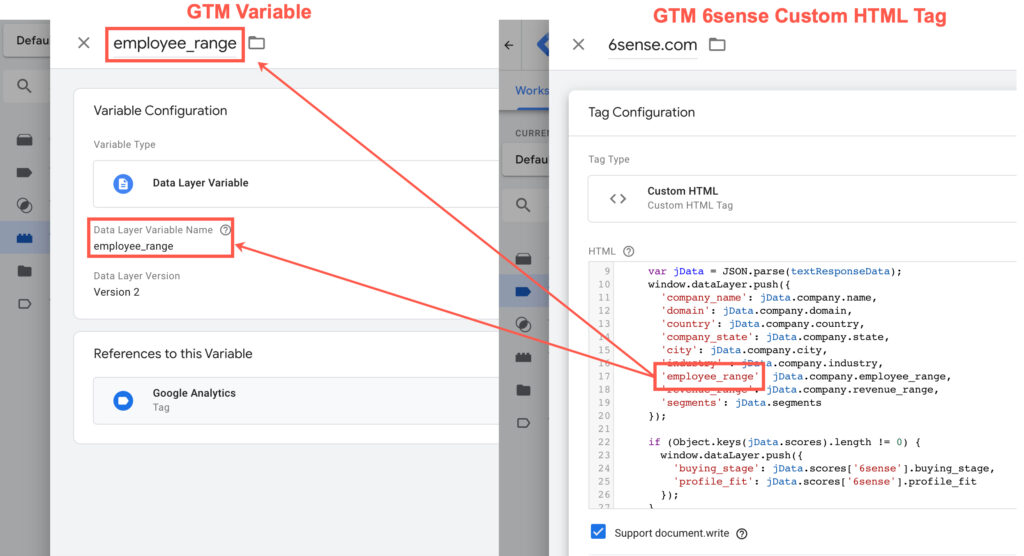
GTM Variable names have to match 6sense Custom HTML value. The image on the left is the 6sense custom HTML deployed within GTM. The image on the right shows the corresponding GTM Variable set up. If there is a misspelling or typo the data will not pass correctly.
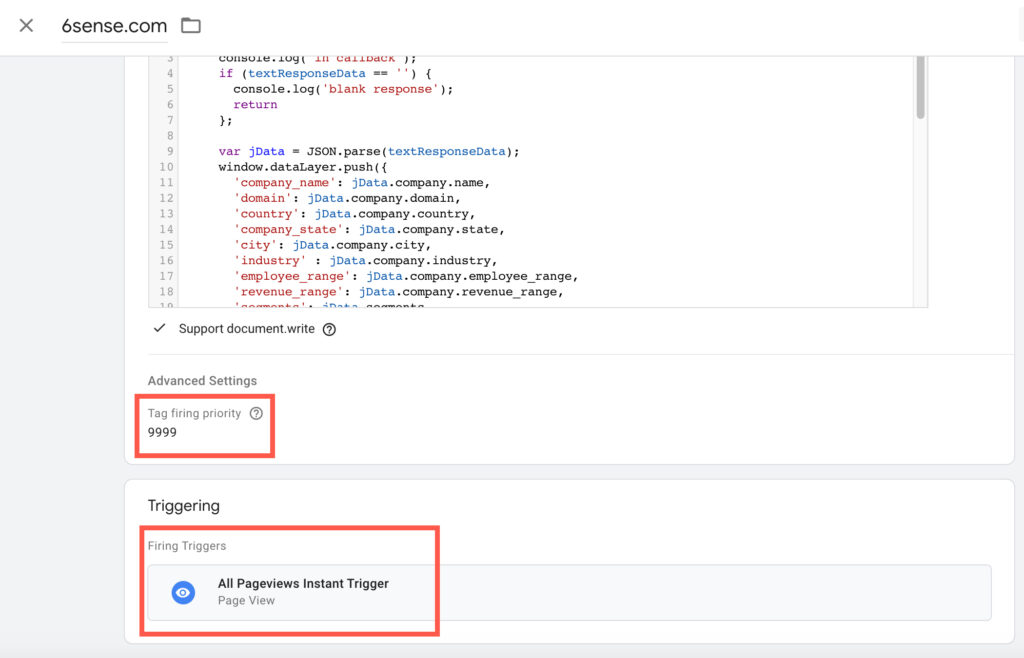
Recommend GTM Tag Firing Priority & Trigger Settings for 6sense Custom HTML Tag: Set the Tag Firing Priority to high (ex. 9999). Set Triggering setting to fire on “Page View”.
Reduce API Usage by Checking Browser Cache before making API Call: There may be a desire for some web developers to reduce their 6signal API usage by referencing the browser cache (localStorage) in their 6sense Web Tag JavaScript Code. There is some suggested JavaScript code a web developer may reference in Advanced Company Identification Implementation – Limit API Calls.
Appendix
Data Layer Variable Names for Advanced Customers with Multiple Models
Note: The below code will only work for the customers who are using the recommended tag code available in Deploying 6sense Company Identification API with Google Tag Manager Event Trigger
Instead of setting the Data Layer Variable Name as recommended in the first section of this document, multi-model customers will need to have separate custom dimensions for each model. The code provided in the above link will dynamically place each set of model attributes in its own data layer variable labeled with the model name.
As such, the company identification attributes for buying_stage, intent_score, etc. should be prepended with “.”
For example, if our model name is “model_a” then the GTM variable configuration would be as such:
