This article is designed to help guide you through setting up and integrating the 6sense Company Identification API with Google Tag Manager. Before getting started, it is assumed you are using Universal Analytics or Google Analytics 4, Google Tag Manager, and have a tag container already set up.
For instructions on setting up Google Tag Manager, see Setup and install Tag Manager.
For more information about the 6sense WebTag 2.0, see 6sense WebTag 2.0 Setup
For learning more about 6sense APIs, see 6sense API Docs site
If you already had the 6sense Company Identification API Deployed to Google Tag Manager, such as following the Deploying Company Identification API with Google Tag Manager Event Trigger (WebTag 1.0) guide, then you do not need to do anything else. The configuration and dataLayer variable names recommended this guide are now sent to the Google Tag Manager dataLayer automatically.
Simply swap out the base 6sense WebTag, including the extra code that wrote the 6sense Company Identification to the Google Tag Manager dataLayer, with the single-line WebTag 2.0.
If you had customized the dataLayer variable names in Google Tag Manager previously, however, please update your Google Tag Manager Variables to reference the Variable Names outlined in Step 2.
Step 1: In 6sense ABM
1a) Create or Update Your 6sense WebTag
In 6sense, create a WebTag 2.0 if you haven’t already:
Set the tag type to Google Tag Manager.
Turn on Company Identification API and Limit Company Identification API Calls. Confirm your web domain is added to the
Add Domainsinclusion list.Copy the one-line WebTag 2.0 code. This will be used later in the custom code tag added to GTM.
1b) Configure Your 6sense Segments
If desired, update your segment settings in 6sense API Token Management to only display Segment ID for Published Segments. Learn more here: Using Segments and Score Configurations for APIs.
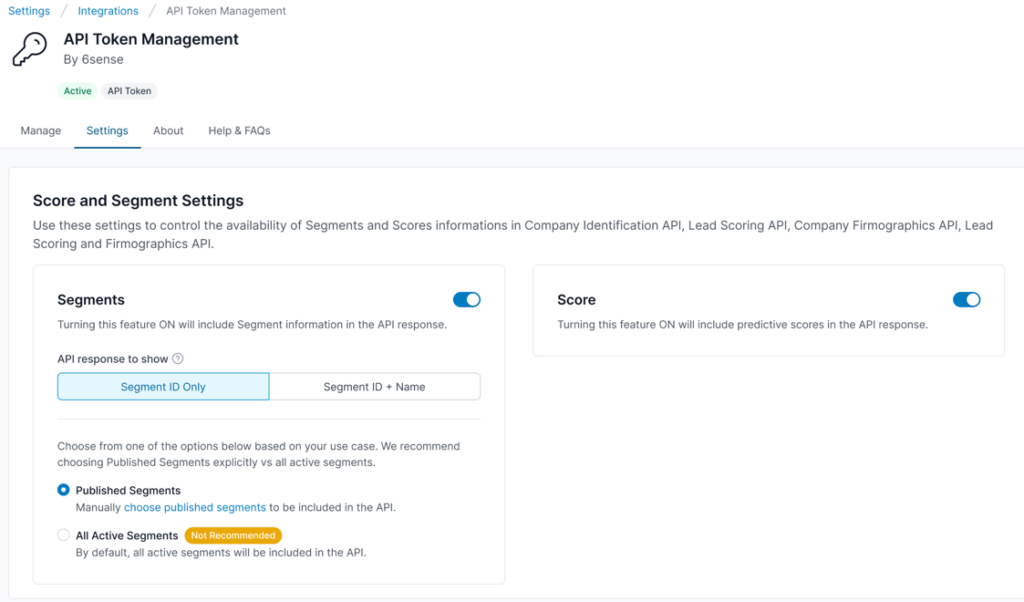
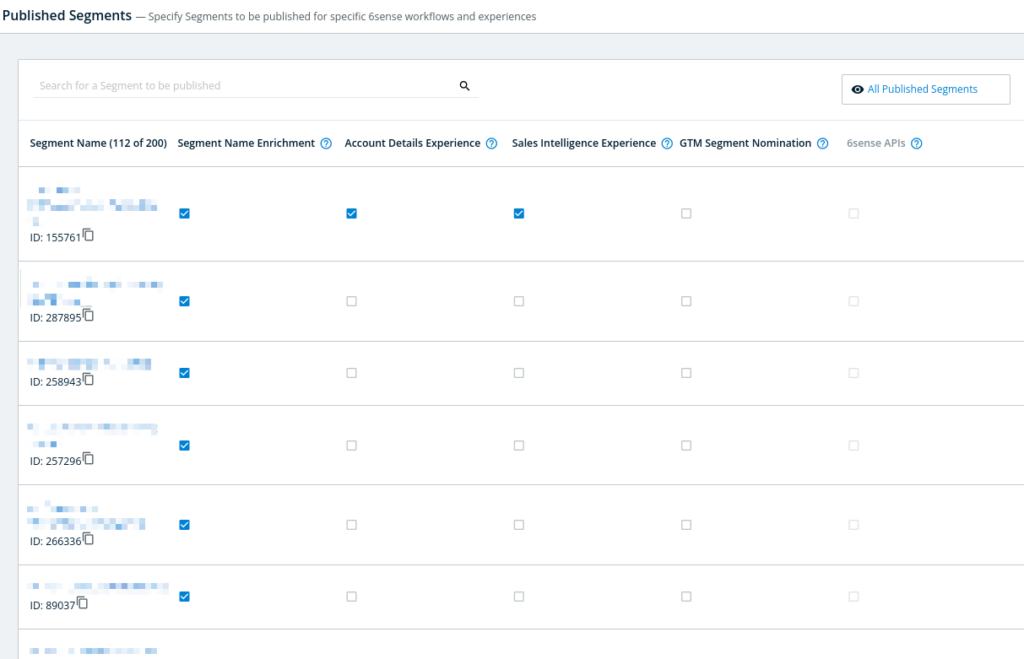
Publish segments for the API as desired. Learn more here: Publishing Segments: Getting Started.
Note down the relevant Segment Names and associated Segment IDs. Segment ID is available to copy on the Published Segments page as well as in the Segments list and each Segment details page.
Step 2: In Google Tag Manager
2a) Create or Update the 6sense Tag in GTM
Create a Custom HTML Tag in Google Tag Manager with the code created earlier when configuring the WebTag. The code looks like this, but you will place your own tag in GTM.
<script id="6senseWebTag" src="https://j.6sc.co/j/abcde-12345.js"></script>Set the tag to fire on all pages to as soon as possible by setting Tag firing priority to 9999 (under the Advanced Settings toggle).
.png)
Set the Tag firing options to Once per page.
Use the default settings for other settings for this tag.
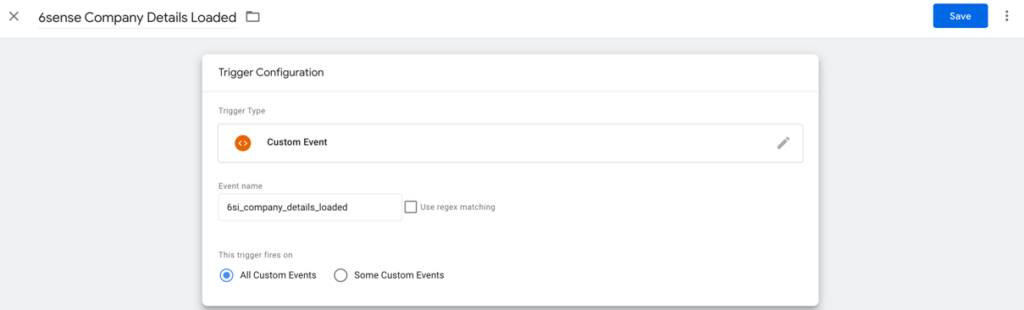
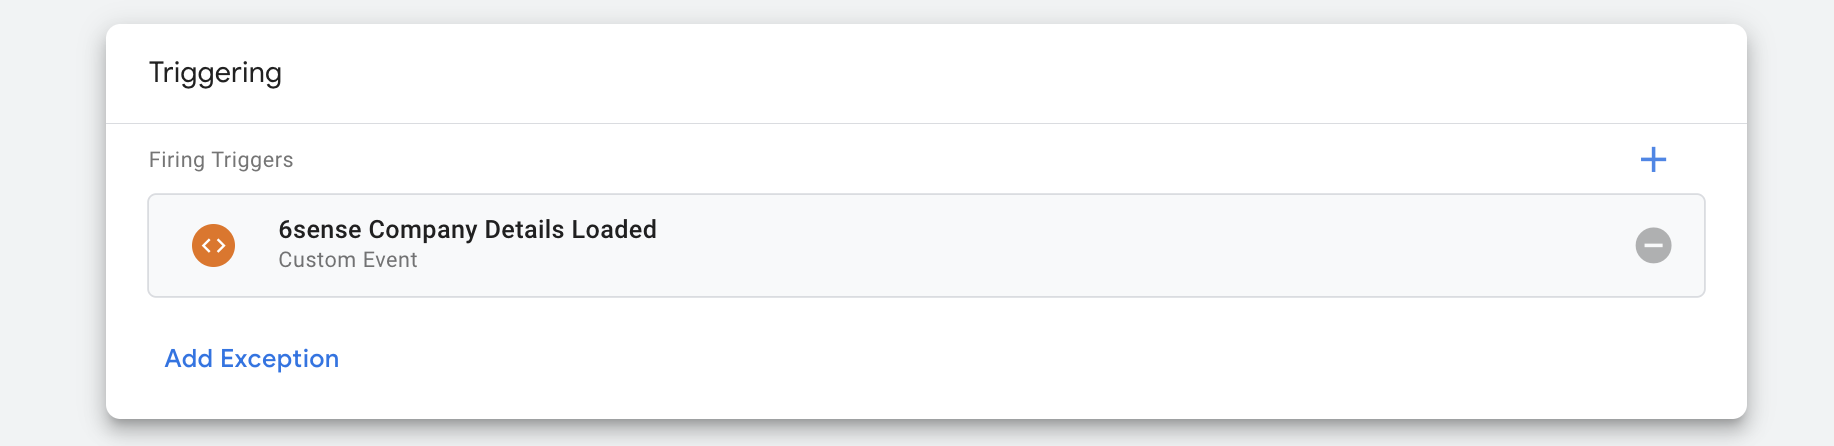
2b) Create the Event Trigger
Create a Trigger in GTM:
Name: 6sense Company Details Loaded
Trigger Type: Custom Event
Event Name:
6si_company_details_loaded
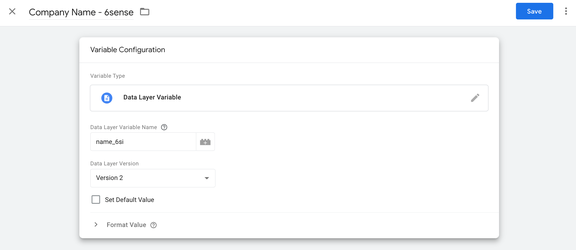
2c) Create Variables in GTM
Create Variables in GTM. For each variable include:
Name: Name it something recognizable, or just use the Data Layer Variable Names below.
Variable Type: Data Layer Variable.
Data Layer Variable Name: Refer to the list below. Please make sure you use the variables ending with _6si only. Do not use the variables that start with 6si_.
Data Layer Variable
Example Value
1
confidence_6siVery High
2
company_name_6si6sense
3
domain_6si6sense.com
4
name_6si6sense
5
region_6siNorthern America
6
country_6siUnited States
7
state_6siCalifornia
8
city_6siSan Francisco
9
industry_6siSoftware and Technology
10
country_iso_code_6siUS
11
address_6si450 Mission St,
12
zip_6si94105
13
phone_6si+1 415-212-9225
14
employee_range_6si1,000 – 4,999
15
revenue_range_6si$100M – $250M
16
employee_count_6si1192
17
annual_revenue_6si104000000
18
is_blacklisted_6sitrue
19
state_code_6siCT
20
geoIP_country_6siUnited States
21
geoIP_state_6siConnecticut
22
geoIP_city_6siStars Hollow
23
company_match_6siMatch
24
additional_comment_6siCompany name or domain match was found
25
industry_v2_6siSoftware
26
sic_description_6siPrepackaged Software
27
sic_6si7372
28
naics_6si511210
29
naics_description_6siSoftware Publishers
30
segment_ids_6si123456,987654
31
segment_names_6siABC,DEF
Note: The data layer variable names are preset by the 6sense WebTag.
Here’s an example of how that might look:
For segments, a special handling of segment IDs is needed. Each segment an account is a part of will be generated as its own variable. When the account identified by the API is in a particular segment, the variable will be created with the naming convention
segment_<segment_id>_6si. For example,segment_12345_6si.Note: For segments, you will need to get the segment ID from the 6sense platform and format the user property name within GTM. See section 1b above.
It may be helpful to create a spreadsheet like the following:
Segment Name
Segment ID
GTM Variable (i.e. =
CONCAT("segment_",$B2,"_6si"))Segment ABC
123456
segment_123456_6siSegment DEF
987654
segment_987654_6siAdditionally for segments, we recommend setting the Default Value to false and to enable Notes (click the three dots on the top right) and note details on the segment such as a link to the ABM platform).
The final segment variable may look like the following:

For scores, the dataLayer variable is built out with the “model” name as a part of the variable name. If you only have a single model, your model name will typically be the same as your 6sense instance URL prefix (IE, https://model.abm.6sense.com). For multi-model 6sense instances, you can repeat the variable names. Naming Convention:
<variable>_<model>_6si. NOTE: The dataLayer values below are examples only; “model” will need to be replaced with the name of your model.Model
Variable
GTM dataLayer Value
model_a
is_6qa
is_6qa_model_a_6simodel_a
intent_score
intent_score_model_a_6simodel_a
buying_stage
buying_stage_model_a_6simodel_a
profile_score
profile_score_model_a_6simodel_a
profile_fit
profile_fit_model_a_6simodel_b
is_6qa
is_6qa_model_b_6simodel_b
intent_score
intent_score_model_b_6simodel_b
buying_stage
buying_stage_model_b_6simodel_b
profile_score
profile_score_model_b_6simodel_b
profile_fit
profile_fit_model_b_6si
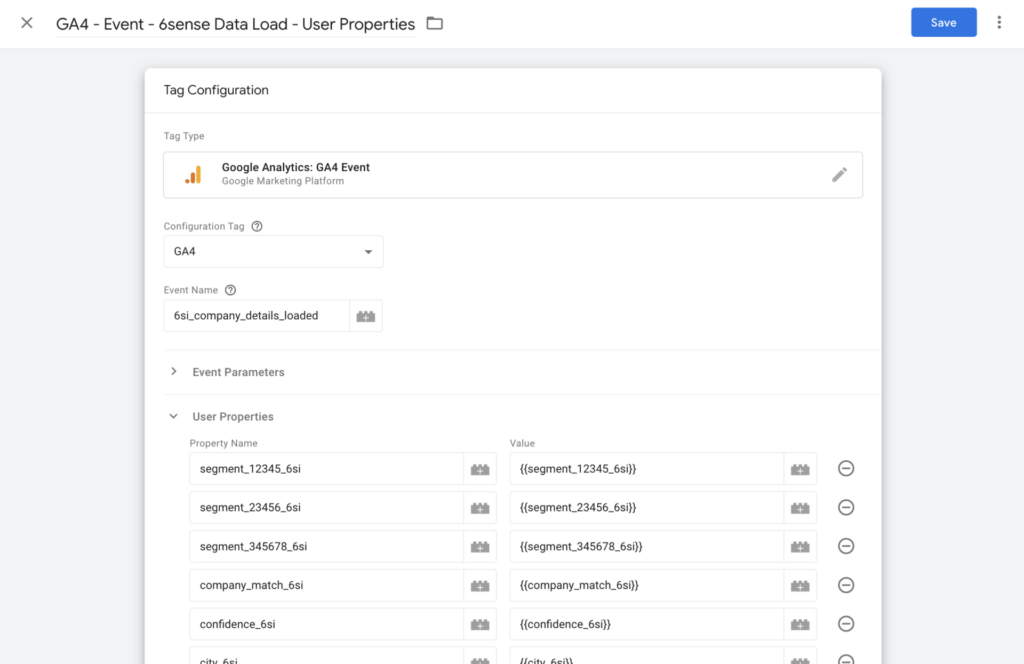
Create the GA4 Event Tag
Create a new tag for sending the data: GA4 Event.
Details:
Tag Name: 6sense Company Details to GA4.
Tag Type: Google Analytics: GA4 Event.
Event Name:
company_details_6si.
Under User Properties:
Property Name: Choose from the above list, pasting in the Data Layer Variable name.
Property Value: Click the building block icon and choose the variable created previously.
Under Triggering, select the trigger you created in step 2b.
Save.
You may publish now, or wait until the final step of this guide to test your setup using the Google Tag Manager Tag Assistant and GA4 DebugView.
Step 3) In Google Analytics 4
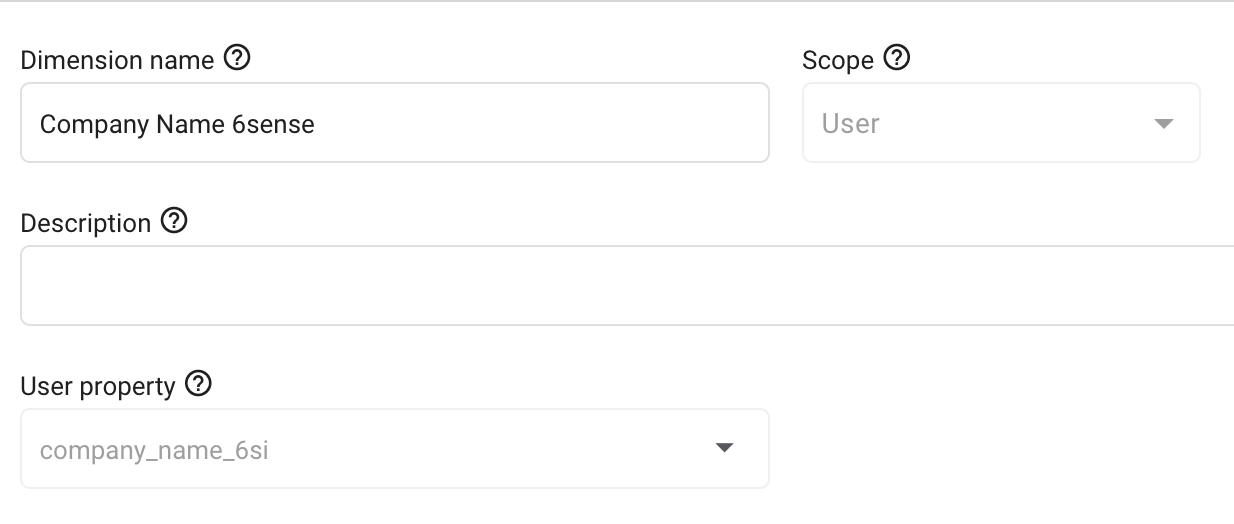
3a) Create Custom Definitions
In GA4, go to Admin > Data Display > Custom Definitions.
Create a Custom Dimension for each user property configured.
Dimension Name: Can be whatever you would like, but cannot start with a number.
Scope: User Description: Can be whatever you would like – for segments we recommend pasting in the link to the segment in 6sense.
User Property: Paste in the Property Name created above.
After creating, your list may look like the following:
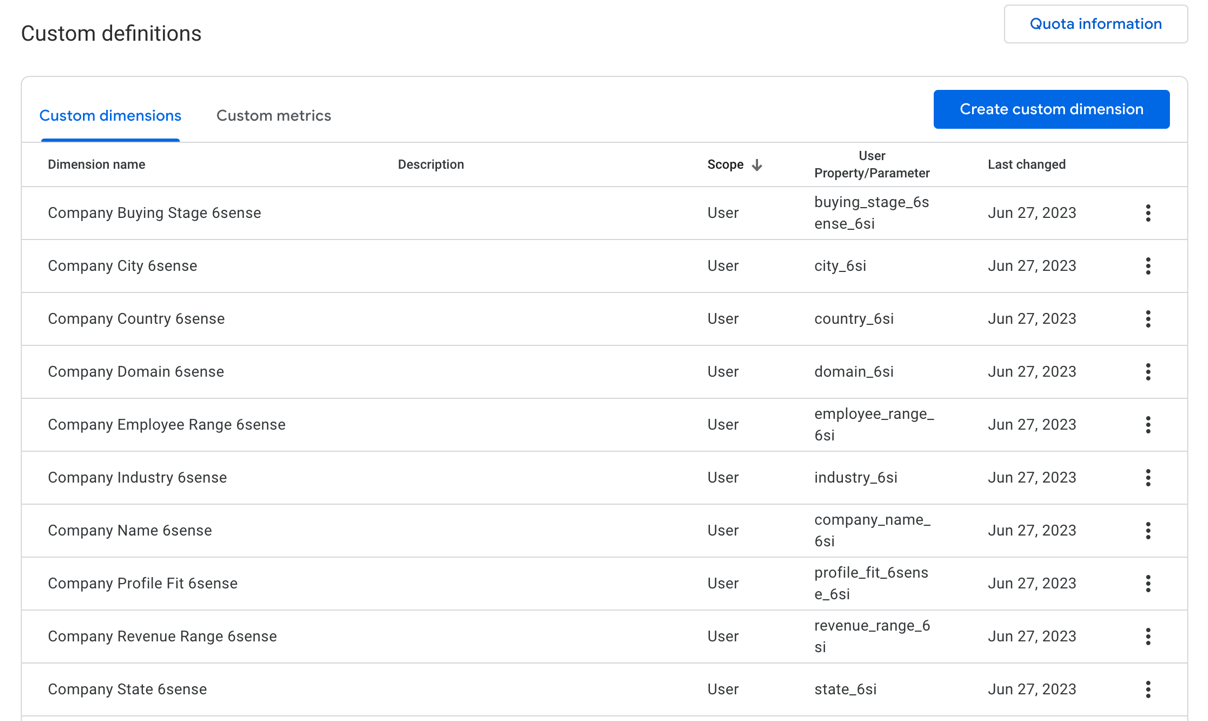
Segment custom definitions will look similar to:

3b) Syncing 6sense Segments as an Audience
In Admin > Audiences, create a new Audience and select Custom Audience.
Add a condition, click Custom, and select the specific Segment User Property you want to sync.
The filter should be “exactly matches (=)”
true.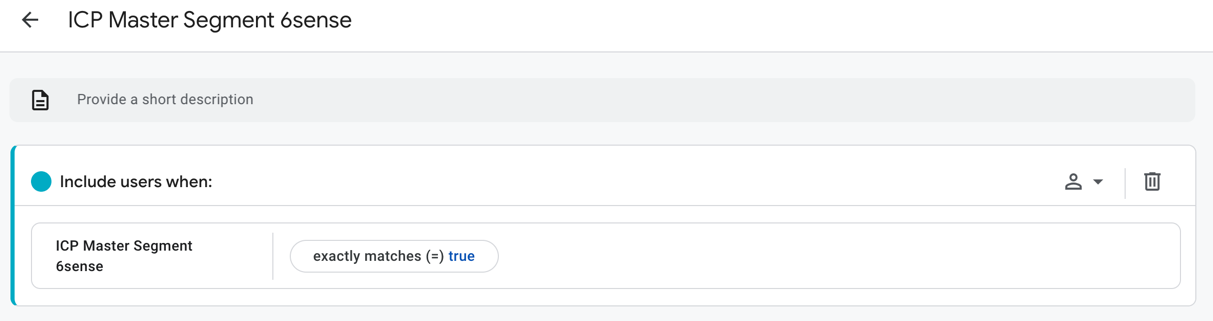
If you just created this User Property and Audience it will take some time to populate. Check back in 24 hours. If you do not see the Audience populating, double check that the Segment was published to the API and that the GTM dataLayer variable name, User Property name in the GTM GA4 event, and the GA4 custom definition User Property name are all the same.
Step 4) Validate and Test
In Google Tag Manager, navigate to Versions and preview the latest version of with all the 6sense changes.
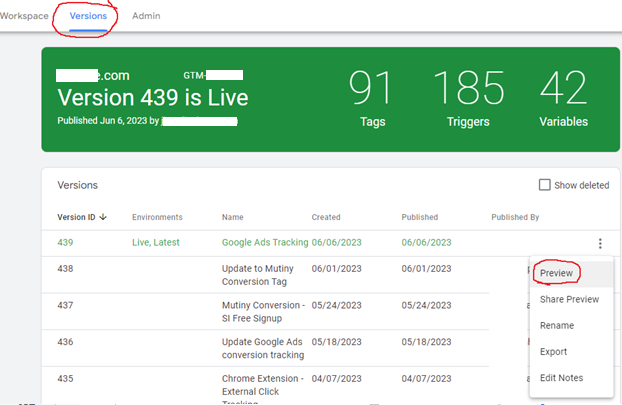
Tag assistant window should open. Input a URL to test if this 6sense implementation is working. Click Connect.
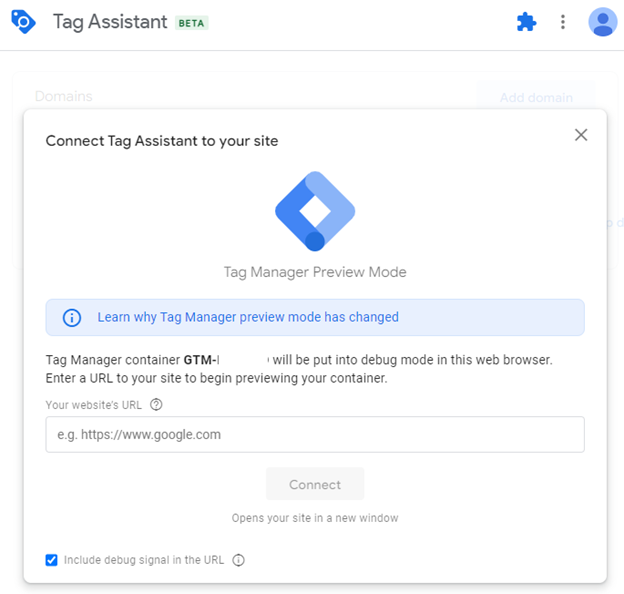
New tabs will open, one for the URL you input and another for tag assistant.
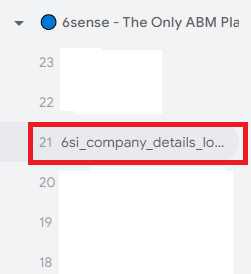
Open the tag assistant tab. There is a list of events on the left. Look for “company_details_loaded_6si”.
If you do not see this event, then go through all the implementation steps above to look for any differences between these directions and what you have setup. Make changes and only proceed to the next step when you see “company_details_loaded_6si”.
Navigate into your GA4 instance to Admin > DebugView.
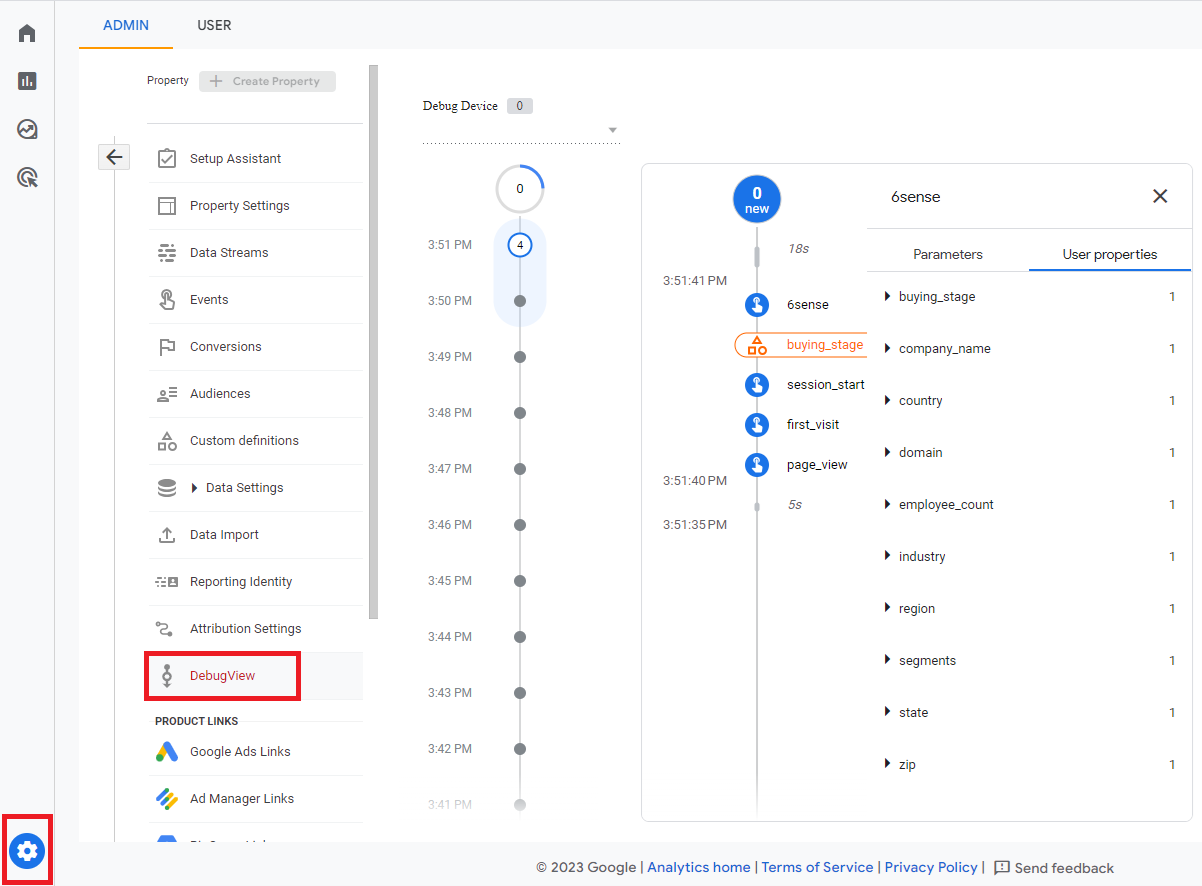
This view will display events related to the tag assistant opened earlier. Look for the “6sense” event or “company_details_6si” event. It may take a few minutes to show. Once you see it, click the event, click User Properties, and verify all 6sense data setup in previous steps is shown in this list.
If you are missing a data point, review your setup against all these instructions to spot any differences related to implementation error. If you see all 6sense data on this screen, then your setup is complete and in 48 hours you will be able to see the data in GA4 reporting.
FAQ
Q: Why are segment names missing or truncated in GA4?
A: You may find that values stored in GA4 custom dimensions are truncated as GA4 has a 36-character limit for displaying custom dimension data. If you are utilizing the approach of storing all segment names or IDs in a single custom dimension, 6sense will store all segments / IDs associated with an account in a comma-delimited format in the same custom dimension. As the number of segments an account belongs to increases, the likelihood of the data reaching or exceeding GA4’s 36-character limit increases. In this case, any characters exceeding this limit will be lost. To resolve this, we recommend the creation of separate dedicated custom dimensions for all critical segments you wish to track in your GA4 reporting. Details on implementing this approach can be found in section 2C (step 2) in the documentation above.
Additionally, segments may not appear in GA4 if your 6sense API is configured only to push data on published segments and the segments in question are not configured for inclusion in API responses. More information on this topic can be found in our published segments documentation.
Q: Why am I not seeing score or segment information but I’m able to see company firmographic data in GA4?
A: This can occur if the option for sending score and segment information is not enabled in the API Token Management screen of 6sense. Please see step 1b of this article for instructions on how to find these settings.
Q: Why am I seeing Not Set when viewing 6sense attributes in GA4?
A: Seeing “not set” values in GA4 can occur for a number of reasons:
The custom dimension is event scoped rather than user scoped.
The custom dimension in GA4 or variable in GTM have incorrect naming conventions. Please review step 2c in this article.
Changes made to GTM were not published.
No value was pushed from the 6sense API. For example, if a visitor is not matched to an account, you will not see account-related information such as industry, predictive scores, segments, etc.
Q: Do I need to add any additional domains to my Content Security Policy (CSP) for this feature?
A: Yes, ensure the following domains are added to default-src
*.6sc.co
*.6sense.com
Q: Why am I seeing no results in GA4 when creating an audience report?
A: It can take up to 48 hours to see 6sense attribute data in GA4.