Overview
Salesforce restricts access to uninstalled connected apps, which can prevent new users from completing integrations. To enable the 6sense and Salesforce integration, new users must install and authorize the 6sense Connected App in their Salesforce org.
For existing 6sense customers, the integration continues to work with existing tokens. However, re-authentication or new connections may fail unless the app is installed and assigned to the appropriate user.
This article walks you through the setup process for both new and existing 6sense customers, including installation, configuration, and reauthorization steps.
Important
This setup applies to Salesforce, Pardot, and Salesforce Sales Engagement. You only need to complete the steps once. Setting up the 6sense Connected App in any one of these environments enables integration across all three. There's no need to repeat the process separately for each product.
Prerequisites
A setup user is the account used to initiate the connection (OAuth) between Salesforce and 6sense. The setup user is a Salesforce System Administrator or a user with a Salesforce license.
Integration user account to perform data sync.
If using a Salesforce licensed user account (not a System Administrator), assign one of the following permissions:
Approve Uninstalled Connected Apps (if API Access Control is off)
Use Any API Client (if API Access Control is on)
To check if API Access Control is ON or OFF:
In Salesforce, select the Settings icon in the top navigation bar.
In Quick Find, type Session Settings and open Session Settings.
Locate for the API Access Control section (toggle/checkbox or related controls).
Note: If the API Access Control is not available, it means the API Access Control is off. To get this functionality, reach out to the Salesforce support.
If API Access Control is ON, assign the permission option Use Any API Client to the integration user.
If API Access Control is OFF, assign permission option Approve Uninstalled Connected Apps.
To assign a permission to a permission set:
In Salesforce, log in as a Salesforce System Administrator.
Go to Administration > Users > Permission Sets.
Select New.
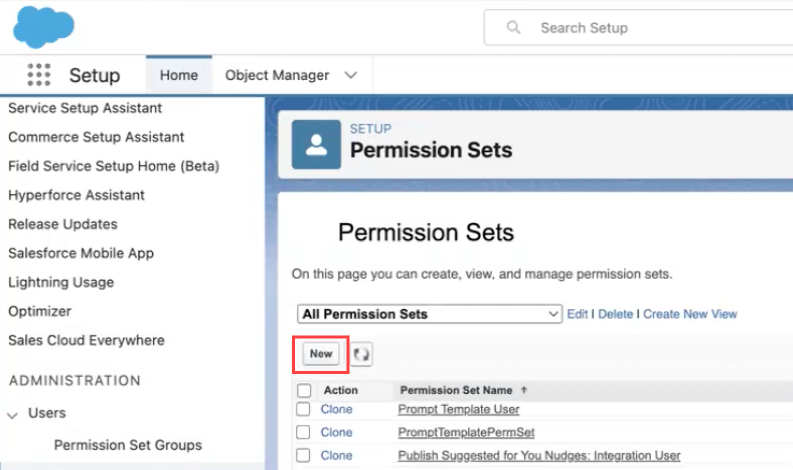
Enter a Label and API Name for the permission set.
Example:
Label:
6sense Integration AccessAPI Name:
6sense_Integration_Access
(Optional) Add a Description to clarify the purpose of the permission set.
Leave the License field blank.
Select Save.
Go to Administration > Users > Permission Sets.
Select the Permission Set you want to modify.
Under the System section, select the type of permission you want to add:
Scroll down to the System section and click System Permissions.
Select Edit.
Check the permissions you want to update.
Select Save.
To assign the required permission set to the setup user:
Log in as a Salesforce System Administrator.
In Salesforce, go to Administration > Users > Users .
Locate the user you want to assign the permission to.
Select the user and select Edit.
In the Permission Sets Assignment section, select Edit Assignments.
Choose the permission set based on API Access Control.
If API Access Control is ON, choose Use Any API Client for the integration user.
If API Access Control is OFF, choose Approve Uninstalled Connected Apps.
.png)
Select the Add icon.
Select Save.
New Customers: Install and authorize the 6sense App
Step 1: Trigger 6sense App visibility in Salesforce (One-Time OAuth Authorization)
By default, the 6sense Connected App does not appear in Salesforce. To make it visible, you must complete an initial OAuth authorization using the setup user but not with the Integration user.
Note: The setup user is the account used to initiate the connection between Salesforce and 6sense. The setup user is a Salesforce System Administrator or a user with the required permissions. The Integration user is used for ongoing data sync and must not perform this step.
To authorize the app:
In 6sense, select the Settings icon in the top navigation bar.
Go to Integrations.
Under the CRM section, select Salesforce (Production).
Select Connect if not already connected.
Sign in with the setup user.
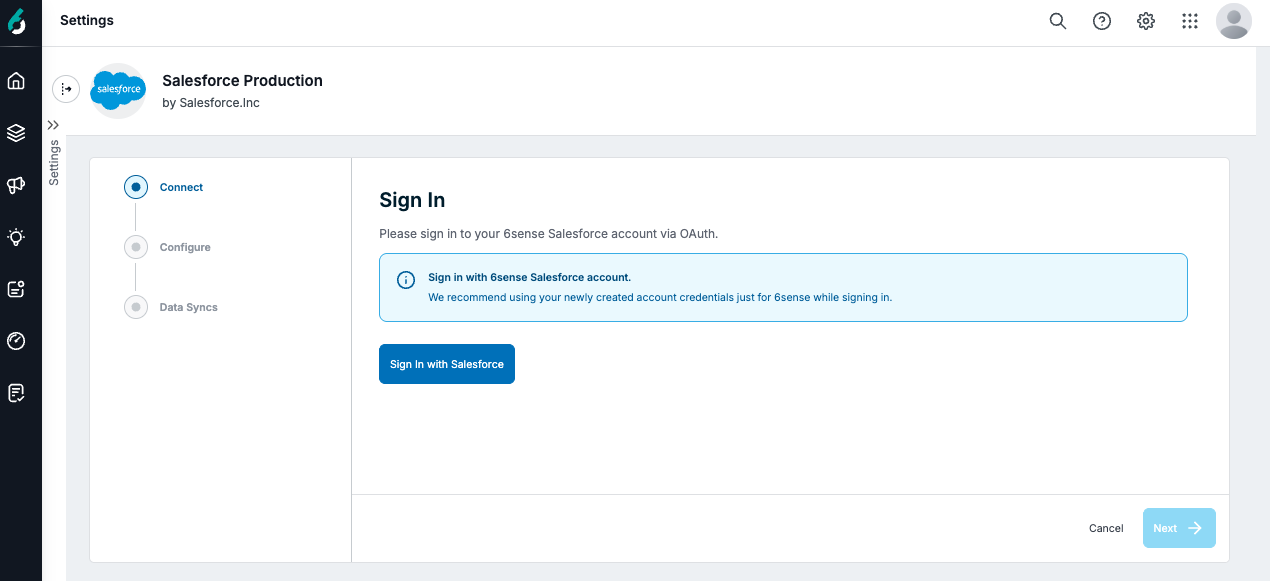
Approve the OAuth consent screen by selecting Allow.
.png)
Select Next.
Select Save & Next.
Select Finish.
The app now appears in Salesforce Setup > Connected Apps OAuth Usage.
Step 2: Install the 6sense Connected App in Salesforce
The name of the 6sense Connected App is sfdc_6sense_oauth_app.Follow these steps to install it:
In Salesforce, login as a System Administrator.
Go to Setup > Apps > Connected Apps > Connected Apps OAuth Usage.
Locate the 6sense Connected App, which is
sfdc_6sense_oauth_app.Select Install next to the app name.
Note: If you don’t see the Install button, repeat Step 1 to trigger visibility.
Select Install to confirm installation.
.png)
Step 3: Configure 6sense Connected App policies in Salesforce
In Salesforce, login as a System Administrator.
Go to Setup > Apps > Connected Apps > Connected Apps OAuth Usage.
Locate
sfdc_6sense_integration_connected_appand select Manage App Policies..png)
On the
sfdc_6sense_integration_connected_app page,select Edit Policies..png)
Under the OAuth Policies section, in the Permitted Users field, set Permitted Users to Admin approved users are pre-authorized.
Note: The policy was recommended by Salesforce.
.png)
Select OK to confirm.
Note: The system logs out all users.
Step 4: Add Profiles or Permission Sets of the Integration user for accessing the 6sense Connected App
The Integration user is the account your organization designates to connect Salesforce with 6sense. This user must have the correct profile or permission set to complete OAuth authorization.
If the Integration user does not have the required permissions, they will not be able to authorize the app, even if it has been installed.
To add profiles or permission sets:
In Salesforce, go to Setup > Apps > Connected Apps > Connected Apps OAuth Usage.
Locate
sfdc_6sense_integration_connected_appand select it..png)
Select Manage Policies or Manage Permission Sets to add your Integration user’s profile or permission set. Refer Enable API Access Using Permission Sets.
If you select Manage Permission Sets, choose the appropriate permission sets.
.png)
If you select Manage Policies, choose the appropriate profile.
.png)
Save your changes.

Step 5: Reauthorize in 6sense as the integration user
In 6sense, go to Settings > All Integrations > CRM > Connect to Salesforce.
Select Sign in with a different Salesforce account.
Log in as the Integration user.
Approve the OAuth consent screen.
Step 6: Verify installation and access
In Salesforce, go to Setup > Manage Apps > Connected Apps OAuth Usage.
Confirm that the Integration user appears under Users for the 6sense app.
Existing Customers: Update or reauthorize the 6sense App for existing integrations
Complete setup to avoid future disruptions
If your 6sense integration is working as expected, you don’t need to take any action. Your existing tokens will continue to work.
However, if you encounter issues with re-authentication or creating new connections, follow these steps to complete the setup:
In Salesforce, login as a System Administrator.
Go to Salesforce Setup > App Manager > Connected Apps OAuth Usage.
Locate
sfdc_6sense_oauth_app.Note:
sfdc_6sense_oauth_appshould appear as you authorized the app earlier.Select Install.
Set Permitted Users to Admin approved users are pre-authorized.
Add Profiles or Permission Sets of the Integration user to do OAuth.
Reauthorize in the 6sense platform.
Important
Reauthorizing may log out users from other Salesforce integrations such as Pardot and Salesforce Sales Engagement. To resolve this issue, reauthorize the applications if the integration user is logged out.
Troubleshooting
Can't see the Install option in Setup?
Reason:
This happens if the app has never been used in your organization before.
Solution:
Repeat Step 1.
Salesforce will then display the 6sense app in Connected Apps OAuth Usage.
FAQ
What happens if the 6sense app isn’t installed?
Salesforce enforces Connected App Usage Restrictions, which block access to uninstalled apps. If the 6sense Connected App isn’t installed and trusted in your Salesforce organization, users may encounter errors during OAuth authorization.
OAUTH_APPROVAL_ERROR_GENERIC Error- If API Access Control is not enabled.OAUTH_APP_BLOCKED- If API Access Control is enabled..png)
Is my Salesforce data safe?
Yes. 6sense doesn’t sync any Salesforce data until you toggle on Data Sync in the 6sense UI. Connecting the app through OAuth only establishes authorization. No data is pulled until you opt in.