This article helps you install the latest version of the 6sense JavaScript website tag.
If you are looking for information on the individual WebTag Configuration Options, see 6sense WebTag 2.0 Configurations.
If you are looking for information on setting up the Company Identification API with WebTag 2.0 in Google Tag Manager, see WebTag 2.0 Guide: Install the Company Identification API on Google Tag Manager & GA4.
If you are looking for information on setting up the Company Identification API with WebTag 2.0 in Adobe Launch (Data Collection), see WebTag 2.0 Guide: Install the Company Identification API on Adobe Launch (Data Collection).
Advantages of WebTag 2.0
WebTag 2.0 is a guided interface and simplified website tag code that you may use to manage web tags from 6sense.
This new interface moves the “configuration” of a 6sense WebTag out of the raw code on your website or tag manager and into the 6sense Integration Settings interface. Additionally, it allows you to generate multiple WebTags, each with their own dedicated configuration, for their domains and landing pages.
As new features become available for the 6sense WebTag, they will be be made available through the 2.0 interface. Because of this, if you have older 6sense WebTags, we encourage you to create a new 6sense WebTag 2.0.
When new features become available for the 6sense WebTag, simply updating the configuration within the 6sense Integration Settings and saving will “push” the update to the tag already in place on the website or tag manager. The code present on the website or tag manager remains the same.
Any and all 6sense WebTags currently deployed on web pages will continue to function as normal. You may enable the 6sense WebTag 2.0 interface with no impact to your existing 6sense WebTag on your websites.
Requirements
Before continuing, ensure that your 6sense instance has been created.
Set Up WebTag 2.0
Considerations when Getting Started
It will take 24 hours for traffic from the WebTag to begin flowing into your 6sense Sales Intelligence App.
By default, subdomains are automatically covered when the domain is tagged, so the manual addition of subdomains is not required.
Generate a New WebTag
In 6sense platform, go to Settings.
In the All Integrations tab, select WebTag & APIs, and then click the WebTag card.
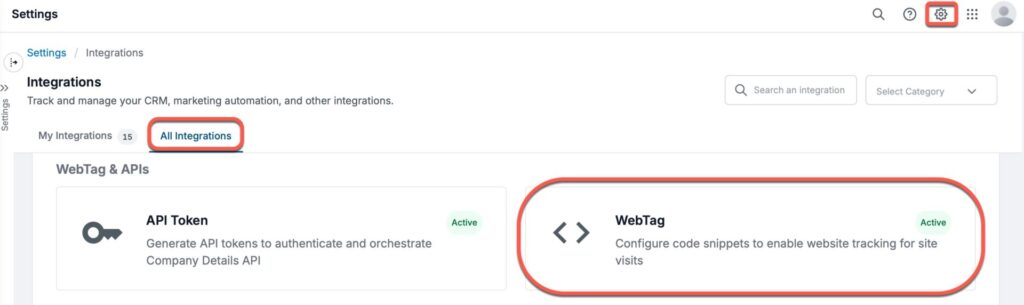
If you are using WebTag 1.0, you can see your WebTag 1.0 [Legacy] Code by clicking on View Code button.
Click Add domains and then click +Add Domains.
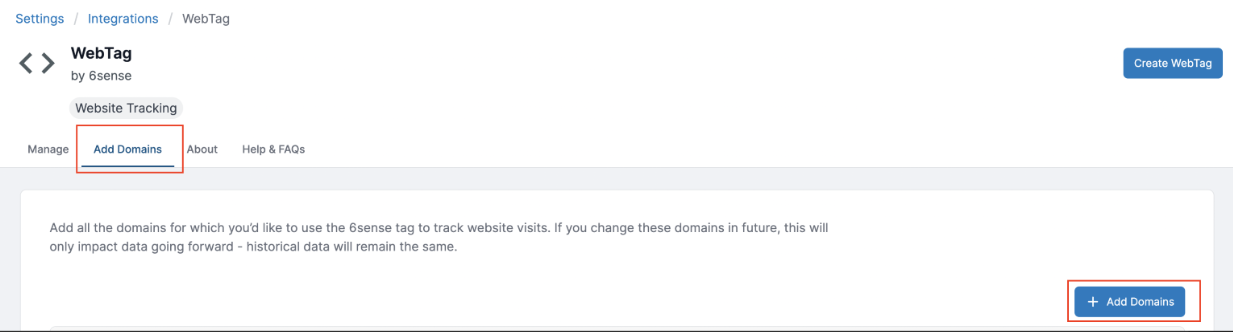
At least one domain is mandatory to enable your WebTag. Please provide all of your domains to make sure all meaningful web activities are being accepted and used in 6sense analytics and predictive models.
Example: Company XYZ owns 4 web domains to help sell their products. They want to track 3 of their 4 domains within 6sense. They would add 3 domains in this section, for example: dundermifflin.com, dundermifflinsaber.com, thedundies.com. The last domain, MichaelScott.com, would not be added to 6sense.
Click Create WebTag.
A Setup page opens, where you provide basic details including the WebTag Instance name and your preferred hosting method.
Note: If you are using Adobe as your tag manager solution, select HTML Website.
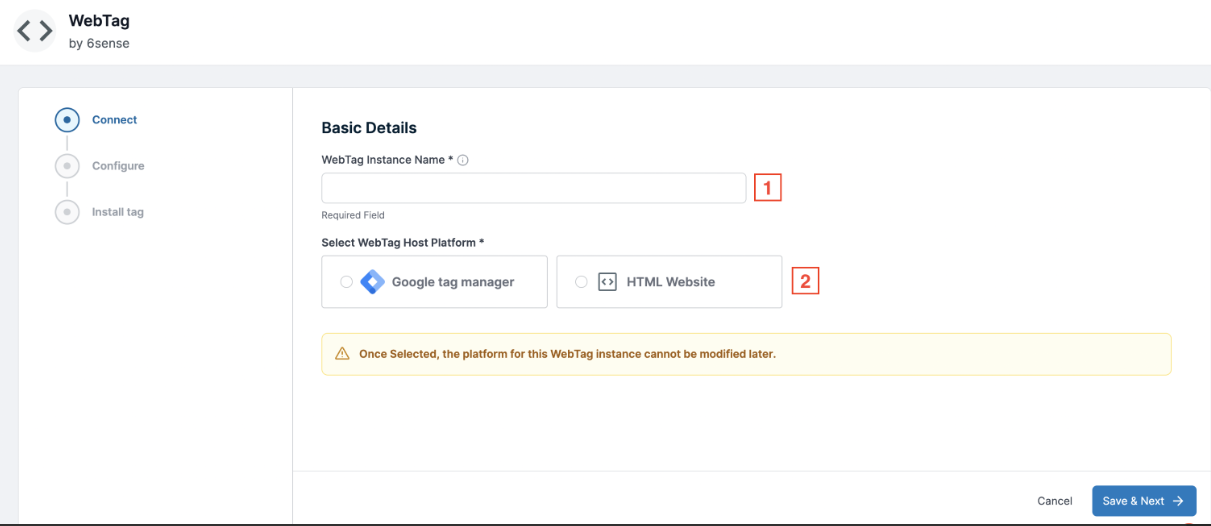
Click Save & Next.
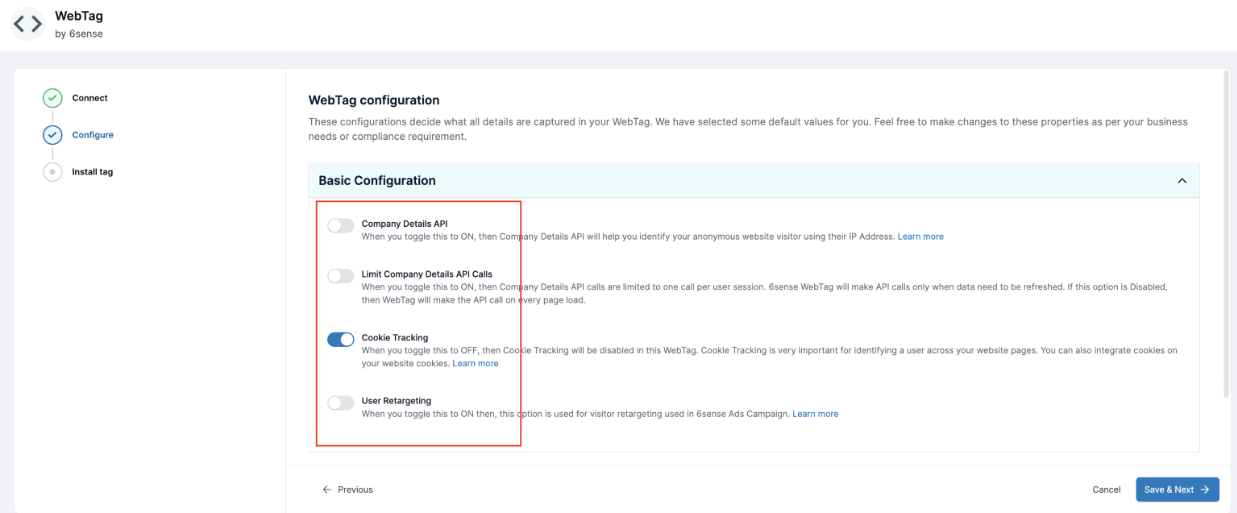
The configuration section shows a list of Basic and Advanced options.
If you need additional guidance work with your 6sense CSM to choose the correct properties as per your business needs or compliance requirements.
Set up your configuration.
Basic Configuration Options:
Company Details API: The Company Identification API (also known as 6signal API or Company Details API) helps you identify your anonymous website visitors or leads by taking an IP as input and returning company firmographic attributes, segments, and scores associated with the visitor.
The default is OFF. When you toggle this to ON, then the Company Identification API will help you identify your anonymous website visitor using their IP Address.See the Company Identification API FAQ for more information.
To integrate with Google Analytics/Google Tag Manager see Install the Company Identification API on Google Tag Manager [6sense WebTag 2.0].
Limit Company Details API Calls: This option works only when the above option of “Company Identification API” in ON. When you toggle this to ON, then Company Identification API calls are limited to one call per user session. 6sense WebTag makes API calls only when data need to be refreshed. If this option is Disabled, then the WebTag makes the API call on every page load.
Cookie Tracking: The default is ON. When you toggle this to OFF, Cookie Tracking is disabled in this WebTag. Cookie Tracking is very important for identifying a user across your website pages. You can also integrate cookies on your website cookies.
See 6sense Cookies & Browser Storage for a list of cookies and more information on disabling and re-enabling the cookies.
Advanced Configuration Options:
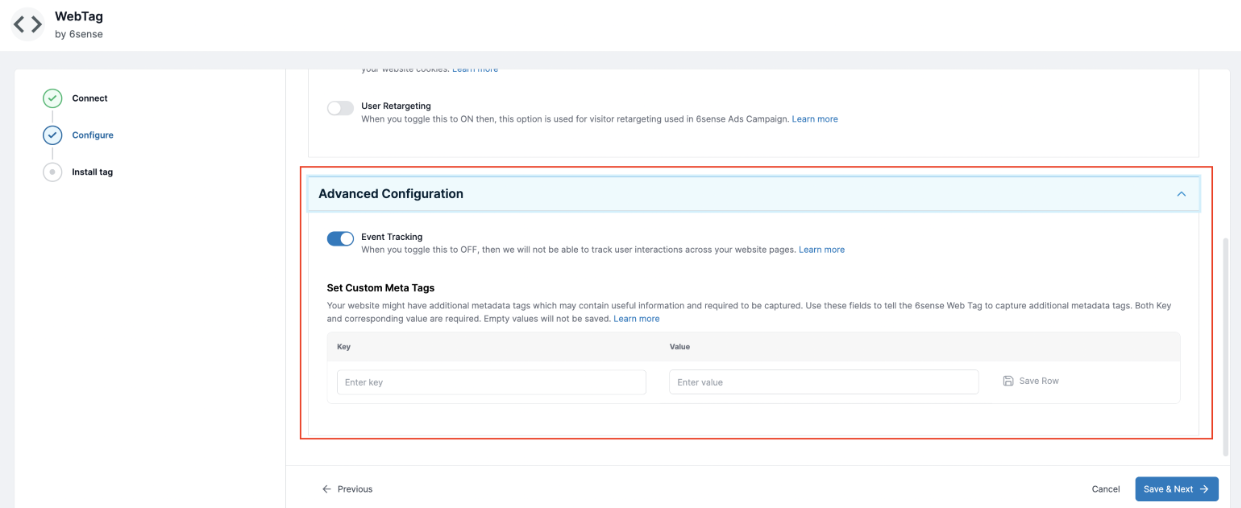
Event Tracking: The default is ON. When you toggle this to OFF, then 6sense will not be able to track user interactions across your website pages.
Events includes user interactions such as:
HTML meta-tag “description” value
HTML meta-tag “keywords” value
Page Title
Page Loads
Form Interactions and Submits
Link, Button, and Object Clicks
Video Events
Set Custom Meta Tags: Your website might have additional metadata tags which may contain useful information and are required to be captured. Use these fields to tell the 6sense WebTag to capture additional metadata tags.
Your 6sense Onboarding Consultant may instruct you to configure this setting.
Click Save & Next.
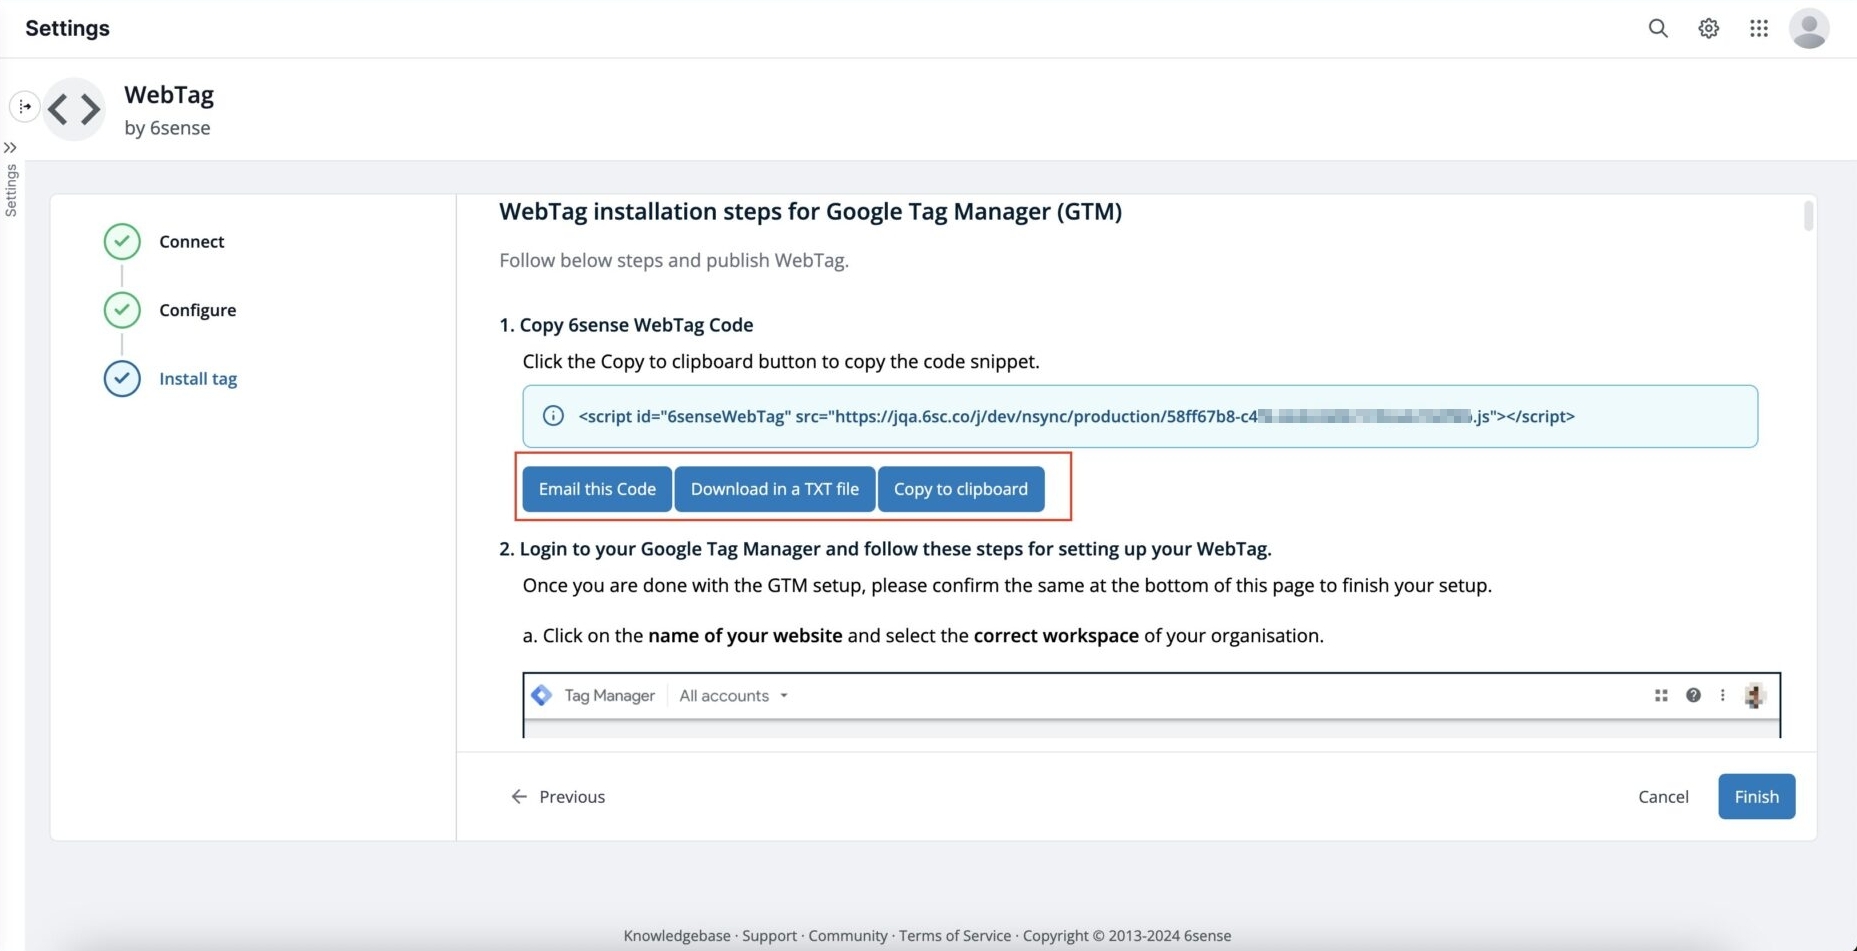
You can now click Download in a TXT file to download the code or click Copy to clipboard to copy the code, and proceed with your selected method as in Step 6 above.
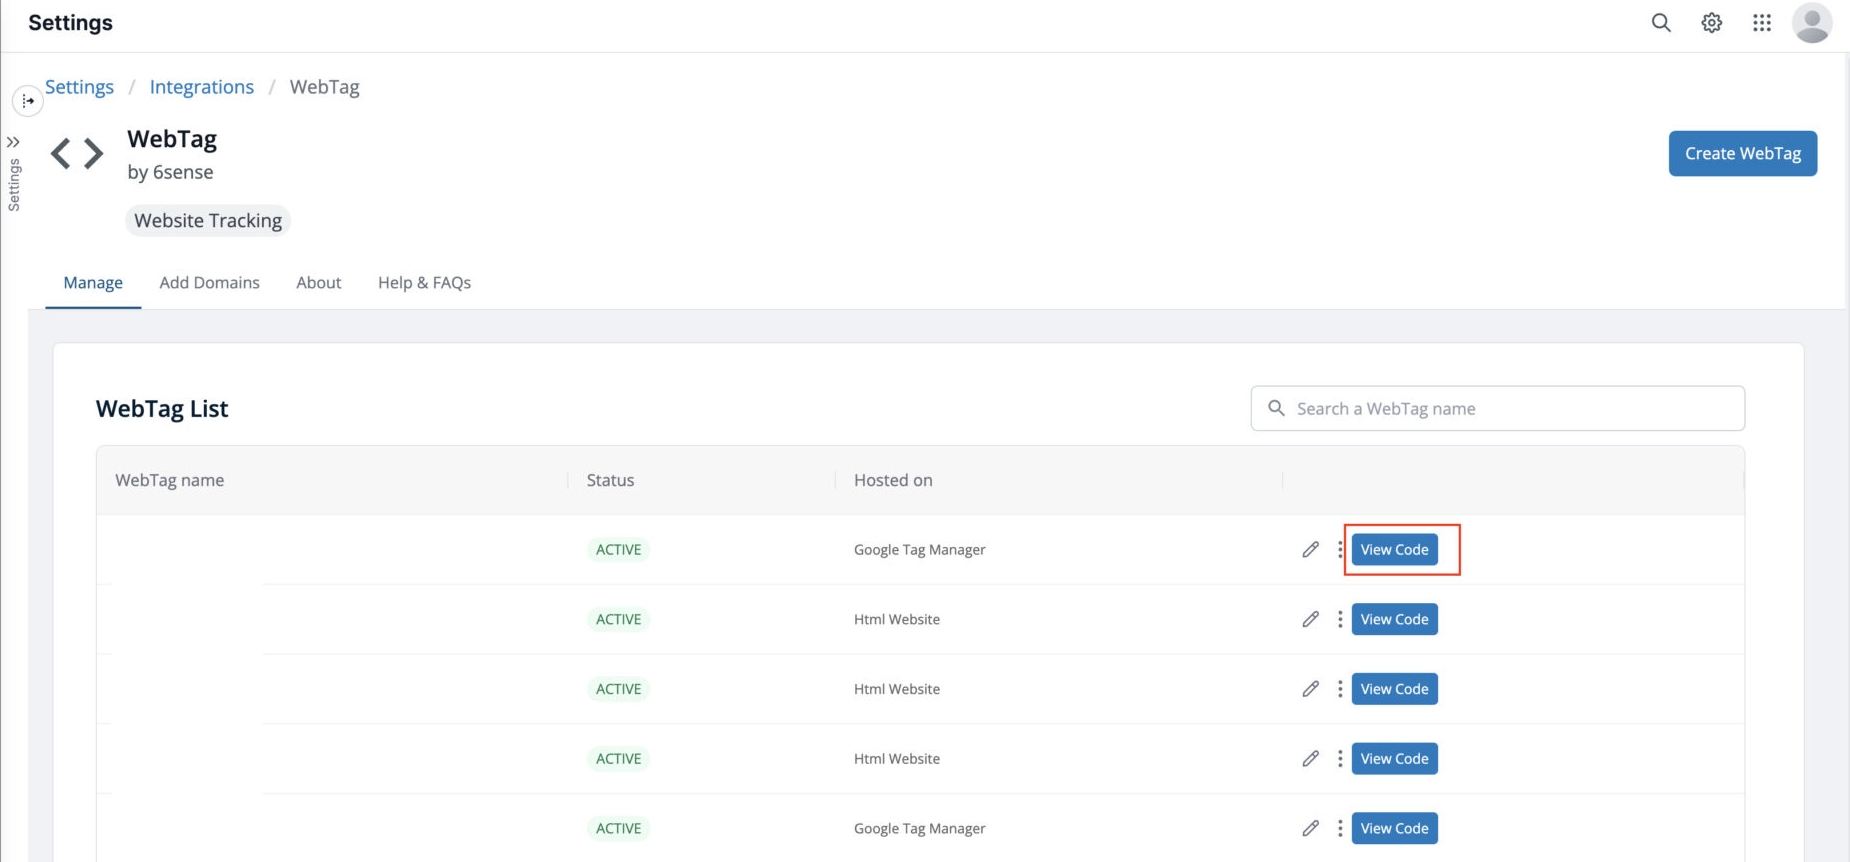
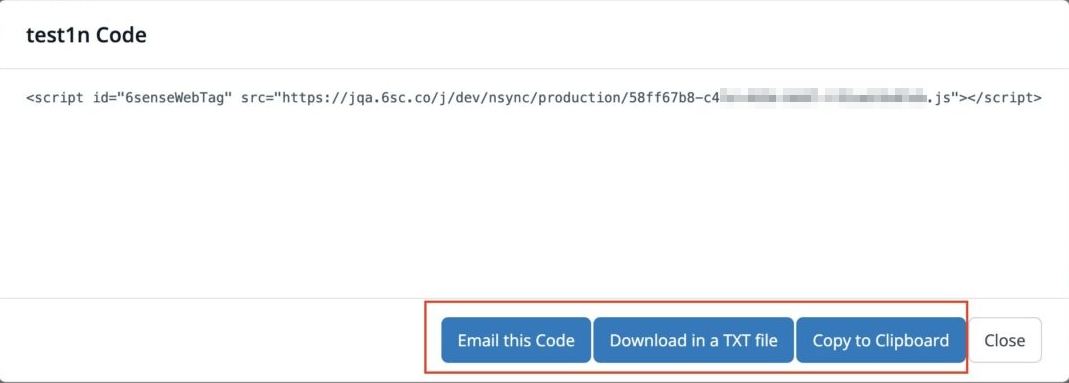
You can view code to download or copy or send code from the Manage Page. To share WebTag code over email, see Send WebTag 2.0 Code to Your Development Team.
Implement the WebTag on Your Website Code
Copy the 6sense WebTag code, as previously described.
Open the HTML code of your website.
Paste the code snippet just above the closing tag of your code. Replace any existing 6sense WebTag if present.
In-line deployment is preferred.
The tag must be placed on every page on your website, including microsites, landing pages, and conversion pages.
Implement the WebTag using Google Tag Manager
Follow the instructions available in the 6sense WebTag Configurations UI. This page is available after you configure and save your WebTag.
Note that you will be replacing any existing 6sense WebTags with your new 2.0 tag.
If you are updating your 1.0 WebTag to 2.0 and you have the 6sense Company Identification API installed with Google Tag Manager, see WebTag 2.0 Guide: Install the Company Identification API on Google Tag Manager & GA4.
Implement the WebTag using Adobe Launch (Data Collection)
Follow the instructions at WebTag 2.0 Guide: Adobe Launch (Data Collection) Installation.
You will replace any existing 6sense WebTags with your new 2.0 tag.
The 6sense WebTag 2.0 is not compatible with the existing 6sense Adobe Launch Extension App. Follow the above guide to achieve the same functionality.
Move from Legacy WebTag to WebTag 2.0
See the Guide to Move from Legacy WebTag to WebTag 2.0.
Salesforce Marketing Cloud Account Engagement (Pardot) iFrames and Smart Form Fill
For a Salesforce Marketing Cloud Account Engagement form to work with Smart Form Fill, make sure to place the Webtag 2.0 Code inside the Salesforce Marketing Cloud Account Engagement iFrame. It will look something like the below.
<iframe src="https://pardot.6sense.com/l/123456/123examplesource456">
#document
<!DOCTYPE html>
<html>
<head></head>
<body>
<form accept-charset="UTF-8">
<script type="text/javascript>
</script>
<script id="6senseWebTag">
FAQs
6sense does not support http/2, only http/1.1.
Q: What is the 6sense JavaScript WebTag?
A: The 6sense WebTag is a small block of JavaScript that’s placed on your website. The WebTag is typically deployed on a template page within a content management system (CMS), through a tag management system (TMS), or in the opening of your website. Make sure the WebTag appears on all pages, including any ad landing pages, micro-sites, or marketing automation platform hosted pages. The JavaScript code is lightweight and loads asynchronously.
Q: Why should I implement the WebTag?
A: 70% of the buyer’s journey consists of anonymous research, website visits, and other interactions that most sellers and marketers don’t know about. Traditional sales and marketing solutions are designed for known contacts and accounts that show up in your known funnel. 6sense lights your Dark Funnel with our patented Company Graph, which identifies anonymous accounts more accurately than any other vendor, giving you visibility into your full funnel so you can select and work the best accounts for your business based on the intent they’re exhibiting.
Q: Do I need to remove my old/existing 6sense WebTag?
A: Yes. Please replace the existing 6sense WebTag with the new WebTag 2.0 code. Only one 6sense WebTag should be present on a page.
Q: What data does the WebTag collect?
A: The WebTag collects a combination of IP address, cookie ID, and advertising ID (from mobile devices where available) from website visitors. The data stored in the cookie is the unique identifier of the user that gets deleted if the user clears their cookie. 6sense looks to match these data points against its Company Graph to identify the account (company) to which that visitor belongs. 6sense does not de-anonymize at the person level, but only matches the account to which that site visitor belongs.
By default the tag sends back the following event data to 6sense:
HTML page “title” value
HTML metatag “description” value
HTML metatag “keywords” value
Page load
Forms
Anchor
Video
Button
Object
Q: Can I configure what data the WebTag sends back to 6sense?
A: By default the tag sends all data back to 6sense. For now, you can only enable or disable the event tracking configuration. We will provide updates to provide controls for each events.
Q: Can the 6sense WebTag be configured to run without setting a cookie on a user’s browser?
A: Yes, customers can configure this setting manually in the Manage WebTag section of your ABM platform. This stores temporary values in-memory, that will not persist across page loads.
That means, all events that happen (clicks, form submits, etc.) on a pageview will be linked to the same visitor. However, once that visitor navigates to a new page, the linkage is broken and there is no way of knowing if this is a different person using the same IP address.
Q: What are the privacy implications?
A: Like any area that impacts our business, and especially our customers, we devote significant resources through our privacy team and executive leadership to ensure we have robust and up-to-date privacy processes in place in compliance with applicable laws. Our in-house privacy team is supported by best-in-class external privacy counsel that helps us monitor regulatory changes that impact the GDPR and other privacy laws, including the CCPA.
As you implement your account-based strategy, in addition to ensuring that you are getting a high-quality product that will provide real value, you may need to work with your legal and/or privacy teams to confirm you have privacy policies and/or cookie policies in place as necessary to comply with applicable privacy laws.
Specifically with respect to the tag, our customers are responsible for ensuring they have the right to provide the data to 6sense via the JavaScript tag. Although we don’t provide legal advice to our customers on privacy compliance, our customers are generally required to maintain a privacy policy compliant with applicable privacy laws that informs visitors about its use of cookies, the data collected, and how used, for example to deliver content or ads of interest or for other marketing purposes, and that the cookie data may be disclosed to third party vendors (like 6sense) for these purposes. Customers can implement cookie consent programs to obtain necessary opt-out/opt-in under applicable laws prior to the collection of data through the 6sense JavaScript tag.
As noted above, features of our JavaScript tag provide our customer’s webmasters the ability to stop the JavaScript from sending data to 6sense for a visitor if the visitor has either not opted-in or has opted out (depending upon how the customer has enabled the features) from the capture of data on the customer’s website.
For customers that use 6sense services for advertising retargeting (in other words, retargeting previous visitors to your website with ad campaigns), the following privacy steps are recommended:
Maintain a privacy policy compliant with applicable privacy laws that informs visitors that you engage in retargeting activities and use third parties for this purpose.
List 6sense as a sub-processor or third-party service provider for this purpose.
If applicable, include information on access to a user choice mechanism such as the opt out page(s) of the Network Advertising Initiative, the Digital Advertising Alliance, or the European Digital Advertising Alliance.
Implement cookie consent programs to obtain necessary opt-out/opt-in under applicable laws prior to the collection of data through the 6sense JavaScript.
See the latest version of the 6sense privacy policy.
Q: How effective is the WebTag if cookies are blocked?
A: IP addresses are our main lookup and we dynamically update our ID graph (not static). Even when cookies are blocked (cookies are already blocked on Safari/Firefox), we have seen minimal impact to our match rates based on the dynamic nature of our company ID graph. In the EU, where GDPR and cookie consent restrictions are more widespread, we have implemented a number of alternate solutions and continue to have strong match rates. Additional updates are available in IP Targeting in the EU.
Q: What are the domains I should add to my Content Security Policy (CSP)?
A:
*
.6sc.co*
.6sense.com
Q: Does the 6sense WebTag script load asynchronously?
A: The script placed on the website is not set to load asynchronously, but it is very lightweight and does not impact pageload times. If setting this script to asynchronously load is a requirement, this can be added with no change to functionality. The contents of this script will load the full 6sense WebTag which is set to load asynchronously.
Q: Why am I not able to delete a WebTag Instance?
A: If the WebTag is currently being used in an active smart form fill, it cannot be deleted. Please unlink it from that smart form fill before you proceed to delete it.
Q: Why am I not able to disable/deactivate a WebTag Instance?
A: If the WebTag is currently being used in an active smart form fill, it cannot be deleted. Please unlink it from that smart form fill before you proceed to delete it.
Q: Why am I not able to disable Company Identification API Setting?
A: If the WebTag is currently being used in an active smart form fill, it cannot be deleted. Please unlink it from that smart form fill before you proceed to delete it.
Q: What are my options for putting the 6sense WebTag JavaScript and cookie behind a cookie banner?
A: While we do not provide legal advice to our customers, our customers typically provide notice in a privacy policy or use cookie banners, in accordance with the Customer’s privacy policies and cookie consent settings. Where legally required, our customers implement cookie consent programs to obtain necessary opt-out or opt-in depending on applicable privacy laws prior to collection of data through the 6sense JavaScript. Features of our JavaScript provide our customers’ web admins the ability to stop the JavaScript from sending data to 6sense for a visitor if the visitor has either not opted-in or has opted out (depending on how the customer has enabled the features pursuant to its privacy and cookie consent policies).
In regards to the GDPR, and without offering legal advice, the EU has the ePrivacy Directive, which is implemented through individual country privacy laws. In general, the EU ePrivacy Directive requires informed consent for the placement of a cookie or use of another technology that stores or accesses information on a user’s device. There are exceptions to the consent requirements, for example, for technical storage and access purposes and where strictly necessary to provide a service requested by a subscriber. The scope of these exceptions (for example, whether it includes analytics cookies) differ among some member countries. Many of our customers follow the most restrictive approach, while others adopt different approaches based on the countries in which they do business and the types of services they provide to their subscribers. Some customers consider the collection of cookie data analytics as essential for running their business. This varies based on the customer and their use case.
Regardless of the above, there are two components to the 6sense webtag: (1) the JavaScript, and (2) the cookie. Features of the 6sense webtag provide our customers’ web admins the ability to either: (1) place both the JavaScript and cookie behind a cookie banner, or (2) place just the cookie behind the cookie banner while allowing the JavaScript to fire.
The 6sense JavaScript allows for account identification without dropping a cookie. In this case, while our customer will not collect cookie information to track a specific visitor’s journey, the JavaScript will be able to identify a specific account that has visited the customer’s website, and information such as date/time of access, browser used, etc. to provide value to the customer. Many customers consider this an important use-case because it allows for website personalization depending on the account that are visiting the website.
Note that all data displayed as a result of collection by the 6sense JavaScript is at the “company level,” and 6sense does not identify a person from the JavaScript data that we collect. 6sense cannot and does not identify individuals through this process.
Related Articles
HubSpot Form Submit Behavior: 6sense Web Tag Use Troubleshooting
Marketo Form Submit Behavior: 6sense Web Tag Use Troubleshooting