You can create many types of ad campaigns in Revenue Marketing (RevM) Advertising, such as LinkedIn ads and 6sense-managed ads.
6sense ad campaigns are managed through our own DSP solution and can serve across thousands of publishers and websites. We work with a number of leading SSPs (Supply Side Platforms) including OpenX, Pubmatic, Magnite, etc., that support programmatic bidding. We do not typically work with more traditional ad networks.
Prerequisites
Your user account must be a Primary Administrator, Administrator, or Marketing User to create campaigns.
A segment containing the list of accounts your campaign will target.
Create a new ad campaign
To create a new ad campaign:
In RevM (ABM), go to Advertising.
The Advertising > Campaigns page opens.
At the top right of the page, select Create Campaign. The Select Campaign Type page opens.
Select Create now for the type of campaign you want. Available campaign types include:
6sense Advertising Campaign: Allows you to run customizable self-serve campaigns.
6sense Connected TV: Allows you to run video ad campaign on streaming platforms.
6sense Contextual Targeting Campaign: Allows you to run campaigns on relevant web pages.
LinkedIn Advertising Campaign: Allows you to run self-serve campaigns in LinkedIn.
External Media Campaign: Allows you to create segments based on campaigns running outside of the 6sense platform to understand their account performance via the external campaigns.6sense Advertising
Note: Each campaign supports only one ad type. To use multiple ad types, create separate campaigns.
Identify the campaign.
For most campaign types, enter a descriptive name for your campaign.
For a LinkedIn Advertising campaign, select the LinkedIn Page and enter a campaign name.
Select Create campaign.
Advertising creates the campaign and opens its first setup page.
Set up the campaign
Based on the type of campaign you choose, the settings may vary.
Select a folder (optional)
At the top right of the page, select a folder for the campaign. The default folder is Unsorted. Refer to Advertising Campaigns Tab for details about using folders.
Select the segment
The first setting is for the segment.
Use the pulldown menu to select the segment, the list of accounts to use in the campaign.
(Optional) After you select a segment, a link appears so that you can review the segment’s definition (its list of accounts, date range, and filters).
Select Next.
The Campaign Setup page opens.
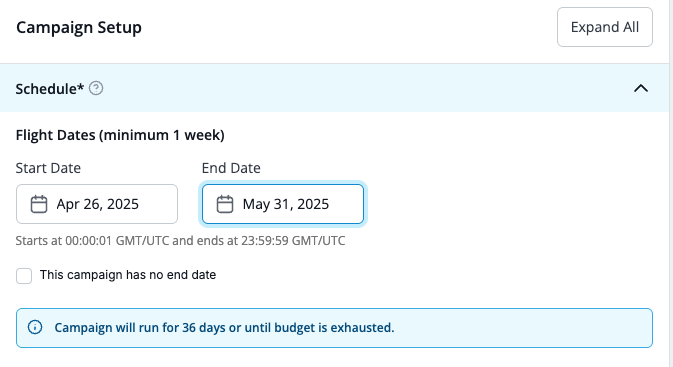
Set the schedule
In the Campaign Setup page:
Select the start date.
Select the end date for the campaign, or check the “no end date” option.
Advertising calculates the number of days in the campaign and tells you that the campaign will run for that number of days OR until your campaign budget is exhausted.
Set the Daypart
In the Campaign Setup page:
Select the Daypart Edit (pencil) icon. The Daypart panel opens on the right.
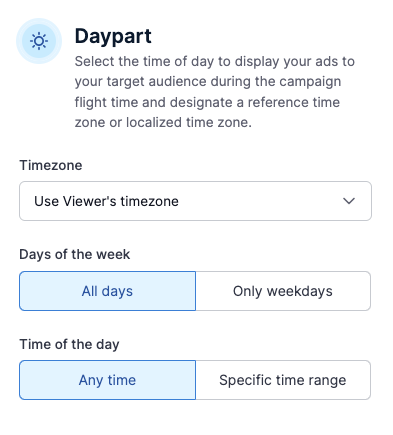
Select the timezone. By default, the viewer’s timezone will be used.
Select whether to send the ads every day of the week (default) or only on weekdays.
Select the time of day, either anytime (default) or specify a time range.
Select Save.
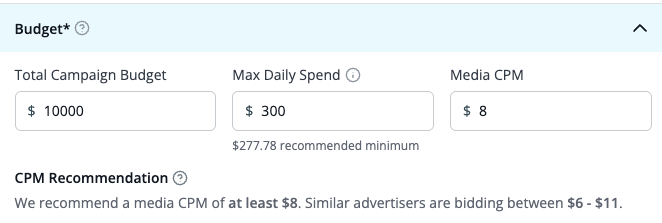
Set the budget
Click the Budget row to access the budget settings.
Set the Total Campaign Budget in dollars.
Set the Max Daily Spend in dollars.
Based on the total budget, Advertising recommends a minimum amount for this setting.Set the Media CPM in dollars. Advertising recommends a value, based on setup factors like segment size, segment geography, and budget.
Tip: Consider raising the recommended CPM by +$2 when using advanced targeting controls such as the Preferred Publisher list / custom allow list.
Set the frequency cap
The frequency cap is the maximum number of impressions that can be served to a person at an account, per day. Adjust this to fit your target audience size, personas, and ad exposure levels. We recommend starting with 6 (the default) and adjusting as needed.
If you find that the campaign easily maxes out your daily budget, you can lower the frequency cap and try to increase your net, for the same price.
If the campaign is not meeting your daily budget and you don’t want to increase your CPM, you can increase your frequency cap, to get additional impressions for your existing users at the same price.

Set alert recipients (optional)
Active 6sense users from your organization (same email domain) are eligible to receive alerts. Alerts are sent to you, the campaign creator, by default.
Enter alert recipients’ email addresses using the menu of eligible users.
(Optional) Check Do not send alerts to me if you do not want to receive alerts.
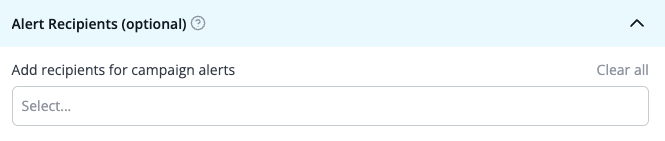
Also refer to FAQ: Advertising Campaign Alerts.
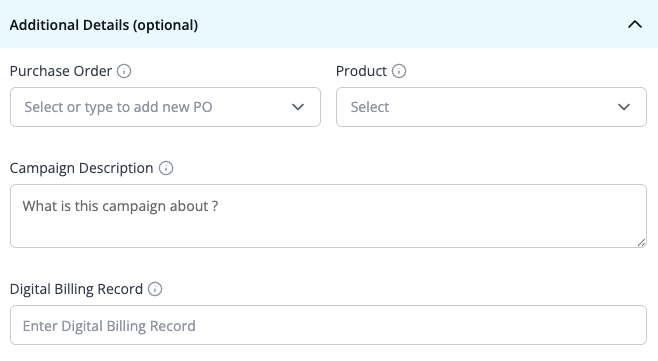
Add additional details (optional)
To add additional details:
(Optional) Enter a purchase order identifier.
(Optional) If your organization has set up multiple product models, select the one to associate with the campaign.
(Optional) For future reference, enter a description of the campaign.
(Optional) Enter a billing record description, usually a billing number. This information is included in the campaign’s report and used by the 6sense Finance team.
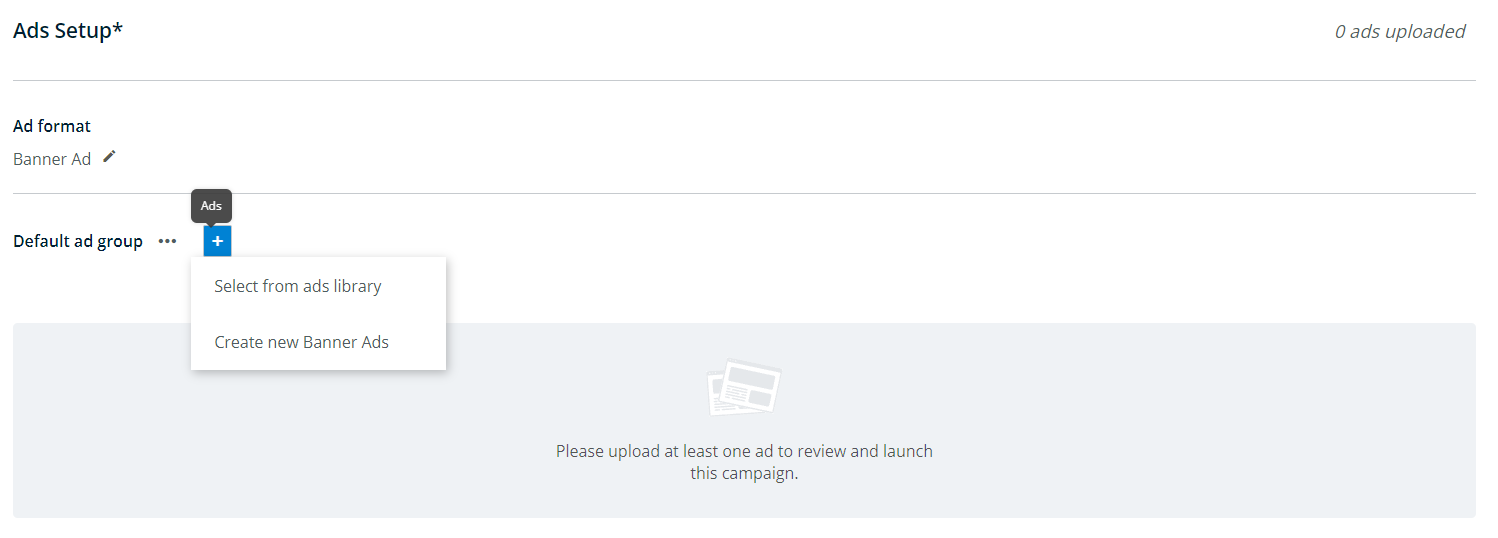
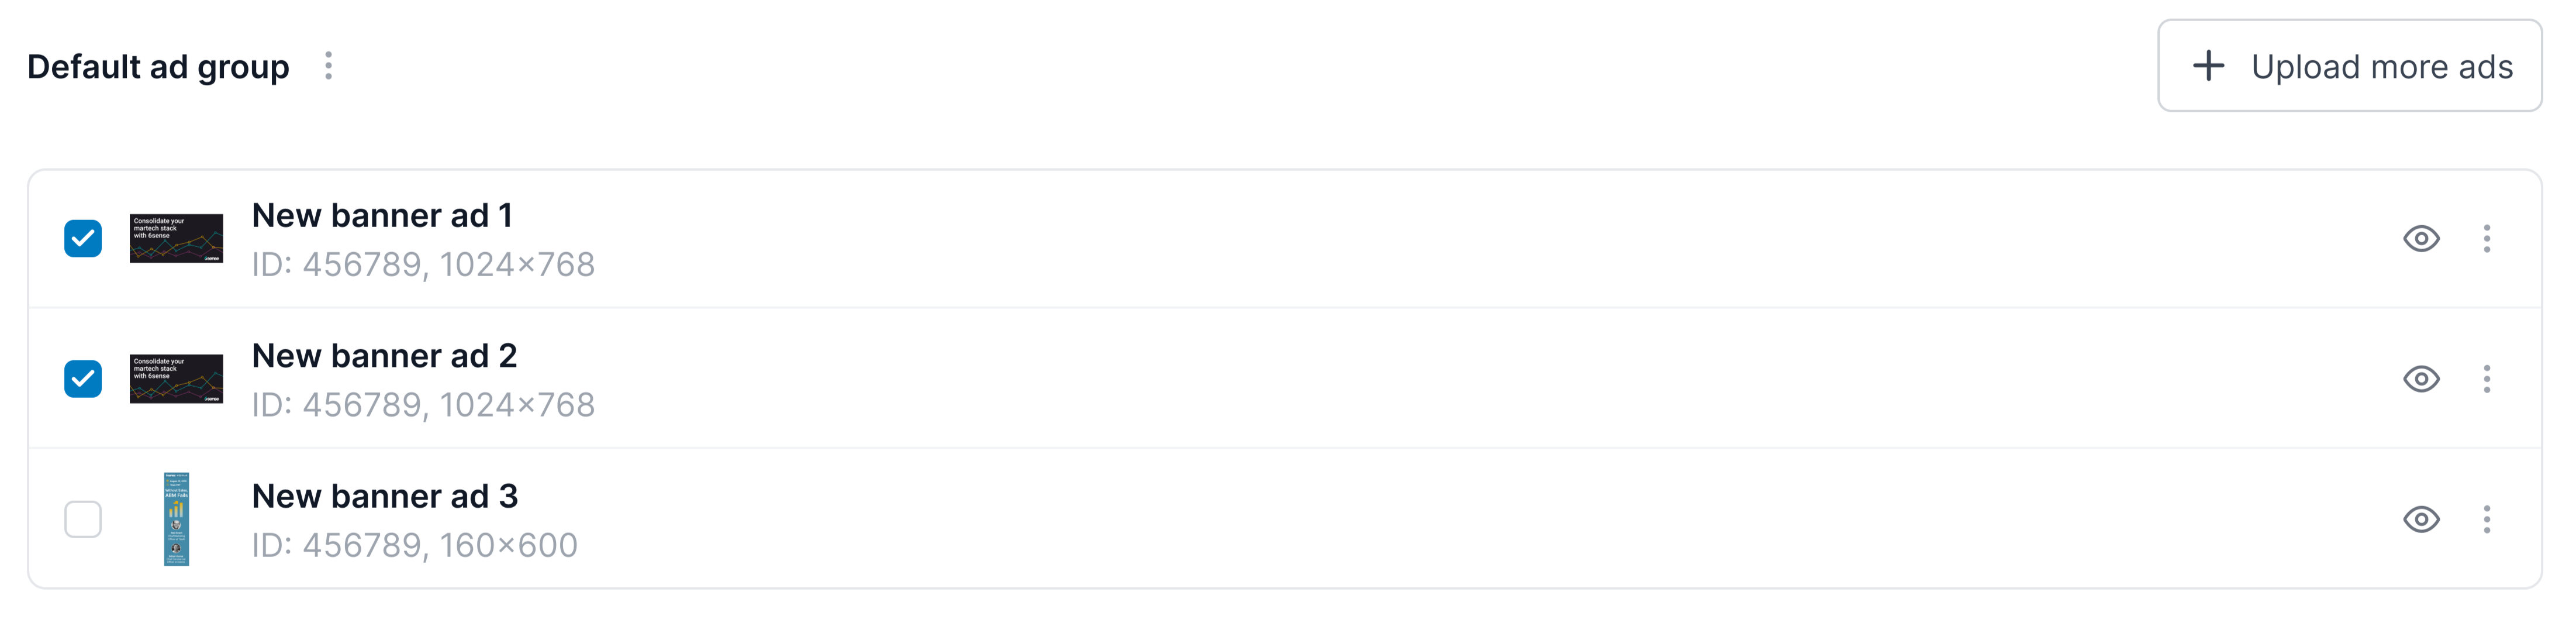
Upload ad files (Except CTV)
Upload ad files to your campaign. If you don’t already have any ads uploaded for this campaign, the page indicates that. Refer to FAQ: Ads Creation.

To upload ads:
Select Add (+) and choose either Select from ads library or Create new Banner ads.
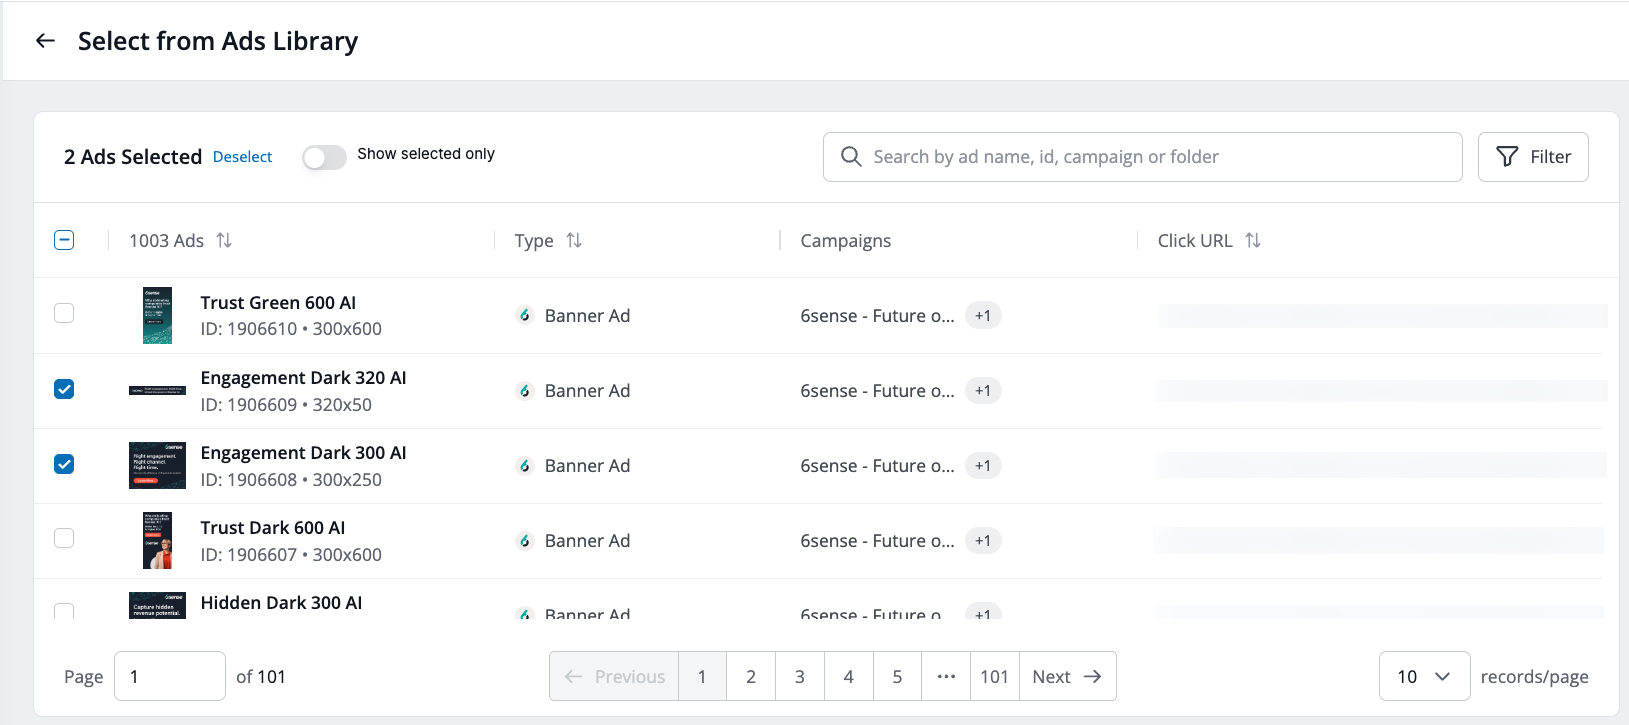
If you choose Select from ads library, a list of all ads saved in the ads library opens, where you can:
Search through and filter the ads in the library.
Select ads by checking the box beside them and the selecting Add selected ads at the bottom of the page.
If you choose Create new Banner ads:
You can either select Browse existing creatives to choose ad images from ads you’ve already saved, or Upload from computer.
You can drag and drop images directly into this popup to upload them as an ad.
6sense automatically creates a name in the Ad Name field, which you can edit if you like.

After you have selected or uploaded the ad images you want to use, you can edit their information from this page before clicking Submit.
Enter the Click URL, for example “https://www.6sense.com”.
Select UTM builder to the right of the entry field to edit the parameters of the URL for that ad.
.png)
The UTM parameters panel opens.
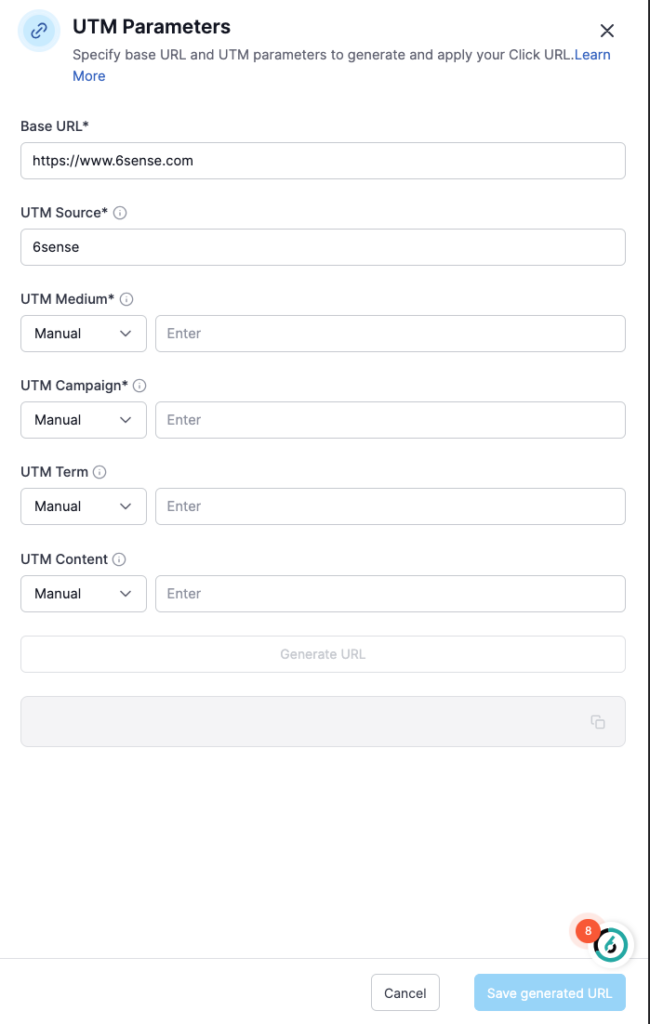
In the UTM parameters panel, enter the details you want to include in the URL, including:
UTM Source: Identifies the sub-channel that is the source of your traffic by answering the question: “where is this person coming from?” Typically source refers to the platform being used within a specific channel.
UTM Medium: Identifies the vehicles you are using to market your company by answering the question: “how are they getting to you?” Typically medium is the highest level channel.
UTM Campaign: Used to identify a specific marketing campaign by answering the question: “why are they coming to you?”.
UTM Term (Optional): Used to identify a specific marketing campaign by answering the question: “why are they coming to you?”
UTM Content (Optional): Used to track more than one marketing piece existing on a single web page.
After you have added ads to the list and configured them, you can move any ads to a new ad group. Select More (hamburger icon) at the right of the listed ad and choose Move to > New Group.
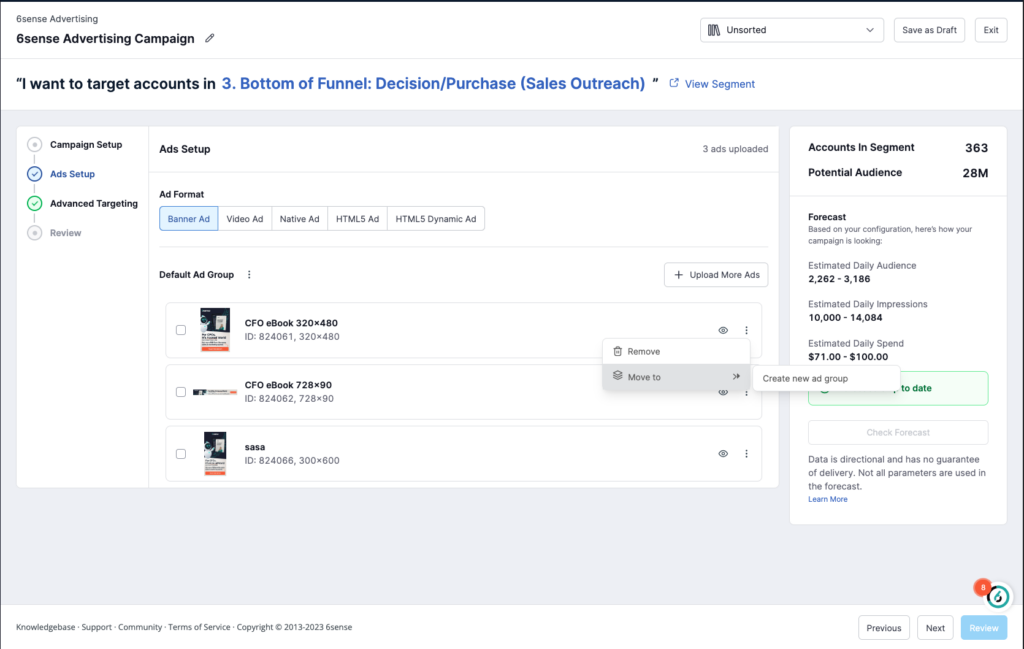
Tip: From the same dropdown you can also delete any ads that were added by mistake.
Upload CTV ad files
After setting up your campaign details, you must upload your CTV video ad creatives. This step is required for all Connected TV (CTV) campaigns.
Click Upload Ad
Select the Upload ad button in the CTV ad setup screen.

Select Your Video File
Choose your CTV video file from your device.
Only MP4 files are supported for CTV campaigns.
Add Multiple Creatives (Optional)
You can upload more than one video creative for your campaign.
Manage Uploaded Ads
Uploaded CTV ads will appear in your creative list.
You can remove or replace creatives before launching your campaign.
Advanced targeting (Except CTV)
Advanced targeting gives you more options for your ad campaign.
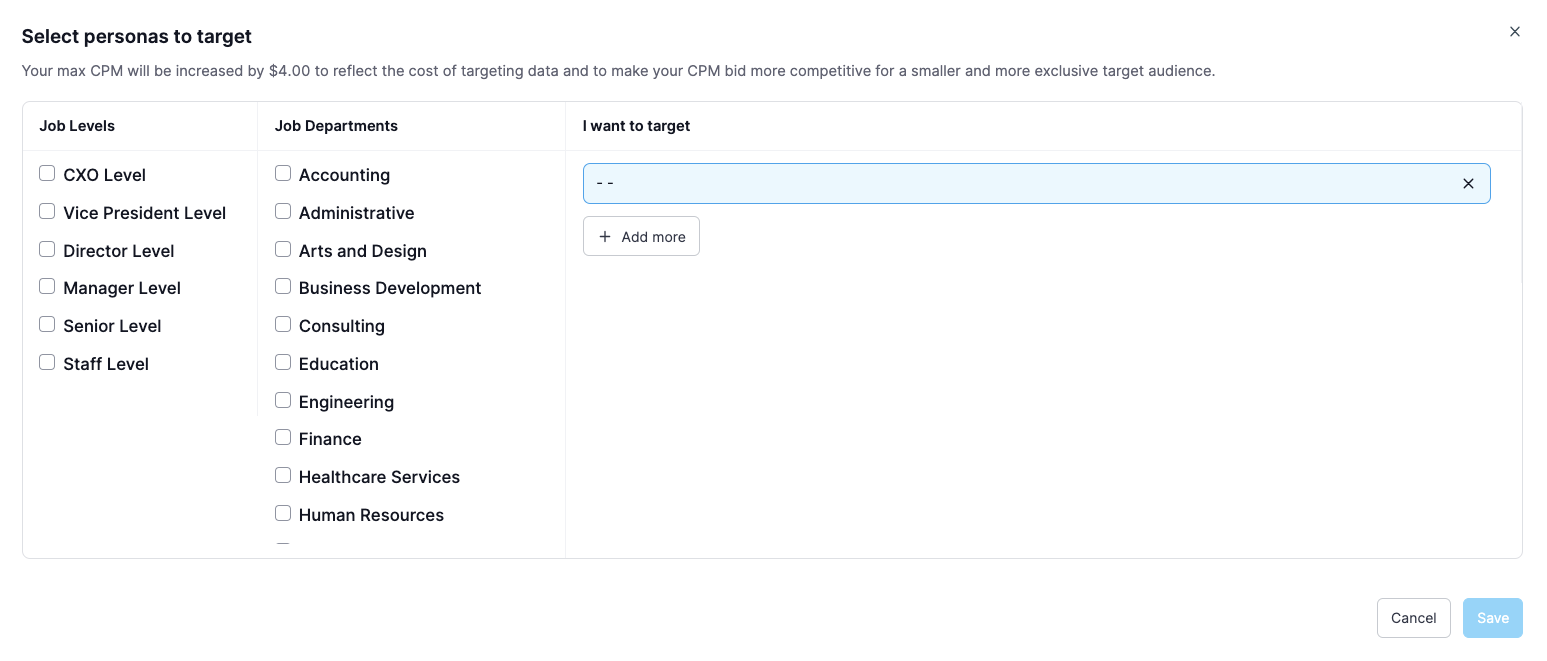
Set the Persona to enable or disable profile targeting. Refer to FAQ: 6sense Ad Campaign Targeting.

Set the Device Type as desktop, mobile, and/or tablet.

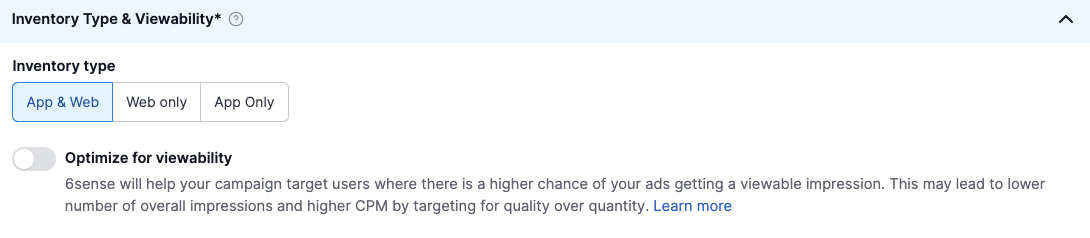
Set the Inventory Type & Viewability as App & Web, Web only, or App only. Refer to FAQ: 6sense Ad Campaign Targeting.
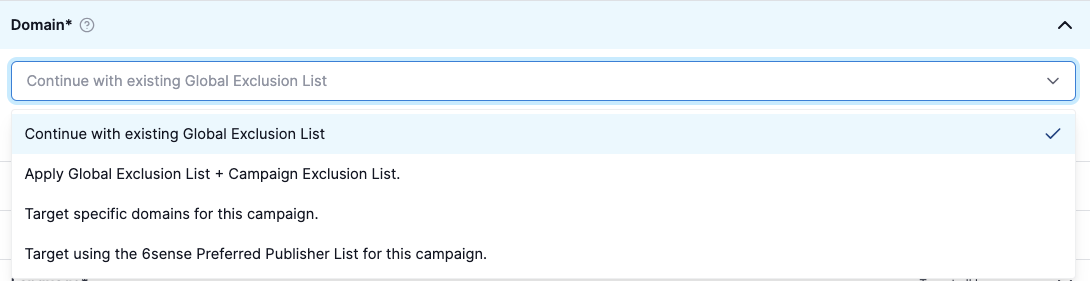
Set the Domain as Add to the Global Ad Inventory Exclusion/Inclusion list for individual campaigns. Refer to FAQ: 6sense Ad Campaign Targeting.
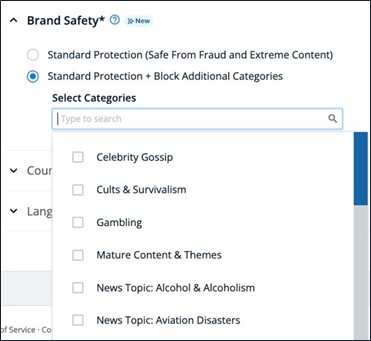
Set the Brand Safety to the level of protection you want for this campaign, and if necessary, select categories to block. Refer to FAQ: 6sense Ad Campaign Targeting.
Set the Country to target all countries in the segment, or only specific countries.

Set the Language to target all languages or specific languages.

After you complete the basic setup, upload ads, and specified advanced targeting, select Review and launch your campaign.
Also refer to FAQ: 6sense Ad Campaign Targeting.
Advanced targeting (Applicable only for CTV)
Advanced targeting gives you more options for your ad campaign.
Persona
Set the Persona to enable or disable profile targeting. Refer to FAQ: 6sense Ad Campaign Targeting.
Platforms
By default, it includes all platforms.
Click View platforms under the Platform section. A modal window will display a list of available platforms.
.png)
To exclude platforms:
Select Exclude specific platforms to exclude the platforms you do not want to target.
You can search for platforms by name in the modal.
.png)
Confirm your selections and close the modal.
Optimization
Enable optimization to distribute budget evenly across accounts.
Set the Country to target all countries in the segment, or only specific countries.
Set the Language to target all languages or specific languages.
Review Targeting Settings
Confirm platform, persona, optimization, country, and language targeting.
Make adjustments as needed before proceeding to campaign review and launch.
Launch the campaign.
Select Launch to launch the campaign.