The Advertising Campaigns list tab shows all your existing campaigns. You can review campaign status and organize them into folders.
Access the Campaigns tab
To access the Campaigns tab list:
Go to ABM > Advertising.
If it isn’t already displaying, select the Campaigns tab.
Organize campaign folders
Campaigns are categorized into folders on the left side of the Campaigns tab. Select a folder to see its campaigns.

You can organize campaigns into discrete folders. You can separate campaigns by classifying them into different folders by objectives, teams, timelines, activities, etc.
You can create, rename and delete folders.
There are predefined, permanent folders, including:
Campaigns:
Drafts: Contains any campaigns that are in draft mode. You can quickly find and complete all drafted campaigns in one place.
Note: Draft campaigns created by workflows can’t be deleted while the associated workflow node exists. You can delete it, only after the associated workflow node is deleted. Campaigns still in use are skipped during bulk deletion.
All Campaigns: Use this folder to navigate around and sort all campaigns, independent of the folder structure.
Unsorted: The default folder into which campaigns are sorted unless otherwise specified during the campaign creation process.
Archived: Contains all archived campaigns.
Manage campaign folders
Create folders by selecting the folder icon next to Campaign Folders.
Rename or delete folders by selecting the More menu (ellipses) icon next to its name.
When deleted, all of the campaigns within the folder will return back to the system-generated, permanent “Unsorted” folder.
Move campaigns to folders
To move a single campaign to a folder, select its More menu (ellipses icon) and then select Move.

To move multiple campaigns, check the box next to the campaigns and then select the Move button at the top of the list.

Tip: When you create a new campaign, you can select the folder where you want it to be sorted. Refer to Create an Ad Campaign.
Create a new campaign
Create a new campaign by selecting the Create Campaign button in the top right of the Campaigns tab.
You have the following campaign type options:
6sense Advertising Campaign: Allows you to run customizable self-serve campaigns.
6sense Connected TV: Allows you to run video ad campaign on streaming platforms.
6sense Contextual Targeting Campaign: Allows you to run campaigns on relevant web pages.
LinkedIn Advertising Campaign: Allows you to run self-serve campaigns in LinkedIn.
External Media Campaign: Allows you to create segments based on campaigns running outside of the 6sense platform to understand their account performance via the external campaigns.
Refer to Create an Ad Campaign for detailed instructions.
Campaign performance indicators
Campaign Performance Indicators (CPIs) refer to all the information displayed in your campaign dashboard that tell you how well your campaign is performing. You can slice and dice the data across multiple campaign types to analyze data points.
At the top of your dashboard are the following CPIs for your entire list of campaigns:

Total Spend: Aggregated spend across your campaigns within a particular folder.
Accounts Reached: Distinct number of accounts reached by all the campaigns within a selected folder.
Impressions: Total impressions displayed by the campaigns.
Clicks: Total clicks reported by the campaigns.
eCPM: Effective cost of every thousand impressions recorded across all the campaigns within a folder. This refers to how much you are paying for an ad space per unit of 1,000 ad impressions.
These numbers are influenced by the timeframe selection and any filtration layers added on top of the dashboard.
Tip: The Dashboards tab shows high-level performance indicators. Refer to Advertising Dashboard.
Campaigns list panel
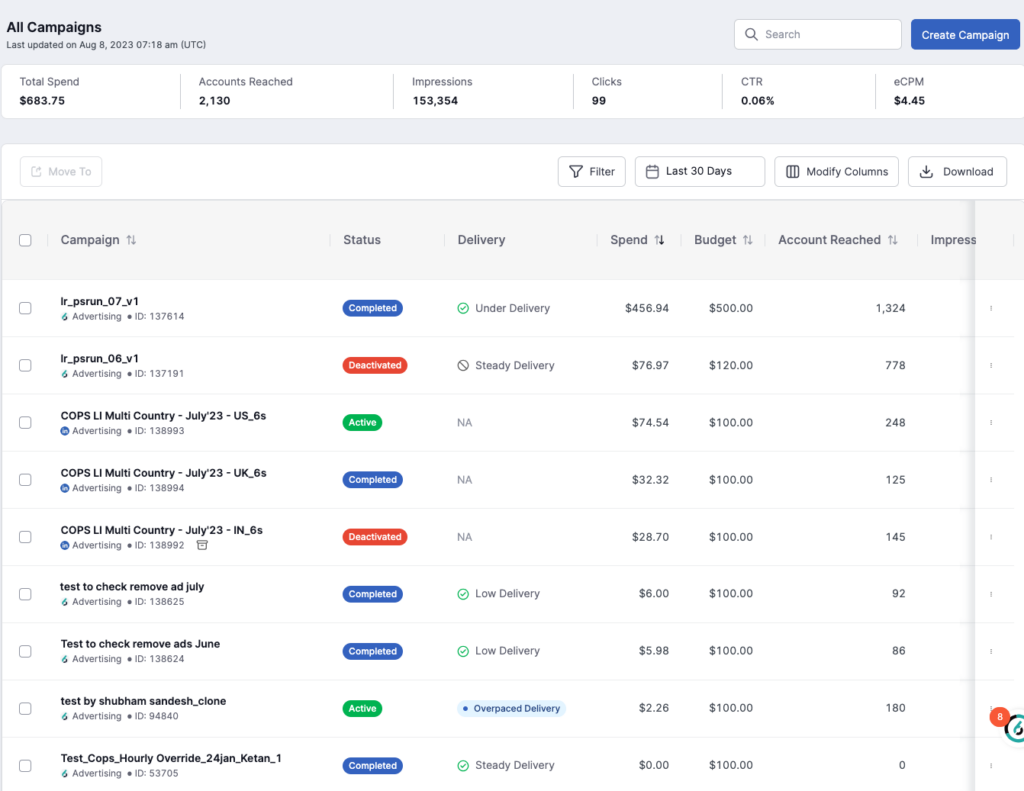
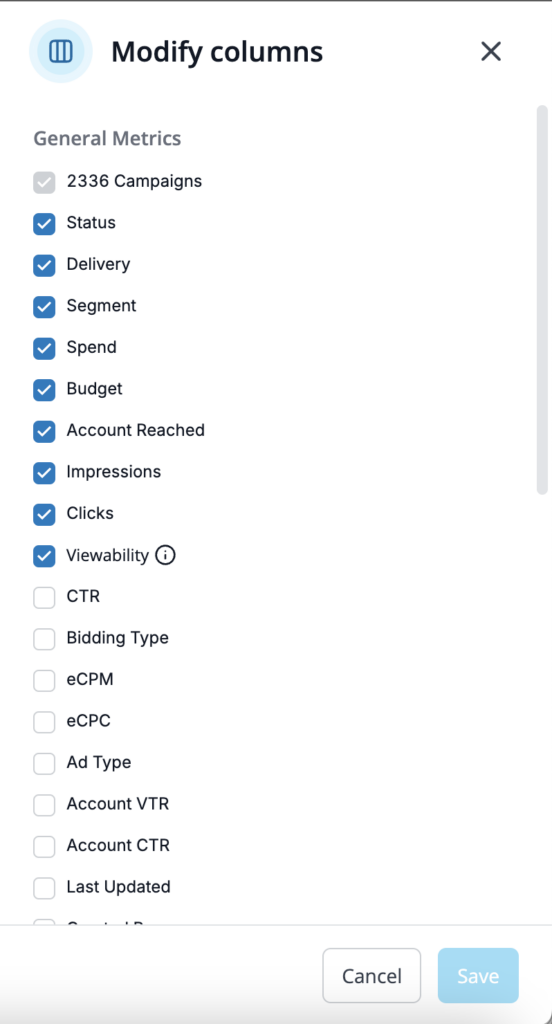
Select columns to show
There are many other CPIs displayed in the columns below, and you can modify which are visible by clicking on the Columns button at the top right of the list. All key metrics are dynamically calculated at the folder level or as you select campaigns and add filter.
Campaign list filters
There are many filters you can use to focus your campaign list.
Select the Filter button at the top right of the list to open the Filters panel.
Adjust the timeframe of your list by selecting the Last 7 Days button at the top for additional options:
Last 7 Days (default)
Last 30 Days
Lifetime
Custom Date Range
Campaign list actions
Beside any campaign name, select the More (ellipses) icon to view actions for that campaign.
View: View all details of this campaign including performance graphs.
Edit: Modify the configuration of the campaign.
Move: Move the campaign to a different folder.
Deactivate: Deactivate a completed campaign.
Clone: Create a copy of the campaign.
Export as CSV: Export the analytics for the campaign.
Archive: Archive the campaign. It will still appear in the Archived Campaigns folder. Note that scheduled and active campaigns cannot be archived.
Drag and drop campaigns into folders (no subfolders).
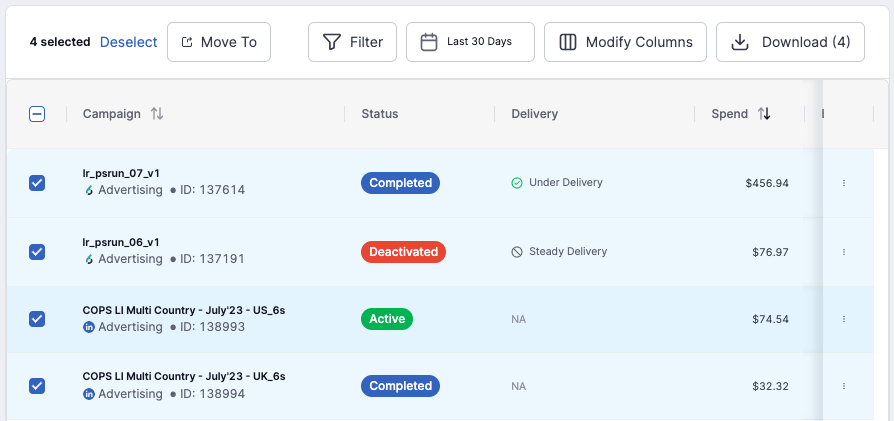
Select multiple campaigns by checking the box next to their name. You can then move or download them by clicking the ellipses icon at the top of the list.
Download a campaign list as a CSV file
Select Download at the top right of the campaign list to export all selected campaigns. If no campaigns are selected, all campaigns in the given folder will be exported.
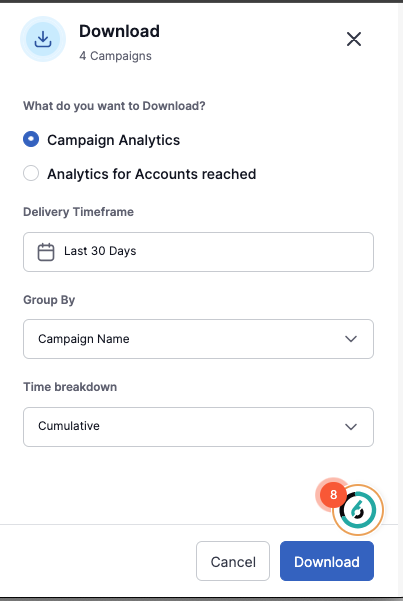
Campaign Analytics: Provides an export of the dashboard with the configured filters (if any).
Analytics for Accounts reached: Provides an export of the accounts reached by the campaigns filtered on the dashboard. This will be a lifetime report and cannot be broken out by intervals.
Timeframe: Sets the timeframe of the campaign analytics you wish to export.
Group By: Groups the analytics by campaign and/or placement group and/or ad.
Time Breakdown: Adds a time interval to the report. The analytics are available by day, month, week or cumulative.
If a report download is taking too long, a pop-up in the bottom right of the report notifies you. It gives you the option of either adjusting the settings of the export to make it smaller, or have the full report emailed to you when it is complete. If you choose to have the report emailed to you, it may take 30-90 mins to arrive.