After you define a segment start node and add a decision node to your workflow, you add one or more action nodes to perform actions on the accounts filtered by the decision node.
Account-level channel action nodes
Account-level action nodes push contacts or leads from a segment to the following integrated systems for ad channel campaigns.
Node Name | Ad Platform |
|---|---|
Push to 6sense Display Ads | 6sense Advertising |
Push to Google Ads | Google Ads |
Push to LinkedIn | |
Push to Meta Ads | Meta (Facebook) |
Account-level channel action node requirements
Syncing to Google Ads, LinkedIn, and Meta (Facebook) consumes segment syncs and affects your segment sync limit. Refer to FAQ: Segment Sync Management.
Account-level action nodes must be preceded by a decision node. An account-level action node does not require you to select accounts because it is assumed that the accounts have already been qualified by a previous decision node.
You cannot use the same label text on more than one action node in a workflow.
Account-level channel action node timing considerations
Audiences pushed to Google Ads, LinkedIn, and Meta (Facebook) channels appear in the channel after the audience qualifies for the push node in a workflow. The audience syncs to the respective channel only after it qualifies for the push.
Qualification considerations
An audience qualifies for push when it contains at least one account. For example, in a workflow that pushes to LinkedIn, the audience appears in LinkedIn Ad Manager only after accounts meet the criteria and pass through the Push to LinkedIn node.
Timing considerations
The timing of the sync is influenced by the nodes that precede the push node in your workflow.
Timing is very important. For example, if a Push to Channel node follows a node that has a wait time or condition that must be met, the audience will not sync until the that happens. The audience will not appear in the channel’s campaign manager until the wait period or condition completes.
Example flow
Here is an example flow:
Segment > Decision node > Timer node wait for [30] days > Push to [Channel] Node ---> Channel campaign launches
In a scenario like the example, we recommend that you set yourself a reminder to launch your campaign 30 days after publishing the workflow, aligning with when the audience will be available in the channel.
Push to 6sense Display Advertising Campaign node
The Push to 6sense Display Advertising Campaign node exports accounts to a 6sense display advertising campaign.
Dependencies
The Push to 6sense Display Ads node requires a dedicated 6sense display ad campaign. You click a button to create or clone a dedicated campaign from this node. Then you continue setting up the new campaign in Advertising.
You cannot directly use a previously created campaign; instead, you can clone it from this node’s interface and modify it in Advertising.
The Push to 6sense Display Ads node does not support contextual or visitor retargeting campaigns. These types of campaigns are not available when cloning, and you cannot configure these types of campaigns in Audience Workflows.
Tip: Ensure that the schedule for the ad campaign makes sense in relation to the schedule of your workflow.
Properties
Node name: A brief description that displays on the node’s icon.
Description: A lengthier description of what the node does.
Segment Name: A new, unique identifier for the ad campaign segment that displays in the Advertising application. This is required before you can create or clone an Advertising campaign.
Create a Campaign or Clone a Campaign: Either go to Advertising and create a new campaign or clone an existing one.
When you create or clone an advertising campaign, 6sense creates it in the Advertising Drafts folder.
After you create the campaign, its name appears in the node with a toggle next to it. If you deactivate the toggle, the workflow no longer exports accounts to that ad campaign.
New May 12 2026: If, in the future, a draft workflow display campaign node is deleted, 6sense also deletes the Advertising campaign the node previously created. If the workflow is published, the campaign is not deleted.
If Accounts No Longer Meet the Entry Conditions: You can instruct the workflow to either:
Remove audience from Display Ad: Remove accounts that did not meet the node entry conditions.
Leave audience in Display Ad: Retain accounts that met the entry conditions and push them along through this node.
For example, if you configured the prior decision node to only qualify Awareness stage accounts to be pushed to the ad campaign, then you can select Remove audience from Display Ad to ensure that any account that is no longer in Awareness stage is taken out of the campaign.Advanced options
If Account exits node, do not process again for 30 days: When an account is pushed to a display ads campaign, then the workflow will not process the account again for this number of days. This allows you to control how often an account gets an ad, and not over-saturate with too many ads in quick succession. If you set this value to 0, the workflow will process the account and push it to a 6sense display ad every time it runs.
Push to LinkedIn node
The Push to LinkedIn action node exports accounts to your LinkedIn Ads account as an audience.
Dependencies
A LinkedIn Business Manager account and LinkedIn integration. See LinkedIn Advertising and Segments for LinkedIn Ads.
Accounts in the segment must be from only one country.
After the accounts are in LinkedIn as an audience, you sign into your LinkedIn Ads account and connect this audience to a LinkedIn campaign. To learn more about what to do in your LinkedIn Ads account, see FAQs: Segments for LinkedIn Ads.
Properties
Node name: A brief description that displays on the node’s icon.
Description: A lengthier description of what the node does.
Segment and campaign Alias – Set up:
Segment nickname: A unique identifier for the ad campaign segment that displays in the LinkedIn Campaign Manager. Choose this as your LinkedIn Audience.
LinkedIn campaign name: The name of your LinkedIn campaign, to be used in 6sense reports. Make sure that the name matches the one in LinkedIn. After you enter the name, a toggle appears so that you can turn off the push to the LinkedIn campaign at any time.
LinkedIn Campaign Manager Account: Choose a campaign from the list of integrated LinkedIn campaigns.
If there are no campaigns, then no integrations are functional. See FAQs: Segments for LinkedIn Ads.
The campaign you choose is active at the workflow level. You cannot use multiple LinkedIn campaigns in a single Audience Workflow.
If Accounts No Longer Meet the Entry Conditions: If this action node was preceded in the workflow by a decision node, the decision node created entry conditions (qualifications) for this node. You can instruct the workflow to either:
Remove audience from LinkedIn: Remove accounts that did not meet the node entry conditions.
Leave audience in LinkedIn: Retain accounts that met the entry conditions and push them along through this node.
For example, if you configured the prior decision node to only qualify Awareness stage accounts to be pushed to the ad campaign, then you can select Remove audience from Display Ad to ensure that any account that is no longer in Awareness stage is taken out of the campaign.
Advanced Options
If Account exits node, do not process again for 30 days: When an account is pushed to LinkedIn, then the workflow will not process the account again for this number of days. This allows you to control how often an account gets an ad, and not over-saturate with too many ads in quick succession. If you set this value to 0, the workflow will process the account and push it to LinkedIn every time it runs.
Push to Meta Ads node
The Push to Meta Ads action node pushes accounts to your Facebook account as an audience.
Dependencies
A Meta Business Manager account and Meta integration. See 6sense for Meta Ads.
Properties
Node name: A brief description that displays on the node’s icon.
Description: A lengthier description of what the node does.
Segment and campaign – Set up:
Segment nickname: A unique identifier for the ad campaign segment that displays in Meta. Choose this as your Meta Audience.
Meta campaign name: The name of your Meta campaign, to be used in 6sense reports. Make sure that the name matches the one in Meta. After you enter the name, a toggle appears so that you can turn off the push to the Meta campaign at any time.
Meta Account:
You cannot use multiple Meta campaigns in a single Audience Workflow.
If Accounts No Longer Meet the Entry Conditions: If this action node was preceded in the workflow by a decision node, the decision node created entry conditions (qualifications) for this node. You can instruct the workflow to either:
Remove audience from Facebook: Remove accounts that did not meet the node entry conditions.
Leave audience in Facebook: Retain accounts that met the entry conditions and push them along through this node.
For example, if you configured the prior decision node to only qualify Awareness stage accounts to be pushed to the ad campaign, then you can select Remove audience from Display Ad to ensure that any account that is no longer in Awareness stage is taken out of the campaign.
Advanced Options
If Account exits node, do not process again for 30 days: When an account is pushed to LinkedIn, then the workflow will not process the account again for this number of days. This allows you to control how often an account gets an ad, and not over-saturate with too many ads in quick succession. If you set this value to 0, the workflow will process the account and push it to Meta every time it runs.
Push to Google Ads node
The Push to Google Ads action node pushes accounts to your Google Ads account as an audience.
Dependencies
A Google Ads account and integration. See 6sense with Google Ads.
Properties
Node name: A brief description that displays on the node’s icon.
Description: A lengthier description of what the node does.
Segment and campaign – Set up:
Segment nickname: A unique identifier for the ad campaign segment that displays in Google Ads Campaign Manager. Choose this as your Google Ads Audience.
Google Ads campaign name: The name of your Google Ads campaign, to be used in 6sense reports. Make sure that the name matches the one in Google Ads. After you enter the name, a toggle appears so that you can turn off the push to the Google Ads campaign at any time.
Google Ads Account:
You cannot use multiple Google Ads campaigns in a single Audience Workflow.
If Accounts No Longer Meet the Entry Conditions: If this action node was preceded in the workflow by a decision node, the decision node created entry conditions (qualifications) for this node. You can instruct the workflow to either:
Remove audience from Google Ads: Remove accounts that did not meet the node entry conditions.
Leave audience in Google Ads: Retain accounts that met the entry conditions and push them along through this node.
For example, if you configured the prior decision node to only qualify Awareness stage accounts to be pushed to the ad campaign, then you can select Remove audience from Display Ad to ensure that any account that is no longer in Awareness stage is taken out of the campaign.
Advanced Options
If Account exits node, do not process again for 30 days: When an account is pushed to LinkedIn, then the workflow will not process the account again for this number of days. This allows you to control how often an account gets an ad, and not over-saturate with too many ads in quick succession. If you set this value to 0, the workflow will process the account and push it to Google Ads every time it runs.
People-level channel action nodes
People-level channel action nodes specify the contacts and/or leads you want to work with in that action node.
People-level channel action nodes push contacts or leads from a segment to the following integrated systems for channel campaigns.
Node Name | CRM | MAP | SEP | Ad Platform |
|---|---|---|---|---|
Push to [CRM] Campaign |
| |||
Push to [MAP] Static List |
| |||
Push to [SEP] Campaign | (pushing to SEP requires integration with HubSpot or Salesforce) |
| ||
Push to Gong Flow | (pushing to Gong requires integration with HubSpot or Salesforce) |
| ||
Push to AI Email (formerly called Conversational Email) | (pushing to AI Email requires integration with HubSpot or Salesforce) | 6sense AI Email (formerly called Conversational Email) |
People-level channel action node dependencies and requirements
All
Integration with the 3rd party systems involved in the workflow. Refer to Integrations.
3rd party objects (campaign, Cadence, Flow, sequence, or static list) in the relevant system. You specify them in the node properties panel, as discussed below.
The workflow qualifies accounts using decision nodes leading up to an action node. Since these nodes deal with contacts or leads, you must specify them so that they can be selected from your CRM, MAP, or SEP for every single qualifying account and pushed to the destination channel campaign.
For example, say a decision node only qualifies Purchase stage accounts to be pushed to a Salesforce campaign. In the following Push to Salesforce Campaign node, you must specify the contacts or leads you want to push. This is so that 6sense can select them from your CRM, MAP, or SEP for every single qualifying account and push them to the Salesforce campaign.
You cannot use the same label text on more than one action node in a workflow.
Eloqua
When using the Push to Static List node with Eloqua, AWF pushes to an Eloqua campaign where a shared list is attached. If there are multiple shared list attachments, the node will push to the first one that was attached to the campaign.
Follow the Eloqua instructions to configure your Eloqua campaigns:
Configure a segment with a shared list (of contacts) in Eloqua. This Eloqua segment becomes the source of contacts for the campaign.
Configure a campaign that uses the previously configured segment. 6sense pulls a segment ID from the campaign, and then when audiences/new contacts are pushed into Eloqua, 6sense creates the relationship between the lead and the segment ID, adding the lead to the segment and indirectly to the campaign.
6sense always looks for the first Eloqua segment with shared list in the Eloqua canvas configuration and adds contacts to it. If you change the order in the canvas 6sense automatically changes to whatever is the first segment with a shared list.
Possible error messages from Eloqua include:
campaignId: XXX does not have any sharedList: The Eloqua campaign isn’t configured with a shared list as its source. Refer to the Oracle Eloqua User's Guide.
unmatched records errors: It is possibe is that the Eloqua contacts that 6sense synced in our database from your Eloqua instance no longer exists in your Eloqua instance. Since the record still exists in the 6sense database, when the workflow is trying to push the record into a shared contact list, Eloqua returns this error.
Sales Engagement Platform (SEP) Salesloft and Outreach
The Push to [SEP] Campaign node requires:
Multi-product integrations, either:
Both Salesforce CRM and Salesloft, or
Both HubSpot CRM and Outreach.
Your Revenue Marketing user account must also:
Have a license and permissions in the SEP.
6sense can only route contacts or leads that already exist in the CRM into the SEP.
For Salesloft:
Your Revenue Marketing user account must be the owner of the Cadence, or the Cadence is a shared Cadence.
If 6sense displays a “user not found” error, it may be caused by the lack of permissions on the SEP user account. Refer to the Salesloft roles documentation.
AWF syncs Cadences approximately every 5 minutes. A new Cadence created in Salesloft should appear in AWF within 5-10 minutes.
Salesforce CRM Campaign Member Status
Salesforce Campaign Member Status must be enabled in Salesforce before you can use it in a workflow.
New May 12 2026: If you are using Salesforce, you can filter by the Salesforce Campaign Member Status field to find the people who attended a campaign. The Push to SFDC Campaign node supports the Salesforce Campaign Member Status field. 6sense gets the valid status list options in real time when you select the campaign. By default there is no status.
For example, you could have a workflow that targets people who attended a webinar and pushes them to another campaign. You would set the Salesforce Campaign Member Status when pushing people into a Salesforce campaign, so that downstream syncs, Salesforce-triggered actions, and reporting reflect the correct status. (Salesforce Campaign Member Status is also available as a segment filter.)
Gong Engage Flow
New in Feb 2026
The Push to Gong Engage Flow requires:
Your 6sense environment must have an active CRM integration, either:
Salesforce CRM
HubSpot CRM
Your Revenue Marketing user account must also have:
A license and permissions in Gong.
Be the owner of the Gong Flow.
If 6sense displays a “user not found” error, it may be caused by the lack of permissions on the Gong account.
6sense can only route contacts or leads that already exist in the CRM into Gong flows.
Additional notes about the Push to Gong Flow node include:
You can select only one assignee for a Gong Flow, either the default user or a specific Gong user.
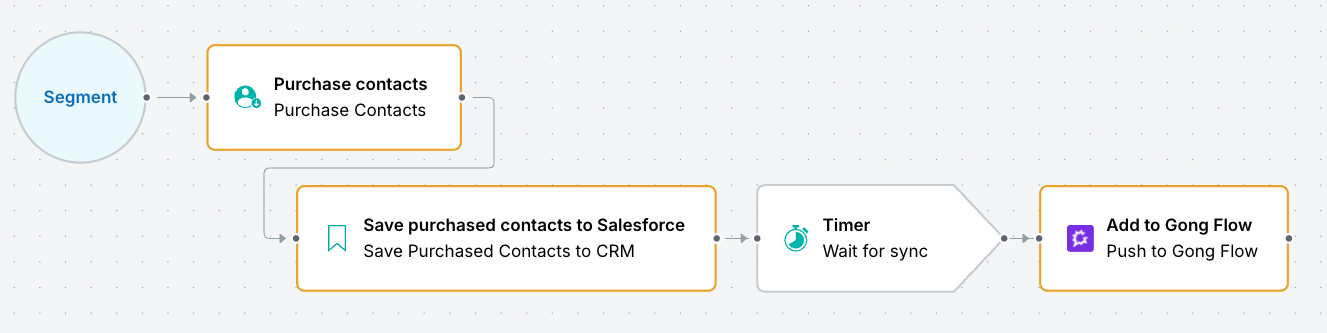
The sync process between a CRM and Gong can range anywhere from 6 minutes to 2 hours. For example, when using a Purchase Contacts > Save Purchased Contacts to CRM > Push to Gong Flow flow, the workflow status will remain in progress while the sync is pending processing.
6sense automatically adds a timer node after Purchase Contacts > Save Purchased Contacts to CRM nodes in a workflow that uses Gong, to account for a maximum 2 hour delay on the Gong side. By default the timer node is set to 2 hours, and you can reduce that time if that works better in your environment.
When using Remove Audience, it runs one record at a time since Gong does not support bulk removal. Large audiences may take longer to process and increase API usage. This is because the Gong Remove Audience API operates on a single record at a time; there's no bulk API for removing records from a Gong Flow.
AI Email
The Push to AI Email (formerly called Conversational Email) node requires multi-product integrations, either:
Both AI Email and Microsoft Dynamics CRM, or
Both AI Email and HubSpot CRM, or
Both AI Email and Salesforce CRM.
Also refer to AI Email - CRM Integration.
AI Email syncs to AWF approximately every 10 minutes. Published AI Email campaigns should appear in AWF within 10-20 minutes.
People-level channel action node properties
Node name: A brief description that displays on the node’s icon.
Description: (optional and recommended) A lengthier description of what the node does.
Destination details: Depending on your CRM or SEP, select whether to push contacts or leads.
If your integrated system only supports one, then it will be the default, and you cannot change it.
The following options differ depending on your integration:
Push to Gong flow: (Gong Flow only) A flow defined in Gong.
Assignee: (Gong Flow only) Either the default Gong user or a specific user from the User pulldown list.
Static List (Marketo only): A static list defined in Marketo. The list appears in the properties panel after it has been made available by the 6sense pipeline. Allow 24-48 hours for a new list to appear in AWF.
Push CRM contacts/leads to Salesforce campaign (Salesforce only): A campaign defined in Salesforce. The workflow pushes people (contacts or leads) to this campaign. The list appears in the properties panel after it has been made available in the 6sense pipeline. Allow 24-48 hours for a new list to appear in AWF.
Campaign member status: The status in Salesforce.
Designated Assignees (Salesloft Cadence only): In order of priority, which user’s inbox each contact or lead should be assigned to for sending emails.
The menu lists 50 Salesloft users. If the list doesn’t include the user you want, enter the email address directly and AWF searches for it.
Conditions and Priorities: (6sense AI Email only):
AWF supports pushing contacts or leads to draft, active, and scheduled AI Email campaigns. You can publish an Audience Workflow even if the AI Email campaign is in draft mode. The workflow will not cause action until the linked AI Email campaign is active.
Push CRM contacts/leads to Dynamics campaign (Microsoft Dynamics only): Select the name of the Microsoft Dynamics campaign.
Push CRM contacts/leads to Dynamics marketing list (Microsoft Dynamics only): Select the name of the Microsoft Dynamics marketing list.
Priority rules and conditions (Optional): You can configure 6sense to purchase contacts based on your persona map configuration and/or “hotspots” – locations where the highest number of visitors have come from that go to your website.
Conditions: Filters on the segment data that specify the types of contacts to purchase.
You must add at least one filter if you don’t use a priority rule.
Filters are categorized as People details (name, job title, etc).
New May 12 2026: When using contact engagement filters, engagement is evaluated at the contact level. Non-engaged contacts at the same account are excluded.
If the Predictive add-on is active then:
You can select the Contact Engagement Grade, Account Profile Fit, and/or Contact Profile Fit filters. Refer to 6sense AI filters.
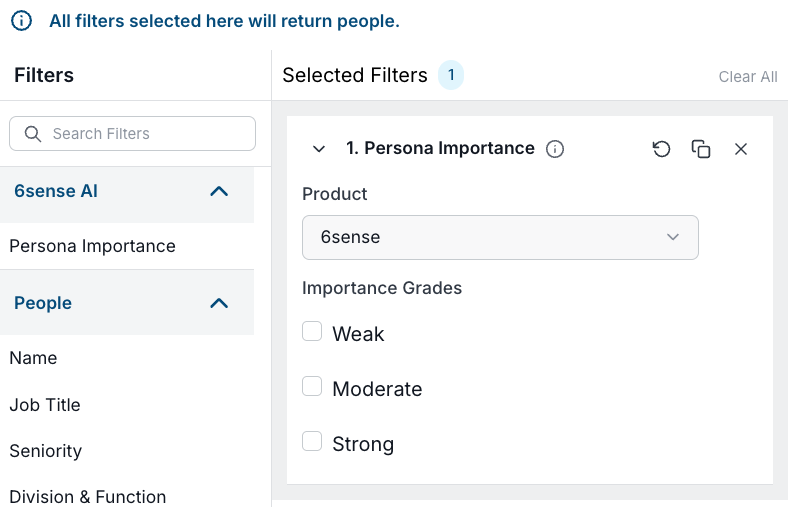
You can select the Persona Importance filter, which is similar to using the persona map and gives you more flexibility in how your filters perform.
You can rearrange the blocks of specified people as per your priority and 6sense will select contacts or leads accordingly.
If Accounts No Longer Meet the Entry Conditions: You can instruct the workflow to either:
Remove audience from [flow, campaign, static list, Cadence]: Remove accounts that did not meet the node entry conditions.
Leave audience in [flow, campaign, static list, Cadence]: Retain accounts that met the entry conditions and push them along through this node.
For example, if you configured a prior decision node to only qualify Awareness stage accounts to be pushed to the campaign, then you can select Remove Audience from [campaign] to ensure that any account that is no longer in the Awareness stage is taken out of the campaign.
Advanced Options:
Max people per account per run [5]: The maximum number of contacts or leads from the same account that the workflow pushes to the campaign, per run.
Batch size [varies per CRM]: The number of records per API call. Reducing the batch size increases the number of API calls, which increases processing times. Changes take effect the next time this action runs.
Process each account once every [0] Days: Ensures that an account and its contacts or leads that were processed in this node in the last X days are not processed again within the specified number of days. The default, 0, means that the people are processed with each workflow run. Use this to avoid saturating people at an account with the same campaign in quick succession.
If Account exits node, do not process again for [0] days: If an account no longer qualifies for the action on this node, 6sense will not take this action again for the account if they re-qualify for this action within the set number of days. Setting this to "0" means there will be no wait time before this action is taken again for a qualified account.
Remove Audience node
The Remove Audience action node removes any accounts or people that were previously pushed to a designated channel in the same workflow.
For example, if you pushed accounts to a display campaign using a Push to 6sense Display Ads node, you can serve the ads for a set duration using a timer node, then remove them from the campaign using the Remove Audience node.
Dependencies
A previous account or people action node in the same path of the workflow.
The Remove Audience node can’t be connected directly to push-action nodes — it needs to be preceded by either a decision or timer node.
When using Gong Engage and removing large audiences with the Remove Audience node, Gong API consumption and the time required to remove large audiences may be high. This is because the Gong Remove Audience API operates on a single record at a time; there's no bulk API for removing records from a Gong Flow.
Properties
Node Label: A brief description that displays on the node’s icon.
Description: A lengthier description of what the node does.
Remove Audience from: The previous account or people action node. A Remove Audience node is only active if accounts or people were previously pushed using an action node in the same workflow and in the same path.
Create Accounts in CRM node
The Create Accounts in CRM action node creates net-new accounts in your CRM.
Node Name | CRM |
|---|---|
Create Accounts in CRM |
|
Account identification and duplication rules
6sense identifies accounts by name, country and domain. This means that 6sense considers “XYZCorp, USA” and “XYZCorp, Canada” to be separate accounts. Therefore, if you have one name/country/domain in your CRM, and the new account from 6sense uses another, 6sense creates the other. However, you may want to treat both of these accounts as the same account in your CRM; in which case you can set custom duplicate prevention rules in 6sense so that 6sense does not create a new account if you want to use the existing account. To set up duplication prevention rules, see Custom Match Rules.
Create accounts action node requirements
You cannot use the same label text on more than one action node in a workflow.
Dependencies
Integration with the 3rd party systems involved in the workflow.
Pre-configured custom match rules for account creation, to prevent duplicates.
A pre-configured mapping profile that includes the name, display domain, and country fields.
6sense credits allocated to the Audience Workflows application. See Distribute Credits Between Applications.
Properties
Node Name: A brief description that displays on the node’s icon.
Description: A lengthier description of what the node does.
The node uses custom match rules to avoid creating duplicates. Edit them if needed.
Select the Mapping Profile.
You can override which fields to enrich when creating an account for this node only.
For Advanced Options, you can set the batch size per API call. 6sense sets a default that varies depending on the CRM. Reducing the batch size may inversely affect the number of API calls. For example, decreasing the batch size from 200 to 50 results in 4x more API calls. The smaller the batch size, the longer the processing times. Changes to this setting take effect the next time the action node runs.
Purchase Contacts and Save to… action nodes
The Purchase Contacts node works with Save to… nodes to purchase contacts from 6sense and export them to your CRM or MAP or download a CSV file.
Node Name | CRM | MAP | File |
|---|---|---|---|
Purchase Contacts | N/A | N/A | N/A |
Save Purchased Contacts to CRM |
| ||
Save Purchased Contacts to MAP |
| ||
Save Purchased Contacts to CSV | CSV |
Purchase Contacts node
The Purchase Contacts action node purchases contacts from 6sense using 6sense credits.
Dependencies
Following a Purchase Contacts action node, the workflow must connect to a Save Purchased Contacts to [system] node. This ensures that the purchased contacts are saved to your designated system. Supported follow-up nodes include:
Save Purchased Contacts to a CRM
Save Purchased Contacts to a MAP
Save Purchased Contacts to a CSV
6sense credits allocated to the Audience Workflows application. See Distribute Credits Between Applications.
Integration with the relevant CRM or MAP.
New May 12 2026: Your company must have completed the Contact Data Compliance terms. If you see an alert that says the node is locked, contact your CSM for assistance.
The Predictive add-on is required for:
Using the optional Records match persona map property.
Using certain filter conditions
Properties
Node name: A brief description that displays on the node’s icon.
Description (Optional): A lengthier description of what the node does.
Priority rules and conditions (Optional): You can configure 6sense to purchase contacts based on your persona map configuration and/or “hotspots” – contact locations where the highest number of visitors have come from that go to your website.
Records match persona map (Requires the Predictive add-on): Returns only contacts that match the persona map configuration in Settings > App Settings > Sales Intelligence > Persona > Persona Map. The persona map settings customize what job functions and titles display in the persona map, based on your organization’s needs. Refer to Persona Map. When you select this option, it will be the highest priority filter; any other filters in the conditions come after this.
6sense uses the Product Category (the Predictive model) selected during workflow setup to determine which persona map settings apply.
6sense applies this setting for both previews and published workflows.
Records are near locations with the most website visitors: Contacts from locations that match to locations with the most visitors to your website. (6sense does not have conditions filter for this functionality.)
Either option, if selected, takes precedence over any conditions specified in the Conditions.
If the advanced option Max people per account per run isn't met, then the Conditions apply.
Conditions: Filters on the segment data that specify the types of contacts to purchase.
You must add at least one filter if you don’t use a priority rule.
Filters are categorized as People details (name, job title, etc).
If the Predictive add-on is active then:
You can select the Contact Engagement Grade and/or Account Profile Fit filters. Refer to 6sense AI filters in the Filter Catalog.
New May 12 2026: When using contact engagement filters, engagement is evaluated at the contact level. Non-engaged contacts at the same account are excluded.
You can select the Persona Importance filter, which is similar to using the persona map and gives you more flexibility in how your filters perform.
You can rearrange the blocks of specified people as per your priorities and 6sense will select contacts for purchase in that order.
Advanced options
Max people per account per run [5]: The maximum number of contacts or leads from the same account that the workflow can purchase, per run.
Contacts will not be purchased for a given account more than once every [0] days: By default there is no wait time. You can specify a wait period in days.
If Account exits node, do not process again for [0] days: When an account is pushed to a CRM, then the workflow will not process the account again for this number of days. If you set this value to 0, the workflow will process the account and push it to the CRM every time it runs.
Updated May 12 2026: Only purchase contacts with: Multi-select what information is required about each purchased record. This is helpful for ensuring that the purchased contacts are usable in your system.
Email: default, required
Company name
Company Phone Number
Direct Dial
First name: default, you can deselect
Last name: default, you can deselect
Country
Updated May 12 2026: Do not call (DNC) settings
Purchase all contacts (default)
Purchase contacts with at least 1 non-DNC phone number
Do not purchase DNC contacts
If configured in administration settings Settings > Data Settings > Do Not Call (DNC), information displays about which countries have their DNC phone numbers hidden.
AWF Save Purchased Contacts to CRM, MAP and/or CSV nodes
The Save Purchased Contacts to… action nodes save contacts purchased from 6sense (using the Purchase Contacts node) to your system.
You can save your purchased contacts to all three systems, but at least one is required.
AWF save to CSV file location
When you save purchased contacts to a CSV file, any AWF user at your company can find it in the Audience Workflows Dashboard > Inbox tab. The listing shows the date, time, workflow name, and node name and lets you download the file.
Dependencies
Integration with the 3rd party systems involved in the workflow.
For CRM or MAP integration, a pre-configured mapping profile.
Your company must have completed the Contact Data Compliance terms. If you see an alert that says the node is locked, contact your CSM for assistance.
Properties
Node name: A brief description that displays on the node’s icon.
Description: A lengthier description of what the node does.
For CSV Fields, click View or Edit Defaults to see or modify the fields to be saved.
For MAP fields:
By default, 6sense saves purchased contacts to the type of object used by the integrated MAP system.
Select the mapping profile.
For Advanced Options, you can set the batch size per API call. Reducing the batch size may inversely affect the number of API calls. For example, decreasing the batch size from 200 to 50 results in 4x more API calls. The smaller the batch size, the longer the processing times. Changes to this setting take effect the next time the action node runs.
For CRM fields:
Select whether to save the purchased contacts as leads or contacts.
Select the mapping profile.
You can pre-configure up to five mapping profiles per object per system.
After you select a mapping profile, you can override specific fields for this node only.
If needed, edit the Custom tie-breaker rules for this node.
If 6sense finds multiple accounts in your CRM that a purchased contact could belong to, it will select one account based on the default tie-breaker rules applied at Settings > App Settings > Workflows > Custom Match Rules > Contact Purchasing Tie-breaker Rules. If you want to change the settings, select Edit existing rules.
However, if you want to specify tie-breaker rules that apply only to this workflow and this node, select Override this node only and set the match logic rules.
For Advanced Options, you can set the batch size per API call. 6sense sets a default that varies depending on the CRM. Reducing the batch size may inversely affect the number of API calls. For example, decreasing the batch size from 200 to 50 results in 4x more API calls. The smaller the batch size, the longer the processing times. Changes to this setting take effect the next time the action node runs.
Document Changelog
Jun 5 2026: Edit to remove Contact Profile Fit as a filter for Purchase Contacts node.
May 12 2026: New Microsoft Dynamics support, new Salesforce Campaign Member Status conditions filter, Purchase Contacts DNC settings, 6sense now also deletes a campaign created by a Push to 6sense Ad Campaign node when the node is deleted, contact engagement filters for Purchase Contact and people-level nodes now evaluate at the contact level, new Purchase Contacts node advanced “Only purchase contacts with” options.
Feb 10 2026: New Gong Engage node, updated priority rules properties for the Purchase Contacts node.
Nov 7 2025: Can now push contacts or leads to draft, active, and scheduled AI Email campaigns.
Oct 13 2025: Edits for minor UI changes.
Mar 24 2025: Updated for General Availability
1st Published Jan 15 2025: Beta